Wednesday, January 26, 2011

Variable Data Meets Large Format Printing

A little history...

This project came about as an attempt to market a newly formed large format printing company. A month or so after I got hired, the company announced that they were going to expand by starting a large format division. We were to get 10 foot wide solvent printer, a 5 foot x 10 foot UV flatbed printer, a digital die cutter (camera guided computer driven table router), and a really big laminator. I was tasked with developing a workflow and a marketing campaign for the new division of our company. So armed with about 3 pages of instructions and $350,000 in equipment, I was off on a new adventure.

Prior to purchasing the large format equipment, this printing company did strictly sheetfed work (shockingly, we did not even own a color laser printer). So there was a considerable amount of education to do with regard to large format printing.

The challenge:

Educating traditional print buyers (designers and print brokers) about large format substrates and capabilities

My personal objectives:

  1. To design a mail piece so cool that people not only would not throw it in the trash, but would pin up on their cubicle wall and show it off to their friends.
  2. To push to the limit the complexity of what my team and equipment was capable of producing.

The project:

Customized MarketMail pieces (non-rectangular) on Sintra board, with variable data graphics, text... and engraving.

Each postcard that we would product would be completely unique. I had seen custom printed postcards before (utilizing different pictures and text). I had also seen CMM postcards before, batch produced by the thousand. But our postcards were going not only combine an unusual shape and custom printing, they were going to have the recipient's name engraved on the front.

The USPS website has a fairly decent writeup about CMM. Basically, it's unusual shaped postcards. They can be weird shapes, have holes die cut through them, they can be even have stuff hanging from them. I heard about a business that sent out flip-flops as CMM mail pieces. Pretty cool!

I chose to use 3M Sintra board for our postcard. Sintra board is an extruded PVC material. It is waterproof, stiff, has perfectly squared edges, and comes in big sheets and various thicknesses. It's great for engraving, and the UV ink doesn't flake off of it like some other substrates.

Here are the step-by-step instructions for creating your own engraved diecut mailers. These instructions are intentionally brief. I am assuming that if you attempt this, you'll already know how to set up templates, do data merge, use InDesign and PDF layers, clean up files in Illustrator, etc. This is more of an overview of a process rather than a tutorial on specific software features.

Note: In many large format workflows, they actually set it up so that the software does the work of imposition, creating cut files, and so forth. You can send a single PDF to the RIP, and the RIP will separate out the Cut file and the Print file. In an ideal world, our workflow would have been set up that way. But for reasons beyond my control, our RIP software didn't communicate with our cutting software. So we did everything manually.

Step 1: Create a 1-up postcard template in InDesign

Front:
  • Graphic placeholder (Orange Oval)
  • First name placeholder (Data Merge placeholder for engraving) Note: I chose Arial Rounded for the font, and just gave it stroke, no fill.
  • Cut Path (magenta line)
  • Drill holes (green circles)

Back:
  • Graphic placeholder
  • Address info
  • Salesperson contact info

Step 2: Arrange objects on layers in InDesign

  • Print layer: everything that is going to be printed
  • Cut layer: everything that is going to be cut or engraved (Cut path, drill holes)
  • Engrave layer: name for engraving


Step 3: Data Merge

  • Choose your data source and merge your data.
  • Now, depending upon your version of InDesign, save the merged file for placing into the imposition, OR
  • Export a PDF for imposition (including Acrobat layers).

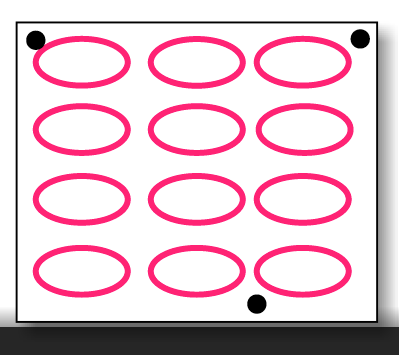
Step 4: Prepare an imposition file, page 1

  • Prepare a template.
  • Make four layers: Print, Cut, Engrave and Registration Marks.
  • Put placeholder frames on the Print layer.
  • Add registration marks in a triangular position. (The registration marks are what the camera guided table router uses to know where to cut. They work so well you can even put your board on the table crooked and the router will still cut correctly because it uses the registration marks as reference points. These registration marks have nothing to whatsoever with litho registration marks that a pressman uses to align various plate colors. They are similar in the sense that they help with alignment, but that's about where the similarity ends.)


Step 5: Prepare an imposition file, page 2

  • Duplicate the placeholder frames onto a second page.
  • Add registration marks on the first page.

Step 6: Prepare an imposition file, part 2

  • Duplicate placeholder frames from Print layer onto the Cut and Engrave layers.

Step 7: Impose 1-up, only Print layer

  • Front: left to right, top to bottom
  • Back: Right to left, top to bottom


Step 8: Prepare Cut Paths in Imposition

  • Place a page (any page) of the 1-up file into the placeholder frames on the Cut Path layer.
  • Be sure to Show Options: show ONLY the Cut layer.


Step 9: Prepare Engrave Paths

  • Do a multi-page import of the 1-up front file
  • Be sure to show options: show ONLY the Engrave layer.


Step 10: Export Print File

  • Hide the Cut and Engrave layers.
  • Showing only the Print and Registration Marks layers, export a PDF.
  • Depending on your RIP, you may want to rasterize and save as a TIFF.
Note: I know traditional litho prepress folks may gasp in horror over this statement, but large format RIPs typically use this as a workflow. As much as I liked the idea of sending to the RIP unflattened PDFs with native transparency, it just didn't work well. Since TIFFs are the preferred file format and the industry standard for large format RIPs, I figured I was not going to change an entire industry. So we used TIFFs.

Step 11: Export Cut/Engrave File

  • Hide the Print layer.
  • Showing only the Cut, Engrave, and Registration Marks layers, export a PDF.


Step 12: Clean up the Cut File in Illustrator

  • Using, Illustrator, open your the PDF cut file you just made.
  • Delete all empty paths (view in outline mode first)
  • Outline type (I used Arial Rounded)
  • Create separate layers for each type of object: Cut, Engrave, and Registration Marks.
  • Offset the stroke by 1/2 the diameter of the router bit you'll be using. (I like to use an Effect for this, then expand the object. That way, there are no extraneous paths to delete.)

Step 13: Go to Production!

  1. Print board - Side 1
  2. If using a non-square substrate (like cardboard, polystyrene, coroplast, etc.) square up the board on the flatbed cutter.
  3. Print board Side 2
  4. Engrave names
  5. Drill holes
  6. Cut out postcards

Tips:

  • Have plenty of time on your hands.
  • Don't have a project budget.
  • Work directly with equipment operators: the guys who run the flatbed printer and table router).

The Finished Product

This was the actual postcard that I mailed to myself when I mailed the postcards to our customers. On the back of the postcard in the top left, you can actually see the tire marks from where it got run over by the mail truck.

Postcard Front
Postcard Back

On a slightly different note, I originally prepared this as a Ignite InDesign slideshow for the 2010 InDesign Secrets Print and ePublishing Conference. I feel I should give a disclaimer that this slideshow was done before I owned a laptop, and I had to prepare the slides on the hotel lobby computer the night before, using Acrobat.com. So in case you think the most of the graphics in this tutorial look a little clunky, you're right, they do.

And in case you're not familiar with Ignite! presentations, that's where you prepare a 20-slide slideshow about your topic of choice, and you have 5 minutes to present, while the slides auto-advance every 15 seconds behind you on the screen. And in my case, my audience included pretty much all the super heros of the publishing world (who also happen to be well-practiced public speakers), and I (not exactly a well-practiced public speaker) was doing my very best not to hyperventilate. Exhilarating? Yes, indeed. Terrifying? OMG! But hey, when I was done, they gave me a neat little magnet to hang on my fridge. It was totally worth it. I'm doing it again a this year's conference!

Saturday, January 22, 2011

A Designer's Guide to Understanding Polygon Point Order when Using InDesign's Corner Effects Script

This experiment came about out of a need to have a rounded rectangle text frame where only the two bottom corners were rounded. Before InDesign CS5, when we wanted rounded corners, we had to either:
  • Round them ourselves using the convert anchor point tool
  • Round them in Illustrator using the corner effects or one of Mordy's nifty rounded rectangle tricks (and then paste into InDesign as a path) or
  • Use InDesign's built-in Corner Effects Script (available in several scripting languages to suit any platform)
This script doesn't use live corner effects (like CS5 does), but actually edits the corner anchor points.


The script is less than intuitive. You have to know which points (first, second, third, and fourth) correspond to which point on the rectangle. You can find this information in a book on InDesign scripting (a couple of which I have read), but those books are a little dry for average designer. So here is a designer's simple guide to understanding polygon point order. Hopefully it will help reduce your trial and error when using this script.

It turns out that the numbering starts somewhere in the top (depending on the number of sides in your polygon) and goes counterclockwise. So here are the patterns I found when working with this script:
  • Polygons with odd number of sides (Triangles, pentagons, and whatever a seven-sided polygon is called): first point is at the TOP
  • 4-sided polygons: (Squares and rectangles): first point is at the TOP LEFT
  • Polygons with even sides starting with at least 6 sides: the first point is at the TOP RIGHT.

I know for those people using CS5 (and thus have Live Corner Effects), this information maybe isn't that important, but for anyone using CS4 or below, perhaps this information will be useful. Happy rounding!

Saturday, January 15, 2011

Making InDesign Absolute Links behave like Relative Links

If you were to ask an InDesign user to show you a "Link" in InDesign, they would likely point you to the "Links" panel. However, there are additional types of links that we don't necessarily think about as often. These links refer to absolute file paths on your computer hard drive or server.
  • Cross references: linking to a specific paragraph or Text Anchor in an InDesign file
  • Documents in a book: the book file links to the documents within the book
So let's say that you want to start a new project that is based off of a similar one. But you want to keep the files totally separate. I used to work in a FrameMaker 7 workflow. And there are a lot of things about that workflow that I didn't like, but one thing that was cool about it was that Framemaker had the ability to have relative links. Relative links are commonly used in web development. In your design program (Dreamweaver for example) you can instruct it that all the images will be located in a folder called "images". It doesn't concern itself with anything above that, like where the images folder is located on your drive. The hard code in each html file just lists the path as images/. That way, you can upload the files to a server and the html files will simply still point to a folder called "images."

Relative Linking offers an amazing portability. Sadly (for better for worse) InDesign is not capable of relative linking. It can only do absolute links. This is typically great, but if you have a lot of files linked together and you need to reuse them for another another project, it can be a nightmare. But it doesn't have to be. Read on and learn from my pain.

If you want to use an old project (in this case a book) as a starting point for a new project, you could do it the hard way:
  1. Copy your old project folder into a new project folder.
  2. Open your new book file and manually replace each each chapter in the book (because the book will still be pointing to the ID files in the old location).
  3. Open each new InDesign file manually.
  4. Manually relink your images, one InDesign file at a time.
  5. Manually relink your cross references.
  6. Grumble in frustration for hours.
  7. Email your developer friends and see if they can write a script to do book-wide link updates within an entire folder.
Or you could do it the easy way.
  1. Copy your old project files to a new project folder.
  2. Change the name of the folder containing your old project files. I like to do something simple, like adding a dash or a space at the end.
  3. Open your new book file and do some global action such as:
  • Update a book-wide Table of Contents
  • Update all cross references
  • Update all numbering
For some reason, if InDesign can't find the links it's looking for (whether they are documents in a book, placed images, or cross references) it will look nearby and do it's best to find them. So if your book file in your old project was located in the same folder with all the document files, and now in your new project, the book file is still sitting right next to all the document files, InDesign somehow remembers the relationship. When you open your new book file, you'll get a little warning in the book panel. Those little yellow triangles are just letting you know that the files have changed. (They really haven't changed, but technically, they're now in a new location.)


Once you run some sort of book-wide global update, you can even go back into your old project folder and change the name back to what it used to be. Your new project is now completely disassociated with your old project.

This global-relinking is handy if for example, your server dies unexpectedly and you have to start immediately using your backup server... Or if you started a project on your desktop and then moved to your laptop (which has a different username, and thus a different file path), or you need to base one project off of another project and not have your original files accidentally updated.

I could kind of compare this to the time we moved down the street. We used to live one block away, in the exact same model of house. So this time, when we moved in, we already knew where all of belongings went. The inside structure was the same. It was just the outside structure that was different.

Tuesday, January 11, 2011

Acrobat Rectangle Tool: Why Do You Disappoint Me So?

In today's daily adventure with Acrobat commenting tools, I decided to create different colored rectangles, and then sort them by color. I made rectangles of about six different colors, gave them all a different fill color, and removed the stroke weight. However, as you can see, according to "Acrobat's Sort by Color" feature, it only recognizes one color: red. What?!


So I have two complaints here:
  1. Even despite my best efforts, the rectangles not only all clearly still have a stroke (albeit very small), and
  2. The stroke color is what Acrobat uses when Sorting by Color. Lovely.


If I was in charge of redesigning the shape tools, here is what I would do:
  1. If a user chooses "No Line" and also sets a stroke weight of zero points, I would make sure that either one of those choices would result in the stroke disappearing completely.
  2. I would allow the user to set a preference (a radio button in the Commenting category of the Preferences dialog box) to choose to sort by either stroke color or fill color.
  3. On another note, I would add an option to set the blend mode to multiply, so that shape tools can be used as highlighters.
For more of my thoughts on using shape tools as highlighters, read another one of my blog posts: "Highlighting a PDF That Contains No Fonts."

Edit: I learned recently that Acrobat X does not have the "Sort Comments by Color" feature. How sad for me and every other technical writer on the planet who uses this feature! I hope it is included in the next version of Acrobat. (It was included in later versions of Acrobat DC.)


Edit: 9-13-918

If you need an easier way to create highlighting objects in your PDF, check out my article on Bluebeam Revu. It's an amazing program designed specifically to meet the needs of users in Architecture, Engineering, and Construction. The drawing tools in Revu have a "highlight" checkbox, enabling any shape to act as a highlighter. It still only sorts by fill color, but the sorting requires fewer clicks than in Acrobat!

Monday, January 10, 2011

The True Story of How Address Book and MobileMe Saved Christmas

Perhaps that's a bit of an exaggeration, but maybe not. Read along, and then you decide.

About thirty years ago, my mother-in-law was given a recipe for the most amazing peanut butter balls known to man. These peanut butter balls are a family tradition, and all the daughters make them every year at Christmastime. And as a daughter-in-law, I continued the tradition. But first, let's chat about recipe storage.

When I was a young bride, I bought my very first recipe box, and did my best to fill it with recipe cards. I also collected about a dozen or so recipe books. A few years after I got married, we started moving frequently. So for about 6 years, nearly all of my cookbooks went into storage. And somewhere along the way, I lost my recipe box. One of our latest moves was 1000 miles away, and required us to get rid of old stuff that had been just sitting in storage. So, I pulled out my old boxes, and I figured that if I hadn't used anything in the boxes in six years, I didn't need them and I wasn't even going to open them to see what was inside. So off to Goodwill they went.

So there I am in a new town, with no recipe box and no cookbooks. I decided to email my sister-in-law and have her send me some of the famous family recipes. In order to avoid losing the recipes, I made Address Book cards for them on my mac. I even made a Group in my Address Book, and all my recipes get filed there. I can view my recipes on my phone while working in the kitchen. How handy! Plus, because I have my address book automatically backed up, my recipes are safely stored in about 5 different servers.

This year, like every year, I made a batch of peanut butter balls. We decided to take some of them to our family vacation in California. It was actually purely for selfish reasons (snack food for the drive), not because we intended on sharing them with the family. Because, surely the family had made their own peanut butter balls using the thirty year old famous family recipe...Surely.

So we're down visiting with the family and my sister-in-law expresses great remorse; she didn't have any peanut butter balls this year because, you see...she had lost the recipe. And the other sister-in-law in Tennessee had also lost the recipe. So no one in the family had any peanut butter balls. What?! I was the sole remaining family member in possession of the Best Peanut Butter Ball Recipe Known to Man. And best of all, it was on my phone! After running to the car to retrieve the peanut butter balls from their secret location (and thus become a hero), I came back inside and showed my sister-in-law the Address Book card containing the recipe. With a few taps of the touchscreen, (Share Contact) I was able to share the recipe with her. She was intrigued about the Groups feature. She had never seen that before on her iPhone.


It turns out that I have been taking Address Book Groups for granted. Because I have a mac computer, any Address Book Groups that I create on my computer get transferred into my phone, courtesy of MobileMe. But iPhone users that don't have a mac or a MobileMe account do not have Groups. Unless of course, they buy an app that adds that functionality to their phone.


And so the moral of the story is: Back up your treasured family recipes using MobileMe and remote offsite backup.


A few tips if you decide to use Address Book cards for your recipes:
  • I use the Notes section of the card to type in the recipe. If you're on an iPhone, the Notes field is not visible by default. You'll need to add that field.
  • Another word about Notes: If you choose to export address book cards on your mac, you may need to fiddle with the export settings in order to get the Notes included. I think the older OS didn't have the checkbox to include notes. I think you just had to know to choose version 2.1.

In case you're interested, here is the Peanut Butter Ball Recipe. I am pleased to announce that this recipe once again safely in the possession of multiple members of the family. Generations of Vaughns breathe a collective sigh of relief.


Saturday, January 8, 2011

How to Synchronize Acrobat Checkmarks Between Your Computers

I like to use Acrobat commenting tools. Okay, it's safe to say that I love Acrobat commenting tools. Sticky notes, highlighters, stamps, text blocks...they make me sigh with happiness. In my daily workflow, I highlight the PDF documents that my clients send me, then I check things off as I work through the project.


At the end of the project, I Sort by Checkmark Status to make sure I didn't miss anything.


That all worked fine and good until I got a laptop. Then, I could work anywhere. I wasn't constrained to just working at my desk. Now I could work in my living room, in my kitchen, on airplanes, on the I-5 while my husband drove us to California for a family vacation, and so on. And with my 1 TB travel drive, I was truly mobile! The only problem was, my PDF checkmarks don't transfer from one computer to another. So suddenly, in the middle of a project, my Sort by Checkmark Status (upon which I had come to rely so heavily) was no longer as available as it once had been. Any checkmarks I made on my desktop were not visible on my laptop, and vice-versa. How sad. (Tear dripping down cheek...)

I had run into a similar problem a couple of years ago, when a coworker and I were both making checkmarks in the same PDF document. I had no easy way to see what was Completed (checked off), and what was yet to be completed (unchecked). We had to resort to "Sort by Status by Person."

Sort by Status by Person, in theory (I suppose) could be useful. If people in a workgroup had a certain selection of tasks to do, and there was never any overlap in job function between workers, and you just want to which co-worker has completed which tasks, then Sort by Status by Person would be useful. But I never need to know who has completed which tasks. Being ever efficiency-minded, I just want to know whether or not the tasks are all complete. That's why I use "Sort by Checkmark Status." And besides, the "Set Status" takes about 4 clicks, but making a checkmark only takes one click. One click sounds better to me than four clicks.


Well, a few months ago, I started using Acrobat Shared Review with one of my clients. While working on a shared review PDF one day on my laptop, I discovered that I could see checkmarks that I made from my desktop. This has to do with the fact that Acrobat on both my laptop and my desktop were set up to have the same user ID in Acrobat.com.


So now, whenever I am working on a project that I know will be split between my laptop and my desktop, I do a Shared Review, and I invite myself.

Quick confession, a couple of years ago when I first discovered the limitations of Sort by Checkmark Status when used in a workgroup, I sent a fairly harsh feature request to the nice people at Adobe, chastising them for not warning me that I wouldn't be able to see checkmarks that other users made...Well, it turns out the Acrobat team actually provided a such a warning the very first time I made a checkmark. And in my haste, I clicked "Don't Show Again." And so, to whoever got my harshly worded feature request riddled with exclamation points, I am sorry.

Edit: 9-13-918
If you need an easier way to create and manage checkmarks in your PDFs, check out my article on Bluebeam Revu. It's an amazing program designed specifically to meet the needs of users in Architecture, Engineering, and Construction. Revu's checkmarks are not user specific; meaning that if you make a checkmark I can see it, and if I make a checkmark, you can see it.

Wednesday, January 5, 2011

Acrobat Typewriter Tool: Just Embrace it!

One of my long-standing issues with PDF forms is that they typically not correctly set up as Acrobat forms. People (without Acrobat) often send me forms to fill out. There are either no Acrobat forms fields, there are missing fields, the form fields are too small, the forms are scans of copies of faxes...they are truly a pain to work with. I used to go through the trouble to manually create form fields. This week, I decided to do all my forms electronically. No more printing and filling-out, and then re-scanning. No more, I say! And anyone who has ever had to read my handwriting will agree: my filling out forms in Acrobat is the preferred solution.

So today's task: fill out a form to set up my new PO box. Here is the form as it was emailed to me. It's a beauty, huh?


Tto fill out this form, here are my options:
  1. Print the form, fill it in by hand, and rescan it.
  2. Create Acrobat form fields by hand and type in the form fields.
  3. Run Acrobat's Form Field Auto-Detection, then fix whatever the automated system didn't catch, and then type in the form fields.
  4. Fill out the form using the Typewriter Tool.
I'm choosing option #4.

I long overlooked the Typewriter Tool because it's so understated... A hidden little gem without any whizbang features. It just lets you type...wherever you want. What a novel idea!

Back when I was in high school, I got a scholarship from the local county fair. My award? A typewriter. I think the people who chose the prize probably didn't know that most kids used computers, but nevertheless, I now had my very own typewriter. When I left for college, I left the typewriter with my mother, who used it in her accounting business to do... guess what...? Type wherever she wanted on her paper forms.

Fast forward about 15 years and I'm working in a corporate job (without any typewriters), when my boss asks me to add a signature line to the bottom of a PDF contract, so he can then print it out and sign it. My clunky solution was to make a custom stamp in Illustrator (containing his Name, Title, and a signature line), load the custom stamp into his Stamp library in Acrobat, stamp the document, then he could print out the document, sign it, rescan it and send it back. When I told him about this custom stamp idea, he rolled his eyes at me.

Fast forward about a year or so when I discovered the typewriter tool. I initially found it a real pain to work with because I didn't understand how Acrobat classified it, and I couldn't figure out how to work with it. Here are some lessons I've learned in using the less-than-intuitive Typewriter Tool.

  • Show the Typewriter Toolbar. Every time I wanted to use the typewriter tool, I had to keep going back to the menu...until I discovered "Show Typewriter Toolbar." Ah... much better.
  • The default Typewriter font is too big. So make it smaller. The options for changing the face face and size are hidden...until you click somewhere on your page with the typewriter tool. Then you can adjust the font settings.


  • Once you have typed with the Typewriter Tool, it seems next to impossible to move the text block or edit the text. According to the Acrobat Help File:

    1. To move or resize Typewriter text block, select the Select tool, click a Typewriter text block, and drag the text block or one of its corners.
    2. To edit the text again, select the Typewriter tool, and then double-click the Typewriter text.
    • If you're able to get this to work, then you have more patience than me. I gave up and found a workaround hiding in the Comments tab. If you're a designer like me, you would think that to edit the text, you would click on the Typewriter tool, and then click back in the same place where you just typed...but that makes a new Typewriter Text block. So, to easily edit your Typewriter text, click on the Comments Tab in the bottom left of the screen. Even though Acrobat classifies the Typewriter Tool simply as a "Tool" not a "Commenting Tool," the typewriter text blocks are actually found in the Comments tab. So if you click on one of them, you can edit your typewriter text. Clicking on your typewriter text block also selects the text, outlines in blue and gives it handles, so you can move it around. And see how the text in the comments tab is highlighted in blue? You can actually edit that text, and it will change the Typewriter text block on your page. Nifty!


      Edit: 9-20-16
      The article is from Acrobat 9, but it works the same in later versions. They just changed the name of the tool. Now it is called the Add Text Comment tool. Here is a screenshot from Acrobat DC.


      Edit: 9-13-918
      If you need an easier way to create and manage annotations in your PDFs, check out my article on Bluebeam Revu. It's an amazing program designed specifically to meet the needs of users in Architecture, Engineering, and Construction. Specifically, read about the Toolchest, where you can store annotations that you use frequently. Revu has done an amazing job of listening to their users and building a tool to meet their needs.