Monday, March 28, 2011

Creative Ways to Track Down Vector Logos

As a designer who works with non-profits, I often get artwork submitted to me that is a lower quality than I'd like to use. So I always go out of my way to find/recreate raster logos so I don't have to use JPGs, GIFs, or PNGs in my printing. Even for presentations going on screen, I will replace raster logos with vector logos. If a logo looks bad at one inch tall, it's surely going to look worse at three or four feet tall.

A typical reason I see for getting raster logos is corporate sponsorship. Let's say I'm designing for a non-profit group or educational organization, and they work hard all year long doing their best to raise awareness, help people, and contribute to the betterment of their community. And they've managed to find businesses who believe in their cause and are willing to give them thousands of dollars to further the worthy cause. And the corporate sponsors' reward? Generally, it amounts to warm fuzzies and a ten second splash of their corporate logo at the annual banquet. And maybe the logo also gets posted on a website or in a newsletter somewhere. And perhaps they'll even get a very small banner on the outfield of a community baseball field. So their corporate logo is basically all that other supporters will see from corporate sponsor. In my opinion, their logo it needs to look its best. Web images might look suitable to most people, but not to me.

So I ask the non-profits for vector logos and the response is generally something along the lines of, "What's a vector? This is the only logo I have."

The folks I work with at the non-profits are not designers. No do I expect them to be. I am grateful that they take the time to gather photos, write some articles, and happily send everything over to me so that I can make it look nice for them.

Here are some ways I've figured out to make my client's artwork look its absolute best. This list goes in my preferred order of use. I start at the top, and work my way down, as I get more desperate.

Brands of the World Website
I am so grateful for the designer who told me about this. That designer was also the one who encouraged me to go freelance after the printing companies I worked for kept going out of business. Anyhow, Brands of the World has got thousands of vector logos, many of which I'm sure you have heard of, but many more that probably no one has heard of. One logo type you won't find there: major league sports team logos. Those organizations have the tightest vector logo-protection that I've ever seen! I once needed a San Diego Padres logo for a non-profit newsletter, and I had to get in touch with their Communications Director to verify that the project was legitimate.

Contact the Corporate Sponsor's In-House Marketing Department
If the corporation is large enough, they'll likely have their own marketing department. If you can track down a phone number or an email for someone in the marketing department, you have a good shot at getting a vector logo. As a passionate designer, I am impressed and grateful when I encounter other people who are concerned abut logo quality. And apparently, I am not alone. Marketing department people have been very nice to me, and when I have managed to track them down and talk with them, they always give me the vector file I need to make their company look its best.

I once had to recreate a form for a fire department, and I didn't want to use the grayscale logo that I had scanned from the hardcopy. So I contacted the city's marketing department and they happily sent me the 6-color vector logo. (That was years ago during the boom years, and that particular city had 6-color business cards with a gold foil emboss and a design that did not easily accommodate business card masters. I can't help but wonder if that city has redesigned their printing to be more affordable...probably not!)

Very large institutions, like military forces and colleges, often provide vector logos right online, on their own websites. Some even give usage guidelines. If you can find the logos posted on the corporate website, they often offer the logo in different color combinations and different orientations, to accommodate different printing and designs needs (1-color versus 4-color, etc).

Use Google's Advanced Search
I figured out this one while working in the marketing department of a civil engineering form. My job was to create marketing graphics for water treatment project proposals to city and county governments. So I  had to track down all sorts of city and water district logos. While we had a decent in-house collection of  logos, I wasn't satisfied with using existing raster based images for my work. As a picky designer, I figured that other picky designers also preferred to use vector logos in their designs, and those designs would often end up as PDFs posted on the web. Unless you're working for a place that has tight communication between the marketing, legal, and IT departments, chances are good (excellent actually) that you can find a logo embedded in PDF on the website of most larger organizations.

In Google's advanced search, choose the domain within which you want to search, and then choose filetype: PDF. As more and more people are creating and uploading PDFs, you'll have more and more documents to sift through. But there are very few times when I haven't been able to find what I need using this method.


If you want to quickly filter out a lot of PDFs, you can also add the words untitled, .indd, or .qxp to your search. "Untitled" is the default name that InDesign gives to a new document, and it's not uncommon for designers to save files first as "Untitled.indd" and then go back and change the name to something more meaningful later on. So unless the designer changes it, chances are good that the word "untitled" will be located in the metadata somewhere, usually in the Title (not to be confused with the file name). The same thing applies to .indd and .qxp.

Once you find a PDF that looks like a good candidate, zoom in really close. If it's vector, you can generally open the file in Illustrator and extract the logo from there. But if you are extracting logos from PDFs in Illustrator, be very careful and be sure to grab all the parts and pieces of the logo. PDFs from InDesign can be very complex when opened in Illustrator, and they are riddled with ridiculous numbers of clipping paths and groups. I like to select each part of the logo individually with the direct select (white arrow) tool, and then cut and paste into a new document. Double check your work, as it is easy to mess this up.

One thing to note about university logos: they are often tightly controlled. Universities have a variety of logos in different color combinations, orientations, and uses. Some university logos/seals are restricted for use only on official documents, like letters from the president, or diplomas. Other logos are restricted for use only by the athletic departments. These athletics logos are often used on t-shirts, hats, and other items for resale. Try to locate the "Logo Usage Guidelines" document and follow it closely. In addition to offering very detailed information about acceptable use of the logos, another bonus of locating this document is that typically, all the vector logos are located all in one place. How handy!

Search for Annual Reports
If Google Advanced Search doesn't work for you, or it generates more results than you want to search through, search Google for an Annual Report. From this designer's standpoint, the Annual Report is typically the most respected document in the year of any organization. For the Annual Reports, many organizations will do fancy layouts and get high-end printing. And you can bet that any annual report that's been designed by a professional designer will have a vector logo. Not all organizations put their annual reports on the web, but many do. Non-profit groups and credit unions are good examples.

Contact the Web Designer
Sometimes, corporate sponsors are large enough to make big contributions, but not large enough to have their own in-house design departments. But many of these types of businesses do have very good websites. And behind every good website is a good designer, or maybe even a team of them! Look at the bottom of the web page to see if the web designer has a link to their own page. Sometimes, web designers are modest, and they don't put their contact information in the visible part of the page, but they'll hide it in the source code near the top. If you can find the web designer's contact information, give them a call and see if they can help you out with a vector logo.

Whenever I have tried this, it's been successful. My conversation/email usually goes something like this: "Hi there, I am a graphic designer So-and-So and I see that you designed the website for Big Corporate Sponsor. It is really beautiful and nicely done. Well, I'm contacting you because Big Corporate Sponsor recently made a donation to My-Client-The-Non-Profit. I'm working on the slideshow for the My-Client-The-Non-Profit's annual fundraising banquet, and I'm trying to track down the vector logos so that the Big Corporate Sponsors look good. Would you be able to assist me with this?" And the answer is yes!

When All Else Fails, Rebuild It
I warn you against doing this unless are a really good, experienced, hot-stuff designer who's insanely particular about little details. Organizations (especially large ones with very good logos) have spent thousands of dollars designing, perfecting, and controlling their logos. Many of these organizations even have legal departments dedicated to prosecuting people who infringe upon their copyrights and trademarks. If you recreate someone's logo and you get it wrong, and they find out (and care), you could be in deep trouble, both professionally and financially. But if you skilled and detailed enough to recreate the logo correctly, probably no one will be the wiser. But again, recreating well-known logos is something that should be reserved only for professionals. I have seen designers recreate logos incorrectly, and besides demonstrating a lack of thoughtfulness and care, and it degrades our profession.

Conversely, recreating logos is an excellent way to gain experience with font recognition. I worked for about a year at a small, mom-and-pop print shop. Customers would bring in their old business cards and want us to scan them and use the logo on new design pieces. Not on my watch were they going to get scanned-and-reprinted logos! These customers were almost exclusively small businesses, and their logos were typically just their business name set in a standard typeface; so recreating these logos was generally pretty quick. If you're going to rebuild someone else's logo for use in your designs, start with something simple and work dilligently to get it correct. (And please, don't choose a major league sports team.)

First, you need to match the fonts. I like whatthefont.com for it's character recognition engine. When that doesn't work, I go to identifont.com and answer questions about the qualities of each typeface. In worst-case scenarios, whatthefont.com has a font forum where all the font geeks hang out and identify typefaces that the rest of us can't recognize.

In either case, the font websites will refer you to page where you can purchase the font that matches. If you want to keep the integrity of the design (and you should!), purchase the font. Font designers work very hard to design all the little details of their letters. Typefaces, especially serif typefaces, are extremely time consuming to try to trace. Just buy the font. But if you work for a design firm or printing company with an extensive font library, they may already have it in-house.

Once the type is completed, you'll next need to recreate the company's icon. While you can trace in manually with the pen tool, Illustrator's Live Trace feature can also give excellent results. Live Trace was introduced back in CS2, and is a great tool for quickly creating vector paths from a raster image. The images that work the best are high-contrast, and well defined edges. Logos are the types of graphics that work particularly well with Live Trace's capabilities.

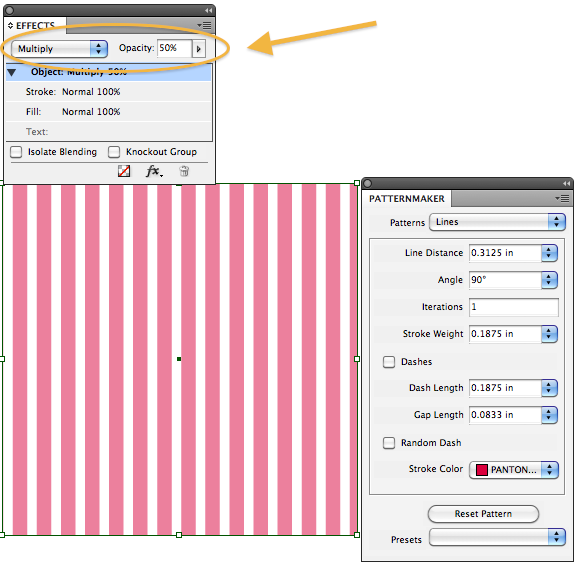
Take the image you'll be tracing and place it into Illustrator. You can set it on its own layer as as template layer, or you can simply lock the image down. By default, template layers will screen back the opacity of the layer by 50%. I prefer to keep the placed image at 100% opacity and instead, screen back the opacity of the object I'm tracing. But that's just my personal preference. Set the type as described above. Now, open the Links panel. Go to Window>Links. I'm an avid InDesign user, so I naturally press Command/Ctrl+Shift+D, which brings up the transparency grid. That's not what I wanted! (Because I've never found a use for Illustrator's transparency grid, I change Illustrator's keyboard shortcut for the Links panel to be the same as in InDesign.)

So once you have the type set and the Links Panel Open, click on Edit Original. This will open the placed image in whatever program you have set to open that that type of raster image. It will likely be Photoshop, but depending on your setup, it could also be a different program, such as Apple's Preview, or Windows Picture and Fax Viewer. But regardless, you need to open the graphic in Photoshop.


Once you have the graphic open in Photoshop, you'll need to erase the text. Be sure to set the background color to white first, or press "D" to reset the foreground and background colors to the default setting. Sometimes, the type within a logo crosses over or  touches the "icon" part of the logo. But do your best to erase the type. You want to isolate the icon part of the graphic. It can also be helpful to clean up other parts of the image in Photoshop by using the Posterize and Find Edges commands. Now, Once you have erased the letters and cleaned up the tracing image, save the image with the same filename. Now go back to Illustrator. You'll get a warning about missing/modified links. Click Yes.


Now, Live Trace the image. There are a variety of presets and settings you can use for Live Trace. For a great how-to on using the finer details of Live Trace, check out a CreativePro.com article dedicated to Live Trace.


As a professional designer, take pride in your work and make sure you have permission to use logos. Whenever I have used any of the techniques listed here, it has been on projects that directly involved the Big Corporate Sponsors. It seems that the biggest potential legal problems come when stealing logos for use on items for resale, such as t-shirts, hats, etc. But of course you would never do that.

Good luck and may all your logos be vector!


For another way to extract logos from PDFs, check out the article I wrote for Creative Pro: Extract Vector Logos from PDFs.

Monday, March 21, 2011

Using Mac Preview as a Workaround when Acrobat Pro Won't Open a PDF File

I recently had a problem file that was submitted to me by a client. When I tried to place the PDF into InDesign, I got the following error message: "Failed to open the PDF file."


So I decided to try to open the file in Acrobat to investigate what might be wrong. But instead Acrobat opening the file, I got the following message: "There was an error opening this document. The file is damaged and could not be repaired."


I decided to try an alternative to Acrobat. For certain tasks, I like to use Apple's Preview software. So just out of curiosity, I wanted to see if Preview would save the day for me as it has on several other occasions. So, I opened the same file in Preview and it opened without any problem whatsoever. I saved it with a different name and then imported the file into InDesign.

Out of curiosity, I checked out the file in Acrobat. All the fonts were embedded properly, and everything checked out properly from a prepress-standpoint.

I'm not sure what the problem was, but it sure is good to know that I have a workaround to rescue problematic PDF files when they don't want to open.

Friday, March 11, 2011

How to Make a Gingham Pattern in InDesign

This technique is easy when using TeaCup PatternMaker.

The gingham pattern is popular in weaving. The plaid effect is achieved by a stringing the loom (vertical warp threads) in a striped pattern. Then, when you're weaving your horizontal threads (weft), you weave in the same striped pattern. The darkest blocks of color are occur where the dark warp threads and the dark weft threads intersect. The mid-tone color occurs when dark warp threads overlap light weft threads (or vice versa). The white areas occur where white warp threads meet white weft threads.

1. Make a rectangle and fill it with the Lines patterns, using the settings shown below. (Click on the images to see a larger version.)
2. In the Effects panel, set the blend mode to Multiply and the opacity to 50%.


3. Copy and then Paste in Place.
4. Rotate the square 90 degrees. Done!

That was so much fun I made four different colors!


If you like this article, be sure to read my other article: Using Teacup PatternMaker to Mimic Knitted Garter Stitch.

Thursday, March 10, 2011

An Easier Way to Open Web-based PDFs from Safari

In the past, I struggled with how to easily work with PDFs from Safari. I used to save the PDF to my desktop, then launch Acrobat, and then open the PDF in Acrobat. I wanted to find an easier way. Here are some of the ways I use web-based PDFs on an everyday basis.
  • Filling in PDF form fields and saving the completed document...with completed form fields intact
  • Saving PDFs that are loaded as part of a web archive
  • Properly viewing PDFs that I know have interactive features such as buttons and rollovers
  • Because I'm curious, I want to see the Document Properties of the PDF (who made it, if there are any keywords applied, if it has embedded fonts, and most importantly, if it was created by a respectable software).
To demonstrate how to more easily work with PDFs, we'll go through the task of downloading some PDF bank statements from online banking.


I've got twelve different PDFs that I need to download, so I need to find a way to make the process easy. And it should be easy, right? PDFs make everything better, don't they?

So, I've got my first PDF loaded, and I try to save it. But it is saving as something called a .webarchive. A what? I don't know what a .webarchive is, nor what types of files it could contain. So I want to stay away from this mystery file type. 


I know my bank statement is a PDF, so I just need to find the best way to save it as a PDF. In Safari, when you are viewing a PDF, if you hover near the bottom of the PDF, you'll get a little pop-up that allows you to save the PDF to your download folder.


Unless you've changed the default setting in Safari preferences, the files will automatically download into your Downloads folder.


So saving to the downloads folder seems like a pretty good solution. So one by one, I save the PDFs to my Downloads folder. But then I take a look at the file names and they are very cryptic and need to be changed.


So I went back and looked at the other buttons that show up at the bottom of a PDF viewed in Safari. The button on the far right is "Open PDF in Preview." I love Preview and use it every day for certain purposes, but it's not my first choice when I want to view the metadata of a PDF. (To see what I use Preview for, read my blog article about it. Also see the Design Geek article on the same subject.) 


So I know how to open a PDF in Preview with 1-click, but what I really want is to be able to open a PDF in Acrobat Pro with 1-click.

And a few weeks ago, I found it! While viewing a PDF in Safari, right click and then choose "Open with Acrobat Pro."


Ahhhh...that's better. Now I can open my PDFs is Acrobat, and easily save them wherever I want, with whatever file name I want. 

I want to mention that this article is based on using Acrobat Pro 9, on a Mac. I've heard Acrobat X is totally amazing, and I look forward to using it, but currently, there is no Mac trial available (and I don't like to buy software without first testing it out for a few weeks). Bummer.


Monday, March 7, 2011

PMS to CMYK Press Sheet

Years ago, while working at a sheetfed litho shop, I was bored one day and looking for something to fill my time. The prepress supervisor asked me to make a press sheet with all the PMS color chips, plus all of their corresponding CMYK values right underneath the color chips. He seemed puzzled at how excited I was to take on the task. Preparing this file was fun! We used that press sheet for a couple of years (until, sadly, the printing company went out of business). This color chart was particularly helpful in helping us color-match on our large format solvent roll printer and UV flatbed printer.

I saved the file and stumbled across it recently. Click here for a downloadable PDF. It is a 38" x 25" press sheet, complete with gripper. Enjoy!

Friday, March 4, 2011

New Web Site for Our Publishing Company

Besides blogging about InDesign and Acrobat, I actually have my own publishing company. I am pleased to announce the we have just launched the newly redesigned website for Verity Yacht Publications. Verity specializes in graphic design and technical documents for the marine industry. We'd love to get your feedback on our new look. Leave a post in the comments. Looking forward to hearing from you!


Thursday, March 3, 2011

Using InDesign Tables to Design a Geometric Color Block Pattern

This article is about how I designed a knitted afghan to mimic the floor tiles on the Fox News network.

Fox News Floor Tile Afghan

For years, I have been fascinated with garter stitch, which has a magical 2:1 proportional ration of rows: stitches. I wrote about this quite extensively in one of my other blog posts, Data-less Tables: InDesign Meets Knitting. While that article focused on diagonal lines and triangles, this post will focus on stripes and squares.

I have provided instructions for two ways to create this pattern:
The project we'll be creating is basically a bunch of squares set in a checkerboard pattern. And instead of cold hard floor tiles, our result is a soft, fluffy blanket. Knit as it as big you want, just by adding more squares...or in my case, knit it as big as you can until you run out of yarn. Then try desperately to find more yarn of the same color (which is impossible when the two colors of yarn you used are either backordered or discontinued). Finally, knit a border of your choosing and stitch it on. For my border, I chose Twin Leaf Lace from Nicky Epstein's Knitting on the Edge. I wanted to add the border on all four sides, as was done on the floor tile design at Fox News, but again, I ran out of yarn. So my blanket just has a border on two sides. I still think it looks pretty.

How to Create the Squares Using Knitting
First let's look at how the individual square is constructed. It consists of five stripes, with the top and bottom stripe being a little bit thicker than the center three stripes. I want my squares to be about 7"x7", and I have already determined my gauge to be five stitches/in, so I need somewhere between 30 and 40 stitches in my square. The trick is figuring out the number of rows for each stripe that will give me the correct stripe heights, and yet still have the overall shape be perfectly square. After doing a little math and making some sketches, I determine that the top and bottom stripes need to be 8 ridges (16 rows), and the center three stripes each need to be 5 ridges (10 rows). The total number of ridges is 31 (62 rows). Since in garter stitch, the number of ridges is equal to the number of stitches, we'll be knitting a square 31 stitches wide.


So the basic square pattern goes like this:
Cast on 31 stitches.
Knit 8 ridges (16 rows) in black.
Knit 5 ridges (10 rows) in tan.
Knit 5 ridges (10 rows) in black.
Knit 5 ridges (10 rows) in tan.
Knit 8 ridges (16 rows) in black.

You can bind off on the last row and have a complete square, or you can leave the stitches live and knit one live stitch from the first square together with the last stitch on each row of the next square (which you'll knit at a 90 degree angle to the first square). I like to leave my stitches live, because I find that knitting the live stitches together makes for a smoother join than binding off and then picking up the bound off edge.

Knit each square perpendicular to the adjacent squares. Be sure that when you're starting a new square, that you have the right side facing you. Because garter stitch is so rhythmic, so soothing, that it is all too easy get in the groove, happily knitting away...and then when you're done with a square, realize that you've knitted it onto the afghan with the back side facing forward and then you have to rip it out and redo it. This is especially problematic when knitting late at night, in a dimly lit living room, after a long day of mentally challenging work. Pay attention when starting a new square and double check your work! Reknitted yarn never looks as good as yarn that's only been knit once. But hey, if (when) you mess up, at least garter stitch is easy to pick back...it's a lot more forgiving than brioche or spanish lace.

How to Create the Squares Using Adobe InDesign
Step 1: Like any graphic design project, I first need to consider my final output size and create an appropriate sized document. My final output of this design will be laser printers, outputting standard sized paper. So I first create an 8.5" x 11" document.


Step 2: Inches are my preferred unit of measurement, but I want to use the same numbers for my measurements that I am using for my stitches. Since I'm using a 31stitch pattern, I need to now choose a unit of measurement where I can have 31 units (whatever my units end up being) and still have my objects fit on a standard size page (which I set up when I created the new document). After  a little experimentation, I figure out that millimeters will work well for this purpose. 31 mm is almost 1.25", so I can fit several squares on the width of an 8.5" wide page. Now I simply go back into the Units and Increments section of the Preferences dialog box and change the Horizontal and Vertical units to millimeters.


Step 3: Next, create a square text frame equal to the width of two squares. Because each square is 31 stitches wide, our text frame needs to be 62 mm high by 62 mm wide.


Step 4: With your text insertion point in the frame you just made, insert a Table 10 rows by 10 columns. We'll be merging some of the rows and columns to create the final design.


Step 4: Because we'll be using this table to create blocks of color with very specific measurements, we don't need any of the strokes. So select the entire table and set all the strokes to 0.

Step 5: Start setting up your column widths. Because the first stripe is 8 ridges tall, we need the first row to be exactly 8 mm high.


Step 6: Next set the next three rows to be exactly 5 mm high.


Step 7: Set the fifth row to be exactly 8 mm high.


Step 8: Merge the first five cells in the first row.


Step 9: Do the same with the next four rows.

Step 10: Add colors to your first five rows.


Step 11: Repeat steps 8-10 for the lower right set of cells to make up the second square. You can either merge the columns manually, or simply copy and paste from the top left square. But be sure to note that the copy and paste function does not copy the width and heighth of the cells. It only copies the content (which in this case, is how the cells are merged, as well as their fill color). 


Step 12: Set the height of the cells to match the square in the top left (8, 5, 5, 5, 8). You'll notice that the table now perfectly fills the 62 mm square text frame.


Step 13: To create the next two squares, merge the rows similarly to how you merged the columns for the first set of squares.


Step 14: Set the column width to the same measurements used for the first set of squares: 8mm, 5mm, 5mm, 5mm, 8mm.


Step 15: Add fill color to the second set of squares. I find that the easiest way to add fill colors to a cell is by dragging swatches and dropping them on whichever cell you want to fill. It just too easy to accidentally select too many rows/cells. Interestingly, you can also drag and drop swatches onto frame strokes, but it's a lot harder. You have to position your mouse just right, and if your table is the same size as your text frame, chances are pretty good that you'll drop the swatch a little too far over and inadvertently fill the cell instead of coloring the object stroke. So I like to stick with using drag-and-drop coloring just for fills.


Step 16: Step and repeat to quickly make the afghan design bigger. By creating as a grid, and setting the horizontal and vertical offsets to exactly the same size as the table, we can instantly make the design huge. Go to Edit > Step and Repeat.


Step 17: Now that the square/table design is done, I would finish designing the rest of the page, adding a pattern name, knitting instructions, a photo of the completed afghan, and contact info. But if you've gotten this far, you're probably a designer and already know what to do next. If you're really obsessive particular about small details, you can even rename your swatches to indicate what colors of yarn you used.


If you like this article about InDesign and Knitting, you may be interested in one of my other articles, Using Teacup PatternMaker to Mimic Knitted Garter Stitch.

I also figured out a way to create this same pattern using Teacup PatternMaker.