Monday, November 27, 2017

Use Replace Document Colors to Help Distinguish Various Files in Acrobat

In a previous post, I shared how to use page color to help distinguish various files. It is a simple trick easily accomplished in InDesign.


But what if you need the same thing, but you're working in Acrobat? Easy!

Simply go to Preferences > Accessibility > and Choose "Replace Document Colors". You can choose from one of four preset color schemes, or choose your own custom colors. Here I have simply changed preference to display the background in a light yellow.

Document Colors Replaced

It's important to note that this is an application-wide setting. So if you change it here, Acrobat will display all of your PDFs this way. If you still need to be able to view some of your PDFs in their default colors, and simply have one of them display tinted, you can open one PDF in Reader and the other in Acrobat.

Open one PDF in Reader and the other in Acrobat
But there's more to this feature than meets the eye! Acrobat has four built-in high contrast color choices.

High Contrast Color Choices

Green Text on Black

Yellow Text on Black
White Text on Black
Black Text on White


It would be wise to experiment and see which settings work best for your document, In the above images, I had both "Only change the color of black text or line art" selected. That meant the the red text didn't get change. And neither did the black bulldog, even when the surrounding background was changed to black. Here are some various combinations for changing the colors.

No Options chosen

Option 1 chosen

Options 1 and 2 Chosen

Option 2 chosen

Which settings you need will be determined by how your document was constructed. Experiment and see what works best for you!


Tuesday, November 14, 2017

Acrobat's Mysterious and Frustrating Hand Tool Behavior

Recently on the Adobe forums, people have been asking a couple of questions that I have been wondering myself for months. These two questions intersect at the Hand Tool, and so this post will discuss and explore several issues and finding related to the Hand Tool
  • Where the heck does the hand tool disappear to in Acrobat DC?
  • How to more easily select text that has been highlighted.

Issue #1: Hand Tool Behavior 

For years, the Hand Tool had one main function, which it handled very well: it let you grab the page and scoot it around. But some time back, Adobe decided that the Hand tool should be able to be multifunctional. They added the capability that it should also be able to select text. It seemed like a good idea on the surface, but it introduced more trouble than it's worth.

The issue it that the Hand Tool also acts as a select tool for annotations. What they changed in Acrobat DC is that they incorporated the behavior of the Selection Tool into the Hand tool, and then seemingly did away with the text selection tool. Acrobat DC does have a preference to let you use the Hand Tool to select text and images, so you can turn that on or off to suit your own preferences. and workflow.

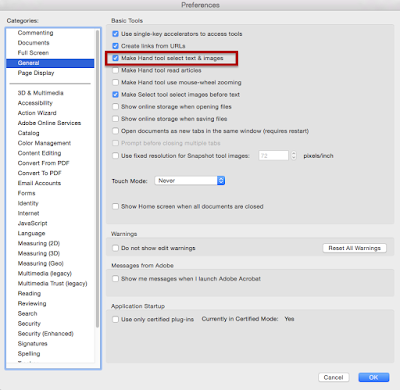
Acrobat DC Preferences

Issue #2: Selection Tool Icon

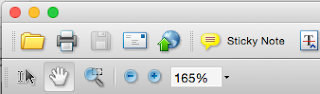
What's so counterintuitive about this is that the behavior of the Selection Tool was incorporated into the Hand Tool, but in addition, it appears that the text selection capability was removed from the Selection Tool, but it wasn't. This is confusing because in every single other Adobe program, the black arrow will not let you select text. The black arrow is for selecting objects. And here in Acrobat DC, the icon of the Selection tool gives us no indication that the behavior of the black arrow is any different than in any of the other Adobe programs. It's only when I hovered over the tool to view the tooltip that it's true behavior was revealed. In previous iterations of Acrobat, the Selection tool had two icons: a black arrow and a cursor icon; hence, the behavior of the Selection Tool obvious. And when you wanted to select something (be it text or an object), you simply clicked on the icon that looked like that it offered function.

Acrobat DC Toolbar showing the Selection Tool

Issue #3: Where Does the Hand Tool live?

In Acrobat 9-XI, the Selection tool, as well as the Hand Tool, were both available in the dock as well as undocked. It was great! Also, notice how the selection tool icon previously included a little text cursor icon. So there was no confusion as to its behavior!

Select and Zoom Tools: Acrobat 9

Select and Zoom Tools: Acrobat XI, Docked

Select and Zoom Tools: Acrobat XI, Undocked
These tools were also available in the menu as tools you could search for and locate independently of their panels.

Select and Zoom Tools List: Acrobat XI

But then things changed in Acrobat DC...

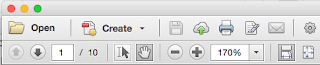
The Hand tool is ubiquitous, and a typical user might think it wise to make is easy to find and easy to use. But no longer! That Hand tool is sometimes visible in Acrobat DC, but more often than not, it disappears. Here is the default toolbar in Acrobat DC. But all too often, the Hand Tool is not in the toolbar when I expect it to be.

Toolbar: Acrobat DC

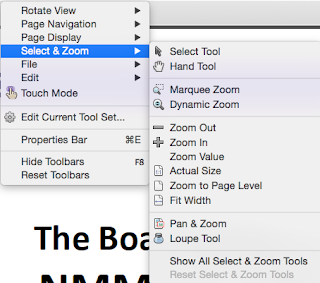
One might think the Hand Tool would be in the same tool set it used to be: the Select and Zoom tools, but alas, no.

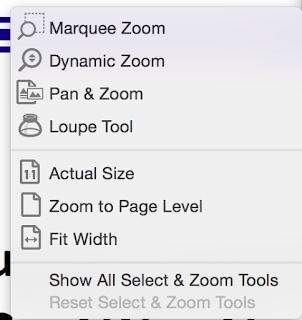
Select and Zoom Tools: Acrobat DC

I finally figured out what makes the Hand Tool disappear. If you right-click on the tool bar, you're presented with this pop-up, where you can quickly choose to display entire tool sets. Sounds great, right? Except that if you choose any of the first five toolsets, the hand tool disappears! The Hand Tool should never disappear! The page field is always there, no matter which toolset you choose (and seems to be excluded from being hidden), but apparently, the hand tool is not in of of those five tool sets, and so it always disappears when you choose on of them.


Disappearing Hand Tool in Acrobat DC

After a bit more digging, I discovered that the issue is that the set of controls that contain the Hand Tool gets pushed to the right whenever you display any of the other major toolsets. If your monitor is big enough, it can show all the tools, but I have a 27" monitor and I still can't display all the tools! Have you ever wondered what the little ellipses are on the right hand side of the toolbar? That's where all the tools reside that won't fit on the toolbar. And look! There's the Hand Tool!

This is where the Hand Tool is hiding!

I wish there was a better way to control and organize the tools in the toolbar. Some of the tools display you matter what, even if you don't want them to. There is no way to hide the File Tools. See how the options are grayed out? I've never once clicked on any of the File Tools; I never intend to; they just east up my screen space, but I have no way to hide them.

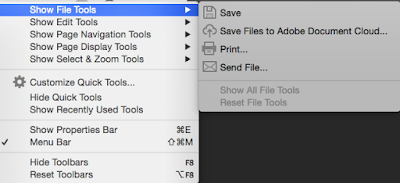
All File Tools are always visible!

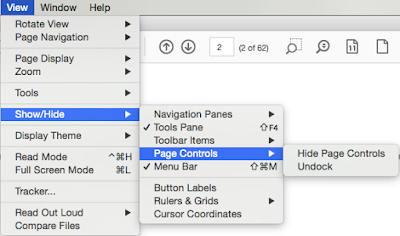
After a bit of searching the View menu, I was able to find out in which toolset the Hand Tool is hiding, and how to make it appear again. It is under View > Show Hide > Page Controls.

View > Show/Hide > Page Controls
This user interface seems wrong to me because Page Controls should be grouped with Toolbar Items, but they're not. They have their own submenu, and Page Controls is the only item in it!

Also, from this submenu, you can either dock or undock the page controls. Below is what they looked like undocked. This is similar to how I am used to seeing them when I view a PDF in Safari. In Safari, they only appear when you hover in the correct spot on the bottom of the page. But here in Acrobat, they are always visible when undocked. And that's nice.

Page Controls: Undocked
So this was a long rabbit trail I went down just to discover an easier way to copy text that had been highlighted and to figure out to where the Hand tool keeps disappearing. Thanks for following along!

Edit 11-14-17
So apparently I didn't really figure out an easier way to copy text that had been highlighted. Here's how: just hide the comments. Easy!


Edit: 9-13-918
If you need an easier way to select text in your PDF, check out my article on Bluebeam Revu. It's an amazing program designed specifically to meet the needs of users in Architecture, Engineering, and Construction. The Hand Tool and the Select Text tool are separate tools (as they should be).

SaveSave
SaveSave

Friday, November 3, 2017

Understanding the Interchangeability of PDF Comments Across Adobe Programs: Part 2

In my previous article, I shared a bit how Notes transfer between Acrobat and Photoshop. When a document in Photoshop is saved as PDF, notes created in Photoshop actually appear in Acrobat. The comment author name in from Acrobat gets populated into the author name in the Photoshop Notes panel.


Interestingly, Photoshop only imports PDF sticky notes, not text correction markups or drawing annotations. Acrobat does provide a somewhat helpful warning. "The PDF document contains annotation types that are not supported by Photoshop. These annotations will be ignored."


That message isn't completely clear in what it will do to your Acrobat PDF annotations. Photoshop will only display Sticky Notes; nothing else. Those are the only type of annotation that is interchangeable between Photoshop and Acrobat. The message would be more accurate if it said "deleted" instead of "ignored."

Let's explore the difference of Acrobat notes and Photoshop Notes, and see who one is better suited for which purpose.  This is a photograph that requires me to use the Notes in both programs. This electrical panel has about 100 breaker labels, and I need to be able to easily find each one of them.


Here are my requirements for labeling all these breakers. 

  1. So I need to label the breakers in a way that I can run a Find on them when I need to (because Acrobat can't successfully run OCR on this image).
  2. I need to be able to have the labels small, so they don't take up too much space and obscure my screen while I am labeling them.
  3. I need the labels color-coded.
Both Acrobat and Photoshop will allow me to do item #1 (label the breakers), but only Acrobat will allow me to run a Find on the labels.

Acrobat: Search Comments

Photoshop can handle #2: labeling while keeping the labels small. It is a much better solution than Acrobat. See how large this comment is in Acrobat? It takes up way to much space! If you click on a comment in Acrobat, the giant pop-up note covers the page.

Comments in Acrobat obscure the image.
Acrobat does have a preference that will align the sticky notes to the edge of the document, but it only works well if you have the comments pane closed.


The width of neither the Comments pane nor the sticky note pop-ups are changeable, so if you have both open, they take up a huge amount of screen real estate.

Acrobat Comment aligned to the edge of the page, with Commenting Pane open

When viewing document, Acrobat centers your document in the window, giving you no ability to drag it over to the left a bit to free up some space on the right for the comments. See all that wasted gray space on the left?

All the gray space is wasted! 

Contrast this with Photoshop. When I click on a note, it doesn't automatically pop-up. The content simply displays in the Notes panel. Plus, I can drag the image over and fully utilize the entire window. The note icon is so small and elegant! Can you even find it in the image below? It doesn't obscure the image, and it's contents are displayed unobtrusively in the Notes pane, which I can either dock or drag wherever I want.

So Photoshop is definitely where I want to do my labeling.


Acrobat can handle item #3: color-coding. This is a very important part of my workflow, and I have written about it extensively. At first glance, Photoshop has no options for Notes. All you can do is navigate through the notes, delete them, or close the panel.

Photoshop Notes Panel
 Compare that with the Photoshop Character Panel, which is rich with options, including the ability to change the color.

Photoshop Character Panel

For real customization of my notes, I have historically used Acrobat, because the user interface exists and is easy to find.

We've already discovered that Notes made on a Photoshop PDF in Acrobat. But one day, I happened to open in Photoshop a Photoshop PDF that I had color-coded in Acrobat. And guess what happened?!

Colored Notes in Photoshop!
The notes were colored! It turns out that Photoshop has the ability to display different colors of notes! After using Photoshop notes for years, I recently discovered that when the Note tool is selected, the control bar displays two options: Author (which is blank by default), and Color. It is these two attributes that are interchangeable with Acrobat. 

Notes options in the Photoshop Control Bar

The default behavior for attributes is different program to program. For example:
  • InDesign: The default attributes of new objects are set when nothing is selected.
  • Illustrator: The default attributes of new objects are picked up from the last object that you had selected.
  • Acrobat: the default properties of new annotations are set when you choose "Make Properties Default."
In Photoshop, the default properties of new notes are more like Illustrator: they are picked up by whatever note you most recently had selected. Of course, you can also simply change the color in the Control bar. However, it's important to note that if you want to utilize Acrobat's Sort Comments By Color feature, the colors you choose need to match exactly. So rather than assigning all the Note colors using the Color Picker eyedropper, I prefer to simply either copy and paste the notes, and then change their content, or click on a note that is the color that I want, and then make a new note set to that color.

How to Sort and Search Notes

Once you've got your notes in Photoshop, it's time to head back over to Acrobat. But first, let's take a final look altho completely notated Photoshop document.

Photoshop PDF with Colored Notes
Save your file as a Photoshop PDF, being sure to check the Notes checkbox.


Now open that file in Acrobat. The notes are color-coded and full searchable! Now I have all the functional that I need for my notes, but I didn't have to endure the overbearing and inflexible user interface of Acrobat commenting to create this.

Colored and Searchable Notes in Acrobat


Thursday, October 19, 2017

Creative Cloud Installation Madness

Last week I started having issues with one of my InDesign plugins. And overall lately, InDesign seemed buggy. It even stopped showing up in the Launchpad and it no longer had the correct application icon.


 I did all the usual things to attempt to fix it:
  1. I uninstalled and reinstalled the plugins.
  2. I trashed my InDesign references.
  3. I restarted my computer.
  4. I uninstalled all my plugins.
  5. I updated inDesign.
  6. I restarted my computer in Internet Recovery Mode.
  7. I restarted my computer in regular Recovery mode.
Then I repeated most of the item a few times for good measure. But nothing helped. It only got worse! Somewhere along the line, ALL of my plugins stopped working. It's as if they weren't even installed... but they were.

The plugins are in the correct folder!

We finally found the culprit!

I reached out to a couple of developer friends of mine and Kris Coppieters was able to come to the rescue. Using a bit of Terminal wizard, he determined that my InDesign version 2017.1 was actually running from my Documents folder! Not the applications folder!

So we uninstalled InDesign, deleted the extra copy, and got ready to reinstall. But we needed to make sure it was installed in the correct spot. Did you know that hidden behind the small three dots in the top corner of the CC app are extra options?


When you choose Preferences, you can actually change the install location for the applications. Mine was set to Documents. That's what was causing all the problems!

Wrong Installation location

By changing it back to the Applications folder, and then reinstalling InDesign, my issue was fixed!

Correct Installation location!

What's so strange about this is that I did not change the install location. It changed by itself somehow!

Special thanks to Kris Coppieters and Caleb Clauset for spending some of their valuable time with me trying to figure out this issue. 

Tuesday, September 26, 2017

Help Make Adobe Products Better with UserVoice!

Recently, Adobe has totally changed the way it handles feature requests and bug reports. They used to seemingly go into a black hole at Adobe, never to be be spoken of again. Even on the pre-release forums they were difficult to find. The engineers would say that few people gave them feedback, and the users who did provide feedback complained that Adobe was ignoring them.

But good news! Adobe has now made the feature requests and bug reports open to the public! You can easily search through other people's feature requests, add comments, and VOTE!

Here is an example of a feature request. Notice that there is a comment from one of the Adobe engineers, who has assigned a status to the feature. Notice that there are also 13 comments, and 18 votes. Once you vote for a feature request, you are given the option to subscribe to the topic and be notified whenever there is a new comment on the topic.


So I've compiled links to the feature requests of my favorite InDesign features (which I personally think are extremely neglected). Would you please take a few moments and VOTE for this features?

I will update this list as I see more features that I'm really passionate about.


InDesign Notes

InDesign Conditional Text

Acrobat Commenting


I love how Adobe is proactively seeking our feedback, and is providing a useful platform to do so. It is my understanding the David Blatner and Anne-Marie Concepcion (from InDesign Secrets) pioneered the idea of using User Voice for InDesign feature requests.

Please consider visiting the InDesign UserVoice site where you become an active part of making InDesign better. You can also visit the Acrobat UserVoice site here.


Edit: 9-13-918
If you need an easier way to create and manage annotations in your PDFs, check out my article on Bluebeam Revu. It's an amazing program designed specifically to meet the needs of users in Architecture, Engineering, and Construction. Specifically, read about the Toolchest, where you can store annotations that you use frequently. Revu has done an amazing job of listening to their users and building a tool to meet their needs.

Friday, September 22, 2017

More Reasons to Hate Dropbox Commenting

This is part 2 of a 2-part article series. Read part 1 here.

Issue #1: Disappearing Comments

I had a new client use dropbox commenting today (because I failed to warn her otherwise), and I decided to go ahead and use the little checkmarks above each comment. In DropboxLand, they are referred to as "Resolve." So if you check them, you are actually "Resolving" the comment.


So what happens next? It disappears! Seemingly forever. What the heck?


Issue #2: Inconsistent User Interface

But after digging through various versions of the file on the Dropbox website, I managed to find an ellipsis that was clickable, and underneath it was "Show Resolved Comments." And that brought the comments back.


However, in an attempt to once again hide the resolved comments, I had a lot of trouble finding that magical eclipses button again. 


Apparently, if you're viewing different versions of the document within the dropbox website, the UI options change. Sometimes you have all the options and sometimes you don't!


Issue #3: Convoluted behavior

So, I finally figured out how to show and hide the resolved comments (globally). But what if I want to see them all at the same time: to see which ones are resolved (checked) and which one are unresolved unchecked)? In Acrobat, I would simply sort comments by checkmark status.

Sadly, dropbox has no type of comment sorting capability. And for some reason, Dropbox also decided to hide the checkboxes! That is, unless you click on just the right spot in each and every comment.

Take this comment for example, I clicked on the comment number (1), and I don't see a checkmark.

But then I click on the Author name (EB), and the checkmark shows up!

I think that in addition to the big blue Share and Download buttons in the top right, Dropbox should have a button labeled 'Open in Acrobat." 


Edit 10-31-18
With the recent update to Acrobat DC, Adobe seems to have used the Dropbox UI for their new web-based commenting features. I have been a huge fan of Acrobat for years, but have recently switched all of my PDF commenting over to Bluebeam Revu. Acrobat DC 2019 is unusable. For more information about why I love Bluebeam Revu so much, read these articles.