I am a lifelong knitter. I am also an avid user of Adobe Illustrator. Occasionally, my two loves collide and the result is something useful and unusual. This tool is one of those results.
In my knitting life, I sometimes do a type of knitting called Fair Isle. In popular culture, this is associated with Ugly Christmas sweaters. But in the knitting world, this has been a sophisticated and much loved technique that has existed for centuries before. Do a quick search for stranded color work knitting or fair isle knittingand you'll find hundred of beautiful designs.
The essence of Fair Isle is that it follows a color chart to indicate which color of yarn to use on which stitches. Usually, two strands of yarn are used on each row, and the unused strand of yarn is held at the back of the work. Usually, the color charts for this type of knitting are created in a spreadsheet program.
As a knitter, the issue that I've run into is that knitting stitches are not square. It's simple enough to make the spreadsheet cells roughly proportional to the dimensions of a knitted stitch (roughly 1 wide by .75 high). But once those designs are knitted, the result can be disappointing, because not only are knitted stitches not square, they're not rectangular either. They are horseshoe shaped. Many times, illustrators will draw them as Vs because that's the part of the stitch that is visible from the front of the work. This is especially apparent when using fair isle to design letterforms. Shapes that would normally have lovely curves and smooth diagonals, can have jagged edges.
You may notice that the Vs in the knitted piece below are actually upside-down; this is because this stocking was knit from the top-down, so the knitting is actually upside down while being knitted.
Traditional graph-paper style charts cannot account for this end result. So help knitters better visualize how their final designs will look when knitted, I designed an accurate fair isle chart, made not of rectangles, but of actual knitted stitches.
This is a BLANK fair isle knitting chart (available in both landscape and portrait). This chart comes with two versions: one has gridlines and the other does not. On the gridded version, every fifth row and column is a darker shaded outline.
It works for both top-down as well as bottom-up knitting. If you are a knitter and want a better type of knitting graph paper, then this is for you!
If you are a knitter, please visit my KnitSwag Etsy shop and see all the other lovely knitterly items I have for sale. I have designed them with you in mind!
One of the things I love the most about PDF comments that they are tidy little packets of information, stored as XML, that can be copied, pasted, sorted, and moved around. They can contain information about:
Author
Content
Date Created
Date Modified
Color
Page position
Type of comment (Highlight, strikethrough, drawing markup, etc)
And certain specialized attributes such as
Icons
Line style
End caps
Transparency
Review Status
Checkmark Status
Topic
and more
PDF commenting is one of my most researched topic on my blog. Some time ago, I wrote an article about how to work with Forms Data Files, and why you'd want to. That article explained some interesting uses for saving out the comments as FDF files, changing the extension to XML, and opening it in a code editor.
What's interesting to me about how comments are contained in an XML file is that various Adobe programs can actually import and interpret those FDF files.
Wait, PDF comments aren't just for Acrobat?
I am so glad you asked, Grasshopper!
Some programs can export documents with PDF sticky notes, such as:
Those three programs all require exporting from their native file format into a PDF format. But there are other Adobe programs that will allow you to save a PDF directly, and then open it again as a native file format.
Photoshop
Illustrator
I've done some experimenting and wanted to share with you my findings, in hope that some of these findings will eventually make their way into the Adobe suit as full-fledged features.
Illustrator
Sadly, Illustrator doesn't have a Note tool, as does InCopy, InDesign, and Photoshop. But interestingly, Illustrator ignores PDF comments. So if you save your Illustrator document as a PDF, add some comments to it in Acrobat, save it, and reopen it in Illustrator, the comments will still be there. Illustrator is ambivalent to PDF annotations. I wish that Illustrator had the ability to view and interact with PDF annotations, but it doesn't and that okay. It's better than the alternative, which would be to delete them.
Photoshop
Photoshop is very interesting to me because, like InDesign and InCopy, it has a Notes tool. But unlike Indesign and InCopy, it also has the ability to save, directly from Photoshop, a native, layered, fully functional document as a PDF, and reopen it as a native document.
What's so great about that is that it allows for direction interaction with PDF sticky notes made in Acrobat. Let's give it a whirl.
First, we have to find the Notes Tool. It's hiding under the eyedropper.
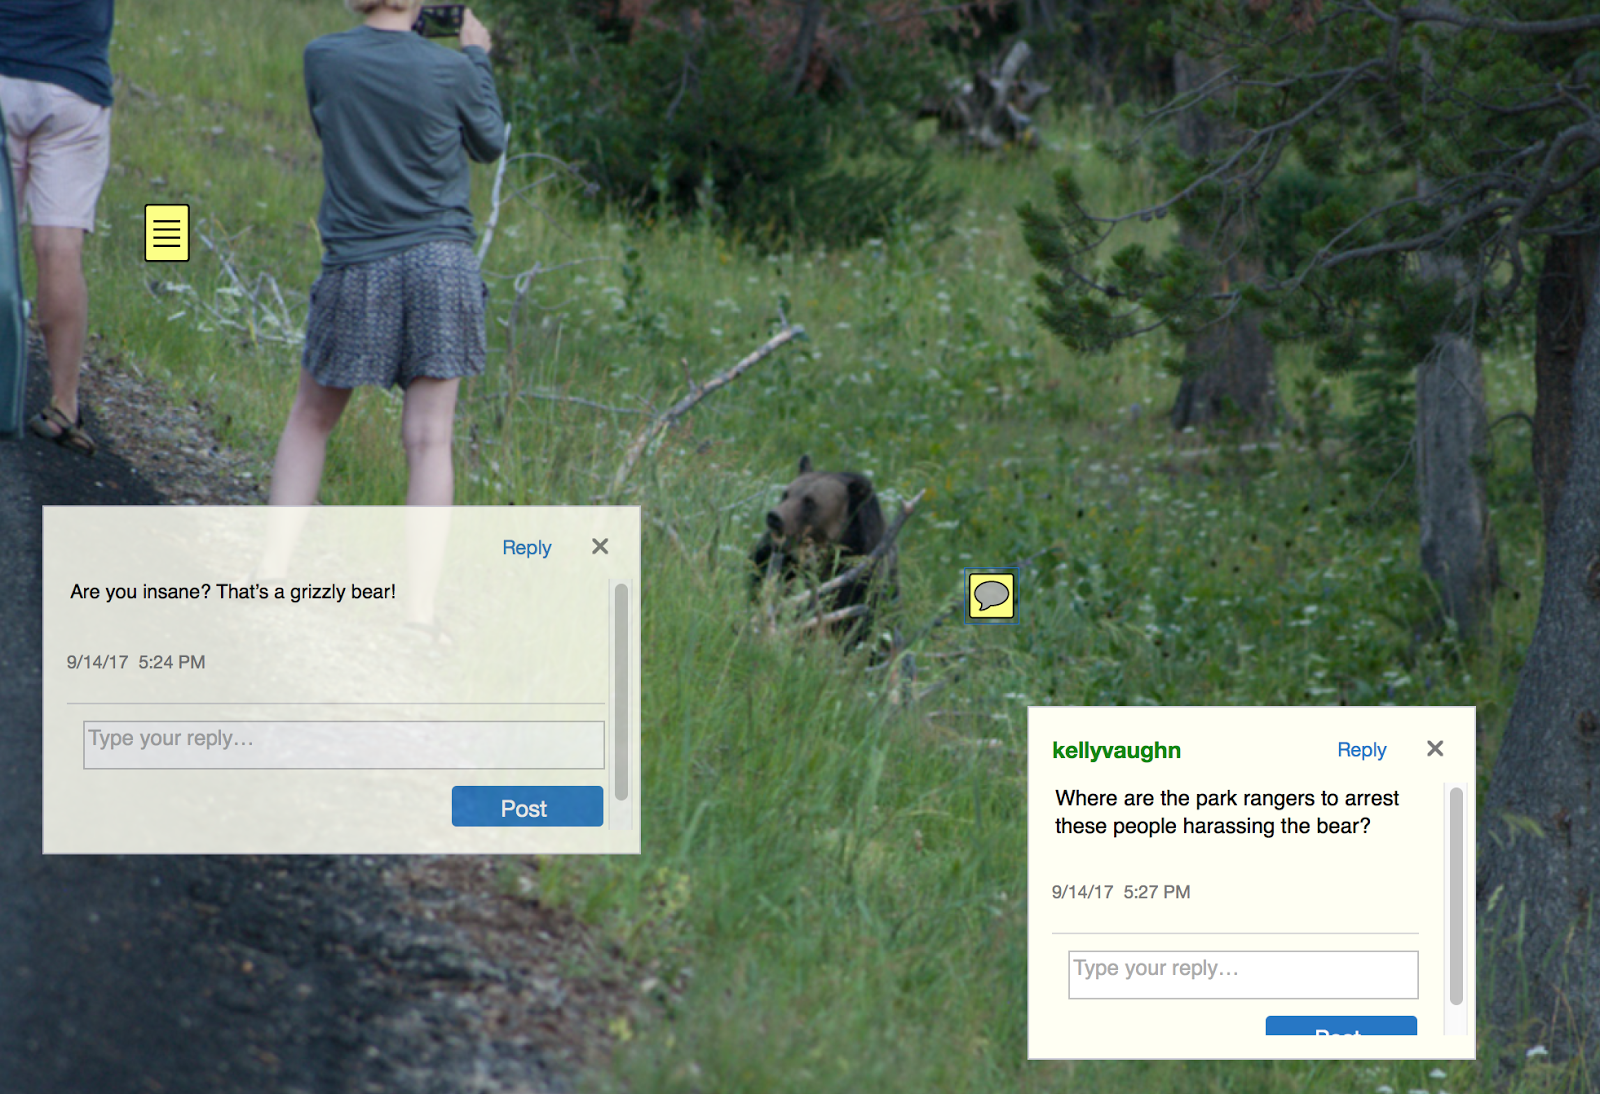
Next, I'll add a note to photo we took on a trip to Yellowstone.
Now I'll save the file as a PDF (Be sure to check the "Notes" icon in the Save dialog box).
Then open it in Acrobat. Voila! But notice that the comment Author is missing.
Next, let's make a new comment here in Acrobat so we can see what will happen on the round-trip back to Photoshop. the comment I made in Acrobat has a different icon, as well as the author name.
Notice how in Photoshop, the second icon is now the same as the first, but the author name is populated into the Notes panel. After closer examination, there is an open space in the Notes panel, just for the author name to populate.
But wait, there's more!
This is just the first article about the interchangeability of PDF notes. There is so much more! This article I hope will whet your appetite for learning more about how you can use Notes across the Adobe Suite. Here is Part 2 of this article series.
Did you know that Acrobat has a variety of built-in stamps? There are several stamp libraries, to serve basic office needs:
Standard Business Stamps
Sign Here Stamps
Dynamic Stamps
But recently, I needed a sign-here stamp with the arrow pointing to the right (instead of to the left). I wanted to use the same design as the original Sign Here stamp, so how to access the vector file?
I did a little digging and found where the stamps are hiding. These file paths are for the English language stamps, but the stamps for the other languages are located nearby.
Applications > Adobe Acrobat XI Pro > Contents > Built In > Comments.acroplugin > Stamps > ENU
The file path for Acrobat DC is: Applications > Adobe Acrobat > Contents > Plugin > Comments.acroplugin > Contents > Resources > Stamps > ENU
What's curious about the stamps in this folder is that there are some additional sets of stamps that Acrobat doesn't load. Take "Faces" for example. This was the very first set of stamps that I ever recall seeing. I think it was back in Acrobat 4. I remember thinking, "That's stupid! Why would anyone use stamps?"
What was Adobe thinking?
Faces Stamps
Also nearby are a few other stamp libraries.
Words Stamps
Pointer Stamps
So, how to repurpose these stamps? Simply open them in Illustrator. In this case, I have opened the SignHere.pdf stamp file in Illustrator. Because this file was made many years ago (before Illustrator had art boards), you'll be asked to choose which page you want to open.
Next, select the red arrow and reflect it.
Then, scoot the arrow into place.
Save the file with a new name and go back to Acrobat.
Now we'll make a custom stamp. Go to Comments > Stamp Tool > Custom Stamps > Create Custom Stamp. Then navigate to the PDF you just made.
In a previous post, I thought that you first had to crop the page size in order for the custom stamp to work properly. But I was wrong. Acrobat will use the artwork dimensions (as opposed to the artboard dimensions).
From the Category drop down menu, choose "Sign Here." Give your stamp a name, then click OK.
Now, your right-pointing Sign Here stamp is added to the Sign Here stamp Library!
I started this afghan after I did the Atlantic Triangle Waves afghan. The original afghan was done using six colors of greens and blues, and one color of white.
Would you like to purchase the pattern for this afghan?
I had such a good time with the first afghan that I wanted to make it again in a different colorway. A year or so after I finished the first Atlantic Triangle Waves afghan, I came across the opportunity to purchase a small portion of KnitPicks 150 Palette Sampler.
According to the Knit Picks website:
"Indulge your fiber senses in a world of color with the 150 Palette Sampler! This fingering weight wool is ideal for projects that let you play and experiment with new and exciting color combinations. And with one ball of each of the 150 colors that make up the Palette yarn line, the sky is the limit for what you can create. With an updated and expanded selection of colors, the 150 Palette Sampler covers the entire range of the gradated color wheel alongside an extensive range of supporting neutrals, soft and muted pastels, and complementing heathers."
I was able to purchase this small portion of all the colors from a woman on Ravelry.com. For you non-knitters out there: Ravelry is a combination social media, e-store and self-publishing platform just for fiber enthusiasts.
So, here's how I got all the colors: some amazing woman on Ravelry purchases the entire sampler for $419, then personally winds down itty bitty little butterflies of each color, for each person, according to how many portions they purchased. So if she had ten people who wanted to split the sampler, she would wind down 1500 tiny little butterflies of yarn. She even labels each color with the color name and dye lot, and make itty bitty ball bands! I think my single portion cost around $40.
When I received my small portions of each of the colors, they came neatly wound in color-coordinated groups of about 10. I would have taken pictures of all the yarn butterflies in advance, only I didn't think about it at the time. These browns are the only Palette yarns I have left and they didn't make it into the final afghan. See how neatly they are wound?
So back to my multihued triangle afghan...
Multi-hued Afghan made in Palette Yarn
The challenge of using this yarn was the very limited amount of each color with which I had to work. I suspect it was about ten yards of each color, though I never measured.
Designing with yarn as a medium is very diferent then designing for printed piece. One of the reasons for this is because the length of yarn is finite: each ball of yarn contains only so many yards. But when designing a printed piece, you're not limited by the amount of ink you have to work with. You may be limited by the number of colors you'll be printing, but not in the volume of ink you have to work with. It's not like you'll run out mid-way through the production process.
So, I had small amounts of 150 different colors to for with. Since this afghan was based on the Atlantic Triangle Afghan, I knew that I needed a thin white yarn to use for the diagonals. While I suppose I should've used a few balls of white Palette (which is the yarn I would be using in the rest of the afghan), I was itching to get started I decided to use a hank of white sock yarn I had on hand. The weight was close enough for me.
I ended up running out of the white sock yarn a couple of strips in, and I figured I could just call up the yarn store I bought it from (four years previously) and order more. Ha! It turns out I didn't have the ball band (which contains the yarn company name, color, and dye lot number), so ordering more was impossible. Calling up a yarn store and asking for more of that "white yarn" is akin to calling up a clothing store and asking for more of those "blue jeans."
I ended up buying some Lorna's Laces natural sock yarn. The weight was close enough to the multicolored yarns, and really, who would be looking at the white stripes when they had all those beautiful colors at which to gaze?
Lorna's Laces Natural Sock Yarn
So why Lorna's Laces? Lorna's Laces is a yarn company that specializes in hand dyed yarn of interesting colorways. Her yarn is very popular and is a joy to knit with. You can find it in most every yarn store across the county. Because her hand-dyed colors are so popular, it was surprisingly difficult to find plan white Lorna's Laces sock yarn. None of the local shops I checked carried white Lorna's Laces sock yarn. The only reliable source I found online was Jimmy Bean's.
So, after purchasing a few skeins of white sock yarn, I was ready to get started. I rarely rely on formal patterns (I typically stick to knitting afghans). I usually draw a rough sketch (or sometimes not), grab some needles and yarn, and cast on! After just a couple tries, I managed to get a triangle dimension that worked with the amount of yarn I had in each color. The basic idea is the same is on the Atlantic Triangle Afghan, only that I changed colors on every triangle instead of on every strip. I also did all small triangles, instead of both small and large triangles.
Once I was done with the knitting, I wanted to figure out a way to create this design in Illustrator without having to draw dozens of little triangles by hand.
But first, let's back up and look at the completed afghan.
Multi-hued Afghan made in Palette Yarn
The design was knitted in strips, one hue at a time. I did all the pinks first, then moved onto the reds, then the yellow-oranges, etc., all the way down the color wheel.
After each strip was completed, I knitted a white strip onto the side and then grafted it to the adjoining strip. (Incidentally, there was supposed to be more blue in this afghan, but I had accidentally misplaced the entire bag of all-blue yarns until after I was done and all the rest of the strips were sewn together.)
So, back to the task at hand: how to recreate this design in graphic design software. The original Atlantic Waves afghan I designed in InDesign. That pattern was well-suited for inDesign. You see, InDesign has a great table feature that allows you to use diagonal lines in your table cells. What that means is that by adding a diagonal line to a table cell, you can take a square cell and instead turn it into two triangles that, together, for a square.
But InDesign won't work for this multi-hued version because InDesign only allows you to have one color per table cell, not two. And this colorway has requires each triangle to be a different color, so I would have to use Illustrator.
We'll create all those triangles in just a bit. But first we're going to start by extracting all these colors from the image and creating them as swatches in Illustrator.
Step 1: Make a new document in Illustrator and place the image of the afghan into it. Now (for you knitters out there) I need to give a disclaimer: you'll likely notice pretty quickly that I did not block this afghan before I photographed it. So there are all kinds of lumpy-bumpies and weird shadows. Sorry. But keep in mind that this is a graphic design blog, not a knitting blog.
Step 2: Get out your trusty eye-dropper tool. But before you start eye-droppering, double click on the eye-dropper tool in the tools panel. Have you ever done that before? No? Well, you're in for a treat! The top-most setting for the eye-dropper tool is Raster Sample Size, and incidentally this is the only setting with a drop-down menu. The default setting is Point Sample. But you're may have gotten changed to one of the other options in that drop down. So just verify that it is set to point sample and not 3x3 Average or 5x5 Average. For our purposes today, nothing else in that dialog box matters. Click OK.
Step 3: Zoom in nice and close on the first triangle and then click the New Swatch button at the bottom of the Swatches panel. Be sure to click on one of the lighter areas. You'll get the following dialog box.
But what if you want to just eye-drop your colors and create swatches without having to click OK through that dialog box 70 times? You're in luck!
Step 4: Click on the lightest part of the next triangle. The Opt+Click on the New Swatch button. See how the swatch automatically gets added to the Swatches panel without you having to click through that dialog box? It's like magic!
Step 5: Repeat Step 4 for the remaining colors in the first strip.
Step 6: Select all the 10 swatches you just made and click the New Color Group button.
Give the Color Group a name.
See how all 10 swatches have moved into the new color group? Nifty!
Step 7: Repeat Steps 4-6 for the remaining triangle colors in the design. Ooh! Pretty! You may want to rearrange the colors a bit in the color group to get them in the correct tonal order.
Now it's time to make the triangles!
Step 8: Be sure that your document units are set to points. I like to work in inches when I am laying out a page, but when I am dealing with effects, I really prefer working in points, as it gives me greater control.
Step 9: Create a rectangle the same proportions as one of the strips. You can fill it with whatever color you want, as we're going to change it later. For now we just need a color that will stand out nicely against the colors of the triangles.
Step 10: Effects > Scribble. Now I've seen the scribble effect misused quite a bit, especially right after it was introduced. But when you customize the settings, and use Scribble in conjunction with other effects, it's pretty powerful.
The Scribble dialog box has 11 different built-in settings, but you can customize the settings however you want. Don't just settle for the default Scribble settings. Customize them!
But so you have an idea of the default settings, here they are used on my peach colored rectangle.
Default Scribble Settings
Childlike
Dense
Loose
Moiré
Sharp
Sketch
Snarl
Swash
Tight
Zig-zag
Okay, so now that you have an idea of how the scribble effect can be customized, let's customize it! I added a little variation to my scribble so that it would more closely resemble the original knitted afghan.
Custom Scribble Settings
Step 11: Transform Effect. Since the original afghan has seven strips, I went to Effect > Distort and Transform > Transform... That brought up this dialog box, where I made six copies of my scribble shape, with an 82 pt horizontal move.
Note: Apparently, my original photo was taken at a slight perspective, so they strips aren't perfectly rectangular in the photo. So I moved the photo up above my scribble drawing, so that I can see they both, and I'm not worried about trying to exactly line up the drawing to the photo, but instead, just using the photo for reference.
Step 12: Click on the Live Paint Bucket Tool. The Live Paint Bucket Tool is hidden under the Shape Builder tool. Note: The next couple of paragraphs I got from the Adobe website.
Select the Live Paint Bucket tool . Click and hold the Shape builder tool to see and select the Live Paint bucket tool. See Select a tool to learn other methods for selecting tools. See Tools panel overview to locate all the tools.
Live Paint Bucket Tool
Specify the fill color or stroke color and size you want.
Note:
If you select a color from a the Swatches panel, the pointer changes to display three colors . The selected color is in the middle, and the two adjacent colors are on either side. To use an adjacent color, click the left or right arrow key.
Thanks to the helpful writeup from the Adobe website, we know that that the cursor will give us an indication how the colors in the swatches panel. So it becomes easy to paint in the colors into the correct triangle, by arrowing through the swatches in the swatches panel as we click into each triangle.
Step 13: Start live painting! But wait! What is this error message?
Step 14: Object > Expand Appearance. This step will allow you to start filling all the triangles with color. Now, resume painting!
Step 15: Start Live Painting! Next I I chose the Live Paint Bucket Tool, and then clicked on the object to make it a Live Paint Group. then started clicking inside each one of the triangles, while at the same time, using my arrow keys to cursor through the swatches. Pressing the right arrow will fill your Live paint Bucket with the next swatch on the left. Likewise, pressing the up arrow will fill the Live Paint Bucket tool with the next swatch up.
Watch this video to see how I painted in all the triangles.
After the triangles were filled with the appropriate colors, I then selected the peach strokes and changed them to white.
After painting all the triangles
Strokes changed to white
Step 16: Flip every other rows of triangles. After I stepped back from the design and compared the original photo to the scribble illustration, I realized that I forgot to flip every other row of triangles. So I expanded the live paint group and selected every other row and flipped them.
Right Click > Transform > Transform Each...
Reflect X
Step 16: Adjust the white and add a filter. Since the original white yarn was not put white, I added a little under color to it to. Then I experimented with raster effects from the Filter Gallery.
Step 17: Finish it off with a drop shadow, just to set it off from the rest of the page.
Multi-Hued Afghan, Recreated in Illustrator
And for reference, here is the original afghan.
Multi-hued Afghan made in Palette Yarn
If you'd like to learn more about this history of this design, read about my Atlantic Triangle Waves afghan. Happy knitting!
Would you like to purchase the pattern for the Atlantic Waves Triangle Afghan?




 . Click and hold the Shape builder tool to see and select the Live Paint bucket tool. See
 . The selected color is in the middle, and the two adjacent colors are on either side. To use an adjacent color, click the left or right arrow key.


