Showing posts with label conference. Show all posts

Sunday, March 10, 2013

The Top Eight Reasons You Should Attend the Print and ePublishing Conference

If you're active in the InDesign community, than you've probably heard of the Print and ePublishing Conference (PePcon). It's coming up soon and you don't want to miss it!

Being a self-employed designer, I can attest to how expensive conferences are to attend. There's airfare, hotel, meals, entertainment... all in addition to the conference registration. Attending conferences is not something I do lightly, as I have to foot the bill for 100% of the cost of attending. There are so many great conferences to attend, but I'd like to share with you my perspective as to why PePcon is so awesome. Please know that I'm not a professional trainer, and I'm not a conference presenter. They didn't pay me to write this. I've simply found this conference to be so valuable for my professional development that I am compelled to share why.

Reason 1: Easy Small Talk (for Once)

I'm in the publishing business. I spend all day at home, on my computer. My officemates are my dogs. I truly enjoy my job and my peaceful, quiet office environment. But I sometimes find small talk outside of work difficult. Why? Because my favorite topics are technical manuals, tables of contents, metadata, and conditional text. If I share these concepts with non-publishing people, I'm usually presented with a blank stare. But to you, my fellow publishers, these are great topics of conversation. Amongst you, My People, I can have effortless small talk. Not only is that amazing, it's not something I encounter very often in my day-to-day life.

Reason 2: Lots of Awkward People

Don't misunderstand. I mean this in the most affectionate way, as I count myself among the awkward crowd. I spend nearly every day alone behind a computer screen, and my social skills aren't the greatest to begin with. But plenty of other people at the conference have the same social skillset as me! It turns out that when you put a bunch of awkward people together, it becomes less awkward for all of them. Who knew?

As PePcon has progressed over the last few years, David and Anne-Marie keep coming up with new and better ways to help get us introverted, somewhat-socially-awkward people talking to one another. Some of their tools are:
  • Business card bingo: a game in which you have to interact with and introduce yourself to approximately 25 different people (one at a time, of course). The bingo winner gets an awesome prize. We may be shy, but we still love prizes!
  • Meet the Speaker table (so you can ask a question privately, in a quiet space, rather than in front of a crowd of people)
  • Table signs: these signs are a helpful suggestion of where to sit during mealtime and breaks. There are tables for Government, Consultant, Business Publishing, Design Firm, software Developer, Education, etc. Those simple table signs help to guide us to the group of people with whom we have the most in common. I was amazed at the increase in interaction from one year to the next, just by the simple addition of signs onto the tables.

Reason 3: The world's experts at your fingertips

It's not uncommon to come to a conference like this, looking for a solution to a problem. Our industry is small enough that we are a pretty tight community. So if you explain your InDesign problem to one of the experts at the conference, they'll likely know the exact person who has already developed a tool to solve your problem. And chances are excellent that the developer you need is just a few tables away, waiting to talk to you.

Reason 4: Awesome Swag

This conference has the obligatory conference goodie bag, but it's filled with much more than a notepad and a few flyers. They give away coffee mugs, plugins, books, posters, thumb drives, and more. And by stopping by the sponsor booths and speaking to the various software developers, you'll get even more coupon codes and freebies. Since many of the book authors are at the conference, it's easy to get them to autograph your books! Many of the individual sessions also offer prizes at the end, for correctly answering questions pertaining to the lesson.

For the last couple of years, a complimentary set of MOO business cards had been included in the conference registration. They also have impressive door prizes at the end of the conference, including a couple of big ticket items such as FontFolio 10 pack, or the entire boxed edition of the Master Collection. With the way things are headed, I wouldn't be surprised if they gave away a Creative Cloud subscription or two this year.

Reason 5: Great Food

They put on quite a spread for us every year. It strikes a great balance between healthful and decadent. The meals have great variety, and let you east as balanced (or as unbalanced) as you like. They also offer all kinds of snacks and goodies in between the amazing meals. Cookies at 10:30? Creme Brûlée at 3:00? Why yes, please! They also make accommodations for folks with special dietary requirements, such as gluten free, or kosher. And if you go to the Ignite Session (which is sort of like an open mic night), there is usually an amazing cupcake selection. Besides being really tasty, I find the food is a great buffer for when we're sitting at a table full of strangers, practicing our small talk.

Reason 6: Conquer Your Fear of Public Speaking

Growing up, I was one of those students who hated doing speeches in school. So much so, that I sometimes would opt to take a F on an assignment, rather than do a required speech. What can get me talk in front of people? Only my favorite topic: InDesign (and its Creative Suite siblings). What better way to get over your fear of public speaking than to commit to speak in front of hundreds of your colleagues and the superstars of the publishing world? If you've figured out a totally amazing trick that the rest of the InDesign world should hear, then come to Ignite and share it with us. We don't bite. We want to hear about your amazing trick.

I've found that nothing boosts confidence quite like having publishing superhero stop by the table and say "Great speech! How did do you that awesome thing in InDesign?" For those brave souls who choose to do an Ignite session, you'll get a very special gift. Last year, they gave out PePcon umbrellas. And I am among the dozen people in the world that has one!

Reason 7: Make New Friends

At my first PePcon, I knew no one there. I went alone, and I was scared to death. To my surprise, I came home having made new friends. For an introverted person, this is a very big deal. It is important to have personal connections with other InDesign users around the world who can offer feedback and assistance with my InDesign problems. Alternatively, if I'm having a rough day, we can commiserate together on twitter, and that is just as wonderful.

Reason 8: Meet the InDesign Team

You may have heard that there is an entire session dedicated to hearing from engineers that create InDesign. But here's something that's not in the conference schedule: those engineers are also walking around mingling in between sessions, just like the rest of us. At last year's conference, I got the opportunity to personally share my InDesign wish list with an InDesign Engineer. And he took notes! Sure, Adobe is a giant global company, but getting to chat with a software engineer face to face made me feel like a very valuable member of the InDesign community.

So please, join me at PePcon. It's going to be tons of fun. And maybe we'll go have BBQ together.

Wednesday, July 13, 2011

How to Incorporate Chapter Thumbnail Images into an Auto-Generating Table of Contents

In May of this year, I attended the InDesign Secrets Print and ePublishing Conference. Once again, I decided to try my hand at speaking to several hundred people. (I'd like to note that public speaking is my geeky version of a roller coaster thrill ride.) So I mustered up all my courage and gave a 5-minute presentation to a room full of strangers. My topic this year was about how to "Make a TOC with Thumbnail images."


For the entire writeup about how it works, check out my article over at InDesign Secrets. They were nice enough to let me be a guest contributor. This article was something I'd been working on for a couple of years, and I wanted to make sure it got published somewhere very special, with plenty of InDesign users.

And here is a photo of me after completing my presentation. I got a 2-thumbs up from Anne-Marie! Plus, I got a special "Speaker Bag."


If you ever have the chance to do an Ignite presentation, go for it! It will rock your world. I did one last year as well, and I have to say, the second time around is much less scary. Of course, I was well prepared and has been practicing for months this time around. In case you're interested in my presentation from last year, here is the writeup.

Wednesday, January 26, 2011

Variable Data Meets Large Format Printing

A little history...

This project came about as an attempt to market a newly formed large format printing company. A month or so after I got hired, the company announced that they were going to expand by starting a large format division. We were to get 10 foot wide solvent printer, a 5 foot x 10 foot UV flatbed printer, a digital die cutter (camera guided computer driven table router), and a really big laminator. I was tasked with developing a workflow and a marketing campaign for the new division of our company. So armed with about 3 pages of instructions and $350,000 in equipment, I was off on a new adventure.

Prior to purchasing the large format equipment, this printing company did strictly sheetfed work (shockingly, we did not even own a color laser printer). So there was a considerable amount of education to do with regard to large format printing.

The challenge:

Educating traditional print buyers (designers and print brokers) about large format substrates and capabilities

My personal objectives:

  1. To design a mail piece so cool that people not only would not throw it in the trash, but would pin up on their cubicle wall and show it off to their friends.
  2. To push to the limit the complexity of what my team and equipment was capable of producing.

The project:

Customized MarketMail pieces (non-rectangular) on Sintra board, with variable data graphics, text... and engraving.

Each postcard that we would product would be completely unique. I had seen custom printed postcards before (utilizing different pictures and text). I had also seen CMM postcards before, batch produced by the thousand. But our postcards were going not only combine an unusual shape and custom printing, they were going to have the recipient's name engraved on the front.

The USPS website has a fairly decent writeup about CMM. Basically, it's unusual shaped postcards. They can be weird shapes, have holes die cut through them, they can be even have stuff hanging from them. I heard about a business that sent out flip-flops as CMM mail pieces. Pretty cool!

I chose to use 3M Sintra board for our postcard. Sintra board is an extruded PVC material. It is waterproof, stiff, has perfectly squared edges, and comes in big sheets and various thicknesses. It's great for engraving, and the UV ink doesn't flake off of it like some other substrates.

Here are the step-by-step instructions for creating your own engraved diecut mailers. These instructions are intentionally brief. I am assuming that if you attempt this, you'll already know how to set up templates, do data merge, use InDesign and PDF layers, clean up files in Illustrator, etc. This is more of an overview of a process rather than a tutorial on specific software features.

Note: In many large format workflows, they actually set it up so that the software does the work of imposition, creating cut files, and so forth. You can send a single PDF to the RIP, and the RIP will separate out the Cut file and the Print file. In an ideal world, our workflow would have been set up that way. But for reasons beyond my control, our RIP software didn't communicate with our cutting software. So we did everything manually.

Step 1: Create a 1-up postcard template in InDesign

Front:
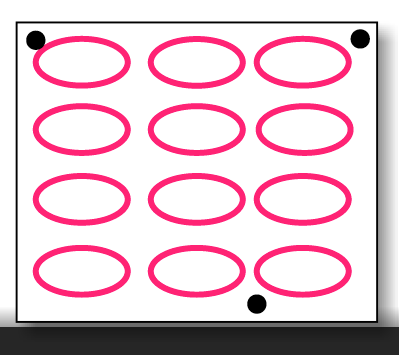
  • Graphic placeholder (Orange Oval)
  • First name placeholder (Data Merge placeholder for engraving) Note: I chose Arial Rounded for the font, and just gave it stroke, no fill.
  • Cut Path (magenta line)
  • Drill holes (green circles)

Back:
  • Graphic placeholder
  • Address info
  • Salesperson contact info

Step 2: Arrange objects on layers in InDesign

  • Print layer: everything that is going to be printed
  • Cut layer: everything that is going to be cut or engraved (Cut path, drill holes)
  • Engrave layer: name for engraving


Step 3: Data Merge

  • Choose your data source and merge your data.
  • Now, depending upon your version of InDesign, save the merged file for placing into the imposition, OR
  • Export a PDF for imposition (including Acrobat layers).

Step 4: Prepare an imposition file, page 1

  • Prepare a template.
  • Make four layers: Print, Cut, Engrave and Registration Marks.
  • Put placeholder frames on the Print layer.
  • Add registration marks in a triangular position. (The registration marks are what the camera guided table router uses to know where to cut. They work so well you can even put your board on the table crooked and the router will still cut correctly because it uses the registration marks as reference points. These registration marks have nothing to whatsoever with litho registration marks that a pressman uses to align various plate colors. They are similar in the sense that they help with alignment, but that's about where the similarity ends.)


Step 5: Prepare an imposition file, page 2

  • Duplicate the placeholder frames onto a second page.
  • Add registration marks on the first page.

Step 6: Prepare an imposition file, part 2

  • Duplicate placeholder frames from Print layer onto the Cut and Engrave layers.

Step 7: Impose 1-up, only Print layer

  • Front: left to right, top to bottom
  • Back: Right to left, top to bottom


Step 8: Prepare Cut Paths in Imposition

  • Place a page (any page) of the 1-up file into the placeholder frames on the Cut Path layer.
  • Be sure to Show Options: show ONLY the Cut layer.


Step 9: Prepare Engrave Paths

  • Do a multi-page import of the 1-up front file
  • Be sure to show options: show ONLY the Engrave layer.


Step 10: Export Print File

  • Hide the Cut and Engrave layers.
  • Showing only the Print and Registration Marks layers, export a PDF.
  • Depending on your RIP, you may want to rasterize and save as a TIFF.
Note: I know traditional litho prepress folks may gasp in horror over this statement, but large format RIPs typically use this as a workflow. As much as I liked the idea of sending to the RIP unflattened PDFs with native transparency, it just didn't work well. Since TIFFs are the preferred file format and the industry standard for large format RIPs, I figured I was not going to change an entire industry. So we used TIFFs.

Step 11: Export Cut/Engrave File

  • Hide the Print layer.
  • Showing only the Cut, Engrave, and Registration Marks layers, export a PDF.


Step 12: Clean up the Cut File in Illustrator

  • Using, Illustrator, open your the PDF cut file you just made.
  • Delete all empty paths (view in outline mode first)
  • Outline type (I used Arial Rounded)
  • Create separate layers for each type of object: Cut, Engrave, and Registration Marks.
  • Offset the stroke by 1/2 the diameter of the router bit you'll be using. (I like to use an Effect for this, then expand the object. That way, there are no extraneous paths to delete.)

Step 13: Go to Production!

  1. Print board - Side 1
  2. If using a non-square substrate (like cardboard, polystyrene, coroplast, etc.) square up the board on the flatbed cutter.
  3. Print board Side 2
  4. Engrave names
  5. Drill holes
  6. Cut out postcards

Tips:

  • Have plenty of time on your hands.
  • Don't have a project budget.
  • Work directly with equipment operators: the guys who run the flatbed printer and table router).

The Finished Product

This was the actual postcard that I mailed to myself when I mailed the postcards to our customers. On the back of the postcard in the top left, you can actually see the tire marks from where it got run over by the mail truck.

Postcard Front
Postcard Back

On a slightly different note, I originally prepared this as a Ignite InDesign slideshow for the 2010 InDesign Secrets Print and ePublishing Conference. I feel I should give a disclaimer that this slideshow was done before I owned a laptop, and I had to prepare the slides on the hotel lobby computer the night before, using Acrobat.com. So in case you think the most of the graphics in this tutorial look a little clunky, you're right, they do.

And in case you're not familiar with Ignite! presentations, that's where you prepare a 20-slide slideshow about your topic of choice, and you have 5 minutes to present, while the slides auto-advance every 15 seconds behind you on the screen. And in my case, my audience included pretty much all the super heros of the publishing world (who also happen to be well-practiced public speakers), and I (not exactly a well-practiced public speaker) was doing my very best not to hyperventilate. Exhilarating? Yes, indeed. Terrifying? OMG! But hey, when I was done, they gave me a neat little magnet to hang on my fridge. It was totally worth it. I'm doing it again a this year's conference!