Tuesday, October 16, 2012

Adobe Reader XI for Knitters

In my knitting bag, you'll find several mangled, folded up, scribbled-on patterns. To keep track of where I'm at in a pattern, I used to use paper sticky notes. I like the light yellow ones, because the paper is thin enough for me to be able to slightly see what is underneath it. Yet, because they are adhesive, I can easily more the sticky note after each row, keeping track of my progress.

If you are a knitter with a tablet or laptop, I'd like to introduce you to a different, perhaps easier way to keep track of your place in your pattern. With the recent release of Adobe Reader XI, knitters now have a great resource for their tool bag. This tutorial will use a charted color pattern, but this technique will just as easily work with a charted lace pattern. First, you'll need a PDF of your pattern.

Open the PDF in Adobe Reader. There are two options for opening files in Reader: Opening from your local hard drive and opening from an online account.


The first option is to open a file on your local hard drive...which is pretty self-explanatory. It's just a PDF located on your computer.

The second is opening a file from an online account, such as Acrobat.com. (Side note: The drop down for Open from Online Account is not exactly clear. I think that Open from Online Account should be outside of the drop down (like Show); it should not be the first item the the drop down. Regardless, if you are opening a file from your local hard drive, you can ignore this confusing drop down menu.)

However, storing your patterns on an online service such as Acrobat.com may be a good solution for you if you don't want to carry hardcopy patterns, have a tendency to lose papers, or need to have access to your pattern on multiple devices.

Once your pattern is open, click on the Comment pane. If you are used to used paper sticky notes, your first inclination may be use the Sticky Note tool to track your progress in your charted pattern. Let's explore why this isn't the best tool for the job.
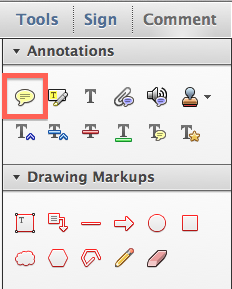

When you first click on the page with the sticky note tool, two things happen simultaneously: 1) A sticky note icon placed on the page. 2) Near the sticky note icon is a light yellow pop-up where you can type notes. The pop-up note will by default line up on the edge of the document. So if you zoom in and out, the location of the pop-up note will not stay constant relative to your pattern. It will always align to the side of your page.


Now you can choose a different color, icon, and opacity for your sticky note. This can be useful if you need to increase or decrease contrast between your sticky note and the page's content. You can easily type notes to yourself in typing area of the sticky note.


You can also move the pop-up note separately from the actual sticky note itself. However, the size of the sticky note and icon remain relatively constant on the page, no matter if you're zoomed in to 800% or zoomed out to 50%. This means that the size of the sticky note and placement of the pop-up are completely independent of the zoom level. So you can't count on them to visually stay where you put them.

What neat about sticky notes (and all other comments for that matter) is that you can change their color and opacity. Right-click on the sticky note and choose "Properties." There are a whole host of icon and color choices.


While sticky notes are great for other uses, in order to more easily track my progress in a charted pattern, I prefer to use a different tool. I like the Rectangle tool.


To make a rectangle, click on the rectangle tool and draw a rectangle on your page. The default rectangle is has a red stroke and no fill. But we can easily change this.


Right click on the rectangle and choose Properties (or press Cmd/Ctrl + I).


Here you can change the stroke and fill colors, as well as the opacity.


You may need to experiment with your Rectangle properties in order to find what works best for your pattern. See how my yellow rectangle has low contrast against my pattern?


By changing the color and opacity, now we have a sticky note that has a higher contrast between the different colors in the pattern.


The beauty of the rectangle tool is that the size of the rectangle stays constant relative to the zoom level. So when viewing the page at 400%, the rectangle will be four times larger than when viewing the page at 100%. Basically this means that the rectangle will stay where you put it, and remain correctly sized and proportioned.

100% Zoom

400% Zoom

In previous versions on Reader, users only had access to the Sticky Note Tool, not any Drawing Markup tools. But with the release of Reader XI, users can "comment" on any PDF you want (barring any security settings that the publishers may have imposed). Better still, you can Save the PDF, and your "comments" will still be there in the exact same place the next time you open the PDF.

Edit: 9-13-918
If you regularly use PDF annotations, check out my article on Bluebeam Revu. It's an amazing program designed specifically to meet the needs of users in Architecture, Engineering, and Construction.

Thursday, October 11, 2012

Where Did My Hidden Characters Go?

Dumbfounded once again, as I discovered a way to lose my hidden characters. But then I found them! Read the entire article at InDesign Secrets. http://indesignsecrets.com/where-did-my-hidden-characters-go.php


Thursday, October 4, 2012

Saving PDFs for Reader Users: the How and Why

In a recent Raleigh InDesign User Group meeting, we discussed how to collaborate with non-InDesign Users. The most popular method is by using PDF commenting tools. While my ideal workflow might include a copy a Acrobat Professional for every user, I realize that most people only have a copy of the free Adobe Reader. However, even with this free software, the other people in your workflow can still comment on your PDFs. The trick is that you need to save your PDFs with a setting that allows Reader users to comment on the document.

Here is what a standard PDF will look like when opened in Reader X. The Comment Pane is fairly stripped down. Users can either add Sticky Notes or Highlight Text. That's it. But what if they want to replace text? Or cross out text? Or add a text box? They can't.


The trick is to save the PDF with the aforementioned special setting. However, this setting is located in two different places, depending upon which version of Acrobat you are using.

If you are in Acrobat 9, this setting is located under Advanced>Extend Features in Adobe Reader.


If you are using Acrobat X, this setting is under File > Save As > Reader Extended PDF>Enable Additional Features. This will give Reader Users access to the most features.


Once your PDF is saved with this setting, here is what it will look like in Reader. Under the Comments Pane, they now have access to all the Annotations tools (not just sticky notes and highlighters).


Further down in the Comment Pane are the Drawing Markup tools.


There 's also a whole new Pane that is now accessible to Reader users of this PDF: the Extended Pane. Here, Readers users can place a signature, add a time stamp, or use the "Add or Edit Text Box" tool (which was formerly known as the Typewriter Tool).


The upcoming Adobe Reader XI makes it even easier for Reader Users to comment on your PDFs. Stay tuned!

Make PDF Sticky Notes in your InDesign Document

Create PDF Sticky Notes, right from InDesign. Two great solutions! This article can be found at InDesign Secrets.

http://indesignsecrets.com/make-pdf-sticky-notes-in-your-indesign-document.php


Thursday, August 23, 2012

Follow the Yellow Brick Road

Learn to use Illustrator to expand your stroke styles; then apply several of them in sequence. This article can be found at InDesign Secrets: http://indesignsecrets.com/follow-the-yellow-brick-road.php

Saturday, July 28, 2012

Gift Ideas for the InDesign Geeks in Your Life

I've been collecting cool gift ideas for InDesign users and I wanted to share them with you. Honestly, these ideas were mainly ideas I gave to my own  family members. But some of these ideas are so great, I think that other InDesigners should know about them as well. While there are plenty of generic-graphic-design-y gifts, these are primarily relating to InDesign.

Custom License Plates: $30-60

My husband got me this for my birthday. I'm still kind of shocked that the plate was even available. I thought for sure another InDesign user in North Carolina would've already snagged it. But lucky for me, they didn't!


InDesign-inspired glass: $15 and up

I found this glass on Etsy. I was looking for a local artist here in Raleigh from whom I could buy something pink.


But if Illustrator, Photoshop, or Acrobat are more your thing, she also has nice designs in orange, blue, and red. Sure, normal people might not know what the colors represent, but your software geek definitely will. I think the red business card holder would be especially appropriate for anyone who makes interactive PDFs.


File Extension Jewelry: $24

How much do I want this necklace? A lot. This artist has a variety of other Creative Suite extensions as well (.psd, .ai, .fla), plus necklaces for Save and Undo. How fun would it be if she also started offering .idml and .icml? Or maybe .indb, .inx, .indl, or .idms?


Pink Pillows: $15

These pillows come in a variety of sizes. The little ones would make great ornaments. The company who makes them used to be backordered for 6 weeks, but they've recently ramped up production and you can get your pillow relatively quickly now. Like any smart business catering to graphic designers, they also have pillows for  all the other Creative Suite applications (even Bridge!). The photos of the large pillows on their home page are CS3 branding. The mini pillows have been upgraded to CS5. I'd be curious to see if they will be doing any new pillow designs for CS6.


Pink Yarn: $84.99

Now, I know that most InDesign users don't knit, but I also know a fair number that do (myself included). This yarn is a sampler pack of fingering weight, 100% wool. I just finished making an afghan using this yarn (worked using #4s, in garter stitch, in case you're interested.) Plus, this yarn is at a truly amazing price! If your software geek is into a different program, they have other colorways as well

Tuesday, July 10, 2012

American Flag Stroke Style

I recently wrote an article on how to use a custom striped stroke style to make the stripes of the American flag. You can find the complete article over at InDesign Secrets. http://indesignsecrets.com/american-flag-stroke-style.php


But I wanted to show you some other cool things you can do with this custom style. Continuing on the patriotic theme that inspired the original design, you can apply this stroke style to a star.


You can apply this stroke style to a circle and make your very own gold record. I copied and pasted some gradients swatches in from Illustrator so I didn't have to recreate the gold gradients in InDesign.


Or you can apply this stroke style to rounded rectangles and stack them on top of each other. For this purple design, I took advantage of a bug in InDesign that automatically expands Live Corners when you try to move the individual anchor points with the direct selection tool.


In case you want to use this stroke style and not have to create it yourself, click here to download a snippet of the waving flag stroke shown at the top of this article. When you place the snippet into InDesign, it will automatically bring in the stroke style and gradients. Enjoy!

Tuesday, June 26, 2012

Make a Mondrian using InDesign Tables

Want a Mondrian, but can't afford the real thing? You're not alone. Don't worry, you can make a similar design using InDesign tables. Take it one step further and have it printed large format on canvas, and hang it in your office.


Congratulations! You just saved yourself $27 million.