In older versions of Acrobat (version 9 and below), we used to be able to click on the handy marquee zoom tool in the toolbar. I think it may have even been up there by default.
Marquee Zoom docked into Toolbar in Acrobat 9
But like so many other tools, the marquee zoom get moved in Acrobat X and XI. My first thought was that it would be in the Tools pane. But nope!
So how about in the Tool Sets? Nope, not there either.
What about View > Tools? Again, no. That just displays the same list of tools as the Tools Pane.
I also thought "Create New Tool Set" might let me dock the marquee zoom, but once again, nope!
The Tools in this list seem to be more of functions (things you want to accomplish) rather than tools as we designers would normally think of them. They are a duplicate of what tools are listed in the Tools pane.
What about View > Zoom? Well, that shows the tool I want, but I really don't want to have to navigate through the menus every time I need to use the marquee zoom. I'm really just looking for a way to get the marquee zoom docked into my toolbar.
Apparently, the marquee zoom did not get grouped with all the other tools. Rather, it is classified as a "Toolbar Item," whatever that means... And if you want to show it, you have to go digging through four levels of menus. Seriously? No wonder I couldn't find this for over two years.
I have to ask: wouldn't a Toolbar Item also be considered a tool? Apparently not in Acrobat... Nevertheless, I now have my precious and oft-used marquee zoom out in the open where I can actually get to it.
Marquee Zoom docked into Toolbar in Acrobat XI!
Edit: 9-13-918 If you need an easier way to access your tools, check out my article on Bluebeam Revu. It's an amazing program designed specifically to meet the needs of users in Architecture, Engineering, and Construction. Their tools are all module based and so much easier to find! The UI is totally (truly) customizable.
Do you often have to relink images in your InDesign documents, only to have InDesign point you to a folder from an entirely different project or client? Then you have to go navigating through your hard drive, looking for the correct links folder? Well, be frustrated no more!
Lately, I've been working on training manuals. The manuals are printed on standard 8.x5 x 11" paper, 3-hole drilled, and placed into a binder. But sometimes, there is an 11x17 foldout page. While InDesign allows for mixed page sizes in a single document, it gets complicated (easily messed up) when the content of all the pages flows together in one story. I've come up with a fairly fool proof solution to this problem. It involves creates the entire document as 8.5 x 11 and using Acrobat to attach the 11x17 file.
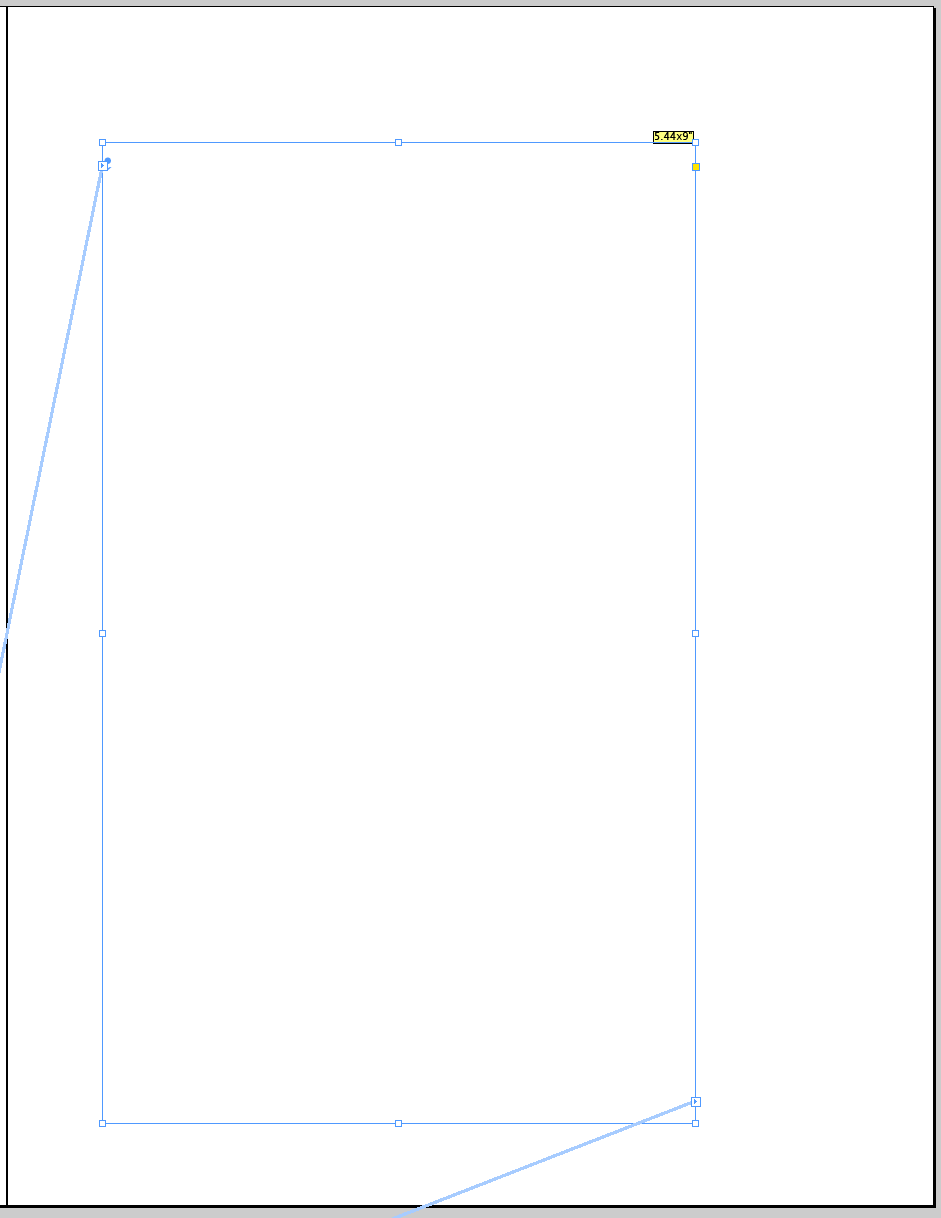
1. Make a empty page in your InDesign document. It should be part of the threaded story.
Empty Page with a threaded frame
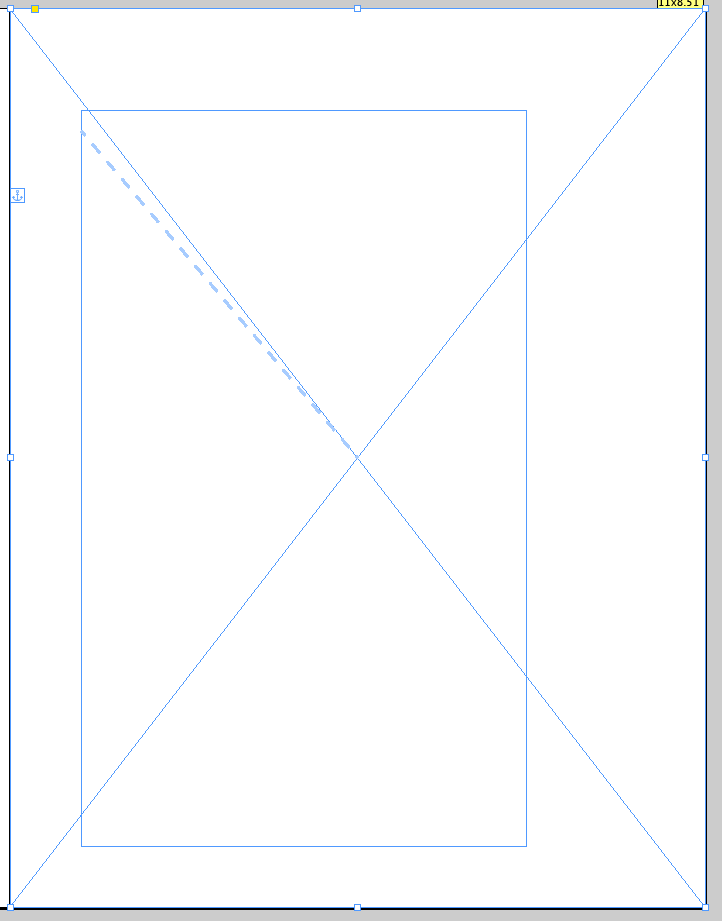
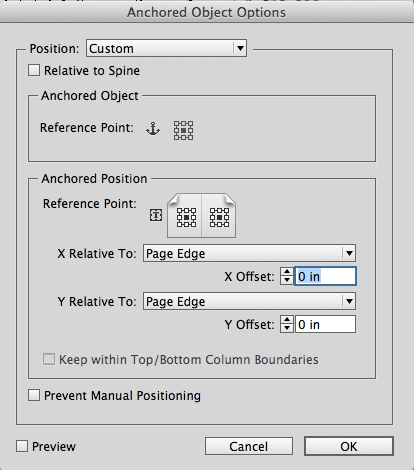
2. Create an 8.5 x 11 graphic frame and make it anchored into this empty frame. Set the Anchored Object settings according to the graphic below.
Graphic Frame Anchored into the Text Frame
Anchored Object Settings for a full page centered graphic
3. Place the 11x17 foldout page as a graphic into the graphic frame you just made.
4. Add a big yellow text frame indicating what this page is for.
Be sure to anchor this text frame into the same place as you anchored the graphic frame. You may need to scoot the graphic frame out of the way for a moment in order to anchor the yellow frame.
5. I also like to add an InDesign Note indicating what is supposed to happen with this page.
I use a plugin called PDF Stickies. It converts my InDesign Notes into PDF sticky notes. I wrote an article about how to use that plugin here. The important thing to do here is to type in the filename of the 11x17 foldout graphic that needs to go here in the final printed piece.
6. Add a blank page after the one you've just made.
Then, using the story editor, copy and paste the contents from the right facing page to the left facing blank page you just added.
7. Change the text to indicate that this is the backside of the 11x17 page.
This serves to keep your page numbering correct upon final output.
8. Export the PDF.
Note: in order to get the PDF Stickies plugin to export the stickies to a Print PDF, you need to add the InDesign document to a book and then export from there.
9. Open the file in Acrobat and go to the Comments pane. Also open up the Annotations twirl down.
10. In the Comments List, you'll find the name of the 11x17 graphic that the printer will be printing full size and inserting here. Copy that filename.
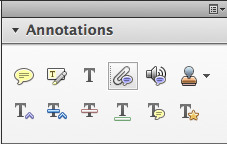
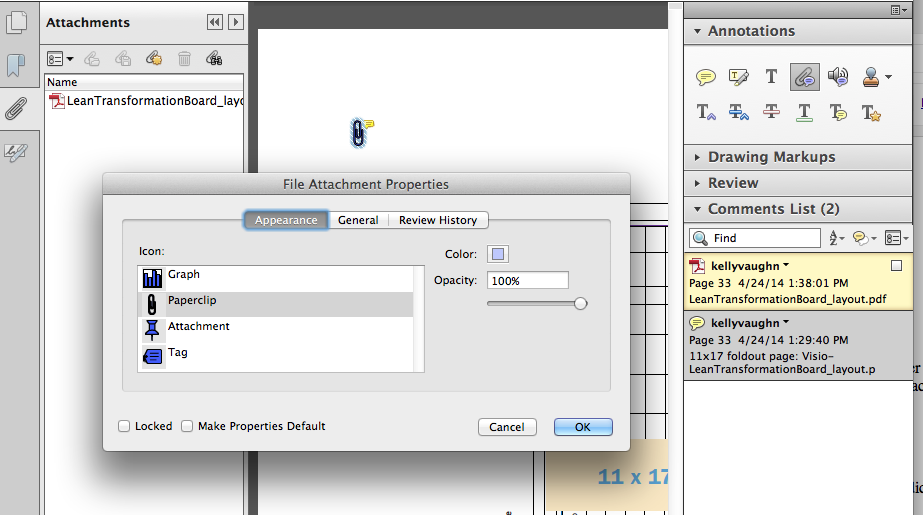
11. In the Annotations twirl down, click on the little paperclip icon.
Attach File
12. When Acrobat asks you what file to attach, paste the filename you just copied into the search field.
See how it attached the file and made a comment all in one fell swoop?
Attachment Comment in Acrobat
13. Now you can delete the yellow sticky note comment in the Comments List.
12. Be sure to tell your printer about the 11x17 foldout page and let him know that the page location is referenced in the Comments List, and the 11x17 file to print is in the attachments pane.
The missing link is a solution that will let me export all sorts of annotations to Acrobat in one fell swoop. The reason is because I create technical documents and I often need to get clarification about certain bits of text in a long threaded text frame. I would like a way to tag that text right in InDesign and have that tag appear as a PDF annotation.
I’d like a way to repurpose the XML tagging capabilities of InDesign to allow me to create PDF annotations. Here is how I envision the annotated text to look in the Story Editor.
Story Editor display, with annotated text markup displayed
Here is what I envision the capabilities of the new and improved Notes panel:
Blocks of text can be marked for PDF annotation, right in InDesign
We should be able to choose annotation type, icon, and color in the InDesign Notes panel (preferably without having to open a second dialog box to do so.
A note navigator that lists all the notes at the bottom of the Notes Panel, under a new twirl down.
These annotations would be capable of appearing in both Print and Interactive PDFs
Here is an illustration demonstrating what I would like to see the UI look like. The Notes panel will have three new drop downs on the top right: Annotation Type, Icon, and Color. At the bottom of the panel will be a twirl down listing all the notes in the document.
New and Improved Notes Panel
New Drop Downs in the Notes Panel
If you enjoyed this article and would like to learn more about how notes can make your publishing workflow more efficient, join me at PePcon 2014, where I will be speaking on PDF Annotations.
InDesign’s Stroke Styles, especially the dotted stroke styles, are a mysterious topic; and for good reason. The Adobe InDesign Help File offers just basic instructions on how to create custom stroke styles, but essentially no information on the logic behind how they work. This article is dedicated to demystifying the dotted stroke styles. To access the Stroke Styles dialog box, click on the Stroke panel flyout menu, then choose Stroke Styles.
If you are a designer, you'll rarely come across an FDF file. In fact, you may have never even heard of FDF, since it's not among the familiar formats that designers know and love. But there's a lot to like about FDFs: their compact nature can simplify your workflow and in some instances, save you a lot of time and effort.
As part of my production workflow, I regularly get PDFs of construction work orders. They are highly technical documents that contain all kinds of important information. Recently, I've come across some of these PDFs that were non-searchable. It took me awhile to figure out the problem, because the PDFs weren't scanned. They had live text. I could highlight and comment on the text using PDF commenting tools. If that wasn't live text, I wouldn't be able to use the text annotation tools.
And by non -searchable, I mean this: I see the word "work," in the body of the PDF, but when I search for that word using Acrobat's Find function, no matches are found.
So I tried searching for the word "WORK." But again, no matches are found. What the heck?!
I tried running the PDF through a couple of different PDF conversion programs (PDF2ID and PDF2DTP) and got nowhere.
As converted by PDF2ID (Recosoft)
As converted by PDF2DTP (Markzware)
However, one of the conversion tools gave me a less-than-helpful error message.
I tried copying and pasting text from the PDF and into a text editor and my email program and I got the same gibberish.
For kicks, I tried saving the troublesome PDF as a Microsoft office document. Not only did Acrobat save it out correctly with editable text, it also converted even the text highlights!
Fast forward a few weeks and I got to thinking that perhaps the inability to search within the PDF has something to do with fonts. So I go to the troublesome PDF and I look at the Font tab within Document Properties. The encoding is listed as "Custom." Now, I'm neither a font developer nor PDF developer, but rest assured I have never seen "Custom" encoding before. I'm used to seeing things like "Ansi" or "Identity-H."
Custom Font Encoding
So I open a non-troublesome (fully searchable) PDF from the same client and check the font encoding there. It is "Built-in."
Built-in Font Encoding
Now, I don't know what "Built-in" means either, but I know that those PDFs are searchable. A quick scan of google leads me to other people that have the same problem. While it doesn't seem that there is an easy way to simply change font encoding, I have come up with a solution.
I remember reading a few years ago that adding tags to a PDF somehow fixes the document so that when you select a paragraph of text and then copy and paste it into InDesign, you won't get hard returns at the end of each line. I also know that tags are really important for making "Accessible" documents. Now normally, I never have to create Accessible documents, so I don't bother with learning all the details involved in their creation. But on a hunch, I decided to add tags to the troublesome PDF and see what happened.
After Acrobat has added tags to the document, a quick check of the Documents Fonts pane revealed something new. There was now something listed below the Custom font encoding.
Now I tried doing a Find. And sure enough, the Find function now worked as expected! Adding Tags to the document somehow fixed the weird font issue and also made it so that I could convert the PDF using my PDF to InDesign conversion tools.
This article is for any of those designers who have ever had issues which make it difficult to be productive at a traditional workstation. Here are a few examples: one hand doesn't cooperate, you have difficulty typing, or can't sit upright in your everyday office chair. As a designer, my job is relatively easy on my body. I'm worked a number of physical-labor jobs in my life and I am so grateful that my daily work does not leave my entire body exhausted (like those plant nursery-worker and home improvement warehouse jobs I had many years ago). But still, there are sometimes when bodies just don't cooperate with our deadlines, and eventually, we'll probably all need to find creative ways to get our work done when certain body parts are working against the deadline. I've compiled some ideas that I hope will help some of my fellow designers still get work done on physically rough days.
Working One Handed
Let's say one of your hands doesn't work: maybe you broke your arm, or had hand surgery or something along those lines. For whatever reason, one hand is non functional.
One solution: Change hands. If you're right handed, try working left handed. Move the mouse over to the other side. At first I tried just moving the mouse to the left of my keyboard. But even though I was working left handed, my left hand still knew that "left click" was supposed to be done with my index finger, and "right click" was supposed to be done with my middle finger. So I had to also change primary button as well. It was a little slow at first, but I got used to it for the most part. To change the primary mouse button, go to System Preferences > Mouse.
Use speech recognition: This doesn't necessarily have to do with working one handed. But it can come in handy if typing is really difficult and you've got long emails to put together. Did you know that the Mac has built-in speech recognition? After a little digging around in System Preferences, I found Dictation. If you've ever used Siri on the iPhone, you'll find that Dictation works exactly the same, complete with autocorrect (or auto Incorrect, depending upon how it interprets your speaking). After using Dictation, I usually have to do a little clean up work. But Dictation can take a lot of the trouble out of typing complex emails. Unfortunately dictation does not work in InDesign (I wish I knew why). But it works great when writing emails.
Can't Sit Upright
Let's say you can't sit at your desk: maybe you have headaches, or you are in a full body cast, or you have to keep your feet elevated above your head. For whatever reason you are flat on your back but you still have to get your work done. One might think that the solution would be to take your laptop and just lay down on the sofa. But if you've ever tried working like this, you'll quickly discover that it doesn't work. Especially on a 13" laptop when designing oversized newsletters. So try this for a more productive workday:
Step 1: Chaise Lounge: Position a chaise lounge on the floor in front of your desk. Because the head and feet can be raised independently, you can put both at the correct angle for whatever your body needs.
Step 2: Move the monitor close to the edge of the desk and tilt it downward.
Step 3: Get a lap desk and move your keyboard and mouse down there. In this case, a small wireless keyboard (without a 10 key) would work much better than a large wired keyboard.
Step 4: Zoom in. Now, we all know how to zoom in our favorite Adobe programs using the marquee zoom, but do you know how to zoom in on everything? When sitting upright at a desk, those Adobe panel menus are a perfectly reasonable size. But when you're several feet away from the screen, those panel menus suddenly seem ridiculously small. I used to think that the only way to increase the size of the panel menus was to decrease the resolution of my monitor, but the problem with that is that you lose way too much screen real estate once. I found a much better solution. Zooming in on the OS level! Watch the short video below for a quick demo.
This feature would also be really useful if you're screen-sharing from a small screen onto a larger screen.
Step 5: Giant Cursor: If your cursor is just too dang small and you keep losing it, go to System Preferences > Accessibility > Display. Change the cursor size from Normal To Large. The cursor will then display about ten times larger than normal. (I wanted to take a screen shot demonstrating how giant the cursor becomes, but whenever I tried, the cursor is either not included in the screenshot, or shown at its regular miniature size.) I also find Giant Cursor useful when doing training. The people watching may not be as familiar with the software as I am, so having a giant cursor makes easier for them to follow along.
I hope you find these tips useful. If you use any of these tips, I love to hear about it. Please leave a note in the comments. And if you know why Dictation doesn't work in InDesign, do tell!
You may have heard the buzz recently about InDesign’s and improved hyperlinks panel. Rufus Deuchler made a great video about it here. Hyperlinks are now simpler to make and easier to edit. But I want to point out that what’s been a bit glossed over is how the Hyperlinks panel has changed: specifically, what has been removed from the Hyperlinks panel.
For the last four years, I have attended the Print and ePublishing Conference. This conference has taken me to Seattle, Arlington, San Francisco, and Austin. The 2014 conference is in Chicago. Each year at the conference, I've presented at Ignite InDesign. The Ignite sessions are basically like on open mic night. Where, for anyone brave enough to speak in front of a few hundred strangers, they'll hand you the microphone and let you do a 5 minute presentation on your InDesign-related topic of choice. I have done this each and every four years I have attended the conference. Each year my presentations have become a bit easier and a bit better.
For the last two years, the producers of the conference (David and Anne-Marie) have allowed potential Speakers to submit their ideas for topics they'd like to speak on. The result is that there was an influx of new speakers into the conference. Last year, we got to hear presentations from a variety of innovative people who are not necessarily professional trainers, but who are working hard every day in the trenches of print and publishing. These folks have come up with interesting and unique solutions to challenging publishing problems.
Although I wasn't chosen as a speaker last year, I filled out the form again this year and crossed my fingers, hoping to be chosen. Well good news: after four years of doing Ignite presentations, I was chosen to be a speaker on the Big Stage! I'll be doing a 20 minute session on PDF commenting. I'll also have a session or two at the Meet the Speaker table.