Friday, February 1, 2013

Why You Should Consider Becoming an Adobe Certified Expert

I have heard someone say once (roughly paraphrased here) that getting an ACE certification won't do you much good unless you're planning on becoming a trainer. Because you have to be an Adobe Certified Expert before you can become an Adobe Certified Instructor.

While I do enjoy training (and occasionally do training sessions), I'm not an Adobe Certified Instructor. I don't need ACE certificates in order to keep my job, or even to do my job. However, I think that choosing to pursue and become an ACE has been the most important job decision of my career. I'd like to explain why.

Why Did I Want To Get Certified?
I didn't go to school for design. I actually kind of stumbled into this field. After graduating college with a degree in Home Ec. (for real!), I got a job managing a taco shop. I was horrible at it and often cried myself to sleep at night. Within about six months, an acquaintance of the family rescued me by offering me a job "working on the computer." That had to be better than making tacos. Anything was better than making tacos!

So, devoid of any formal design training, I entered the world of graphic and document design. I began reading every book I could find about these new graphic design programs, and I scoured the Adobe forums daily to learn whatever I could about the software I was getting paid to use.

After a few years in the industry and a job change, I was feeling like I needed to prove myself to my-then employer. Now, remember, I didn't go to school for design, but I felt fairly competent and was able to maintain a high level of production. So in an effort to prove my my skills, I decided to try and become Adobe Certified. After all, if Adobe was willing to certify that I knew what I was talking about, then maybe I could get a raise. And I really, really needed a raise.

So after two attempts, I passed the InDesign CS ACE exam. I took the test on my lunch break. When I got back to work, my elated boss greeted me with a balloon bouquet and a congratulatory card. And she managed to wrangle me a fifteen cent per hour raise. That equated to an increase in pay of $6/week (or the price one sandwich). Whoopie.


So, my new ACE certification didn't exactly give me the results I was hoping for. But now I had a nifty ACE logo to put on my resume. No one else I knew had one of those. And because of the studying I had done, I was aware of some capabilities of InDesign that I wouldn't have known otherwise. I felt rather empowered, even if I was still as low-paid as ever.

Fast forward about five years. I was working at a remarkably unrewarding job, and really wanted to prove to my boss that I had skills they could (and should) use. So I decided to get a second ACE certification. This time it was for Illustrator. I passed the test on the first try! Sadly, my employer didn't care about my ACE certificate (probably because they didn't use Illustrator). But again, I learned all kinds of new tricks in Illustrator and became more confident of my abilities.


They Say, "Pick Two"
You may have seen the popular project management triangle diagram: “You can have it good, fast, or cheap. Pick two.”


But what if there was a way to have all three? Our modern world is full of examples of people who have found a way to have all three. For example: Henry Ford with the automobile assembly line and Eli Whitney who built firearms using interchangeable parts. Their revolutionary way of thinking changed the way their products were made. In doing so, they made their products available more quickly, at a higher quality, and a lower price than was possible previously. They offered all three: fast, good, and cheap.


What I Really Got Out of Becoming Adobe Certified
Within about a year of getting my second ACE certification, I had the opportunity to take over a failing workflow and start my own business. It was because of my years of studying my favorite Adobe programs that I had the knowledge to fix the broken workflow and become self employed.

Initially, my reasoning for become an ACE was so that I could hopefully get job recognition and a pay raise. I didn't get much of either. What I ended up getting instead was a boatload of skills and a deep working knowledge of the programs' capabilities. With that knowledge came the ability to see opportunity in what others had deemed a impossible business model, and the skills to have a successful publishing workflow where others had previously failed.

Having a depth of understanding of the various programs used in a publishing workflow has allowed me to turn an old workflow on its head, and make my product (technical manuals):
  • produced faster,
  • with better quality,
  • at a lower price than they previously paid. 

Because of this, my product is now accessible to a larger number of people. I could not have seized this opportunity had I not the knowledge acquired through becoming an Adobe Certified Expert. 

One Thing Leads to Another... 
Last year, I was going to teach an Acrobat training session to the Raleigh InDesign User Group, and a good friend of mine sent out an email inviting her many, many coworkers to the event. In that email, she declared me an Acrobat ACE. Oh no! I didn't actually have Acrobat ACE certification. But I didn't want to disappoint (in case anyone actually cared). So I spent the week cramming. And after two attempts, I got my Acrobat certification.


Apparently, when you have ACE certificates in three of the big four programs (InDesign, Illustrator, Acrobat, and Photoshop) they also give you one of these:


When I started on this quest nine years ago, I wanted a little more lunch money. And I wanted my boss to take me seriously. Now, I have my own publishing business and am blessed with great clients and great colleagues around the world in the design industry. What an adventure!


What are You Waiting For?
When I earned my first Adobe Expert Certification, I prepared for the test by reading the InDesign help file cover to cover. The help file was my main resource because it was free, and I was poor. I was on a dial-up internet account, and what few online resources were available were very slow to access. I didn't have any video training courses, and I never took a class in InDesign. I tell you this not to brag, but to empower you. There are so many more resources available today than there were nine years ago! Now we have video training, blogs, eBooks, conferences, and practice tests. And the most skilled people in the industry communicate all day long on twitter, Facebook, and Google Groups. You can have information overload if you so desire. All the information you need to pass an ACE exam is out there, just waiting for you to learn it.

What if you could revolutionize a product and fill a void in your industry?
And in doing so, provide yourself with a good living, doing work that you love.
Would you go down that road?

Join me, my friends. Become an Adobe Certified Expert. You'll never know what opportunities the future may hold for you with your newfound skills. But you'll have to excuse me now. I have a Photoshop test to study for.

Edit: 11-5-13
I'm happy to announce that I recently passed my Photoshop ACE exam! Have you registered for your first ACE exam? What are you waiting for?


Edit: 12-8-14
So, I earned certifications in all of the BIG four programs (InDesign, Illustrator  Photoshop, and Acrobat), and I thought that qualified me to be an Adobe Certified Design Master. But apparently, you have to have the certifications in the same version of each of the programs. So while I was still stuck at the Design Specialist certification for CS6. So I rectified the problem and took my Illustrator CC recertification this weekend.


A little more than ten years after I started this ACE adventure, I have finally reached Design Master status. And with each and every ACE exam I take, I learn something new about the programs I love so much. Now, to maintain my certification, Adobe requires its ACEs to rectify every two years. The recertification exams are $60 each, so every two years, rectifying will cost me $240. That's $10/month. Considering my undergraduate tuition was $15,000 per year (and I graduated with no basically no job skills), I'd say that $120 year is pretty affordable for continuing education! Again, I ask: what are you waiting for? Become Adobe certified!

Autohor Edit: 1-31-15:
Adobe has recently decided to discontinue its recertification exams. Now, all Adobe Certified Experts must retake the full, proctored exam every two years. They have also raised the price of the exam to $180. So now my exams will cost me $720 every two years ($30/month), plus I'll have to take a day off of work in order to drive to drive to the testing center and take the exams. So sadly, it looks like I will not be pursuing the ACE program any further. It's been a great ride for the last 10 years!

Sunday, January 27, 2013

Put Your Book Documents on a Time-Out for Bad Behavior

Are the InDesign files in your book slow to edit? Here's a workaround for InDesign's insistence on constantly verifying the cross references acrossdocuments in a book.


This article can be found at InDesign Secrets.

Thursday, January 17, 2013

Use Place and Link to Impose Documents in a Printing Workflow

Learn how to keep your live artwork and imposed artwork in the same document and still retain the ability to make edits once and have them update in the imposition. This article can be found at InDesign Secrets.


Tuesday, December 4, 2012

The Elusive Stroke Style Units of Measurement

Why does my Stroke Styles dialog box always display strokes in inches? Find out the source of this annoyance, and how to fix it. This article can be found in its entirety at InDesign Secrets.

http://indesignsecrets.com/the-elusive-stroke-style-units-of-measurement.php


Wednesday, November 21, 2012

Not According to My Plan...Better than My Plan


For the last three years, I have been self-employed. Prior to becoming self-employed, I had nine jobs in nine years. Yes, you read that correctly. For roughly half of the jobs I had, I was laid off because the company or department I worked for ceased operation and the entire staff was laid off. So I jumped from job to job, just trying to stay afloat.

In my ideal plan, I would've gotten a good job right out of college, at a stable company with great benefits, and plenty of opportunity for growth. But that's not what happened. However, all these job changes prepared me for something much better than I could have ever planned out on my own.

During this season of Thanksgiving, I'd like to share with you some of the valuable things I learned while working for these nine different companies. Ironically, the most valuable lessons were at the companies who were in the process of going out of business. I've found that stable companies want to stay that way, and so, are pretty careful about how they spend their money.

But the companies who are on the verge of losing it all... well, that's another story entirely. Before the employees find out that the companies are shutting down, the bosses want to save face, and will agree to things that would probably never be considered in a larger, more stable company. For example:

Me: I am done with the work you assigned to me. What else should I do?
Boss: I don't have any more work for you to do. Why don't you read these software training books and just spend some time going through the tutorials?

Me: Can I introduce a new file format into the production workflow?
Boss: Why not?

Me: Can I spend thousands of (your) dollars on an untested marketing campaign? (And I had never done a marketing campaign before.)
Boss: Go for it!

Me: Can I change the software that the company uses for its main graphic production?
Boss: Sure thing.

Here are some things I've learned at my various jobs, half of which were at companies going out of business. The companies where I got laid off are colored in red.

Job #1: (went out of business, exciting, fun job!) 
  • Pagemaker
  • InDesign
  • Interactive PDFs
  • The importance of font embedding
  • Field documentation (behind the scenes tours of marine wildlife parks!)
  • Foreign travel
  • The importance of having enough billable work to make payroll
Job #2: (stable, crazy long hours)
  • RGB versus CMYK
  • Preparing files for 2-color printing
  • The trials of corrupted fonts
  • Rich black
  • How to clean up horrible black and white scans so that they print respectably
  • Keyboard shortcuts
  • Bezier curves
  • Communicating graphic file requirements to non-graphic designers
  • Quark
  • How to get along with difficult coworkers
  • Make friends with people in other departments. Show a genuine interest in what they do, and they'll treat you like gold.
Job #3: (stable, great benefits, established company, boring!)
Job #4: (close to home) 
  • Business cards, letterhead, designing lots of different types of documents
  • File imposition
  • File archiving and backup
  • Paper types: laid, linen, glossy finish, text vs. cover, etc.
  • Grain direction
  • How to avoid cracking on a print with heavy coverage
  • The importance of laser-compatible paper
  • Digital vs. offset printing: choosing the appropriate printing method
  • The importance of outsourcing printing when the job is beyond in-house capabilties
  • Working with dielines
  • Logo recreation
Job #5: (the best job to date, company went out of business right before the holidays) 
  • Sheetfed litho
  • Preflighting
  • Printing! I have found where I belong!
Job #6: (one of my favorite jobs, tons of overtime, company went out of business) 
Job #7: (company hit hard times and couldn't afford to keep me on staff) 
  • The importance of a live production status monitoring system
  • Making clipping paths in Photoshop
  • Learning to work for a boss who makes his employees cry
Job #8: (close to home, my department got shut down) 
  • FrameMaker
  • How to make cross references and tables of contents
  • The importance of using modern software and modifying document production workflow to increase efficiency
  • The direction of a company is determined by the executives, rather than hourly wage employees. No amount of effort on my part can change that.
Job #9: (same parent company as Job #8, but in a different department) 


Thanks to all my employers for giving me a job. An extra special thanks to those employers who continued to pay me for my work, even as their companies were collapsing around them.

And thanks to God for moving me from job to job, where I was able to gain new skills and capabilities at each one. It is because of all of these seemingly random job experiences that I can now be self-employed, doing work that I truly love.

Happy Thanksgiving!

Saturday, November 17, 2012

Making Slanted Strokes

Don't settle for the default right hash! Learn to make custom slanted strokes using a dashed stroke style and Skew. This article can be found at InDesign Secrets. http://indesignsecrets.com/making-slanted-strokes.php


Tuesday, October 16, 2012

Adobe Reader XI for Knitters

In my knitting bag, you'll find several mangled, folded up, scribbled-on patterns. To keep track of where I'm at in a pattern, I used to use paper sticky notes. I like the light yellow ones, because the paper is thin enough for me to be able to slightly see what is underneath it. Yet, because they are adhesive, I can easily more the sticky note after each row, keeping track of my progress.

If you are a knitter with a tablet or laptop, I'd like to introduce you to a different, perhaps easier way to keep track of your place in your pattern. With the recent release of Adobe Reader XI, knitters now have a great resource for their tool bag. This tutorial will use a charted color pattern, but this technique will just as easily work with a charted lace pattern. First, you'll need a PDF of your pattern.

Open the PDF in Adobe Reader. There are two options for opening files in Reader: Opening from your local hard drive and opening from an online account.


The first option is to open a file on your local hard drive...which is pretty self-explanatory. It's just a PDF located on your computer.

The second is opening a file from an online account, such as Acrobat.com. (Side note: The drop down for Open from Online Account is not exactly clear. I think that Open from Online Account should be outside of the drop down (like Show); it should not be the first item the the drop down. Regardless, if you are opening a file from your local hard drive, you can ignore this confusing drop down menu.)

However, storing your patterns on an online service such as Acrobat.com may be a good solution for you if you don't want to carry hardcopy patterns, have a tendency to lose papers, or need to have access to your pattern on multiple devices.

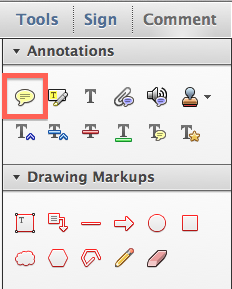
Once your pattern is open, click on the Comment pane. If you are used to used paper sticky notes, your first inclination may be use the Sticky Note tool to track your progress in your charted pattern. Let's explore why this isn't the best tool for the job.


When you first click on the page with the sticky note tool, two things happen simultaneously: 1) A sticky note icon placed on the page. 2) Near the sticky note icon is a light yellow pop-up where you can type notes. The pop-up note will by default line up on the edge of the document. So if you zoom in and out, the location of the pop-up note will not stay constant relative to your pattern. It will always align to the side of your page.


Now you can choose a different color, icon, and opacity for your sticky note. This can be useful if you need to increase or decrease contrast between your sticky note and the page's content. You can easily type notes to yourself in typing area of the sticky note.


You can also move the pop-up note separately from the actual sticky note itself. However, the size of the sticky note and icon remain relatively constant on the page, no matter if you're zoomed in to 800% or zoomed out to 50%. This means that the size of the sticky note and placement of the pop-up are completely independent of the zoom level. So you can't count on them to visually stay where you put them.

What neat about sticky notes (and all other comments for that matter) is that you can change their color and opacity. Right-click on the sticky note and choose "Properties." There are a whole host of icon and color choices.


While sticky notes are great for other uses, in order to more easily track my progress in a charted pattern, I prefer to use a different tool. I like the Rectangle tool.


To make a rectangle, click on the rectangle tool and draw a rectangle on your page. The default rectangle is has a red stroke and no fill. But we can easily change this.


Right click on the rectangle and choose Properties (or press Cmd/Ctrl + I).


Here you can change the stroke and fill colors, as well as the opacity.


You may need to experiment with your Rectangle properties in order to find what works best for your pattern. See how my yellow rectangle has low contrast against my pattern?


By changing the color and opacity, now we have a sticky note that has a higher contrast between the different colors in the pattern.


The beauty of the rectangle tool is that the size of the rectangle stays constant relative to the zoom level. So when viewing the page at 400%, the rectangle will be four times larger than when viewing the page at 100%. Basically this means that the rectangle will stay where you put it, and remain correctly sized and proportioned.

100% Zoom

400% Zoom

In previous versions on Reader, users only had access to the Sticky Note Tool, not any Drawing Markup tools. But with the release of Reader XI, users can "comment" on any PDF you want (barring any security settings that the publishers may have imposed). Better still, you can Save the PDF, and your "comments" will still be there in the exact same place the next time you open the PDF.

Edit: 9-13-918
If you regularly use PDF annotations, check out my article on Bluebeam Revu. It's an amazing program designed specifically to meet the needs of users in Architecture, Engineering, and Construction.

Thursday, October 11, 2012

Where Did My Hidden Characters Go?

Dumbfounded once again, as I discovered a way to lose my hidden characters. But then I found them! Read the entire article at InDesign Secrets. http://indesignsecrets.com/where-did-my-hidden-characters-go.php


Thursday, October 4, 2012

Saving PDFs for Reader Users: the How and Why

In a recent Raleigh InDesign User Group meeting, we discussed how to collaborate with non-InDesign Users. The most popular method is by using PDF commenting tools. While my ideal workflow might include a copy a Acrobat Professional for every user, I realize that most people only have a copy of the free Adobe Reader. However, even with this free software, the other people in your workflow can still comment on your PDFs. The trick is that you need to save your PDFs with a setting that allows Reader users to comment on the document.

Here is what a standard PDF will look like when opened in Reader X. The Comment Pane is fairly stripped down. Users can either add Sticky Notes or Highlight Text. That's it. But what if they want to replace text? Or cross out text? Or add a text box? They can't.


The trick is to save the PDF with the aforementioned special setting. However, this setting is located in two different places, depending upon which version of Acrobat you are using.

If you are in Acrobat 9, this setting is located under Advanced>Extend Features in Adobe Reader.


If you are using Acrobat X, this setting is under File > Save As > Reader Extended PDF>Enable Additional Features. This will give Reader Users access to the most features.


Once your PDF is saved with this setting, here is what it will look like in Reader. Under the Comments Pane, they now have access to all the Annotations tools (not just sticky notes and highlighters).


Further down in the Comment Pane are the Drawing Markup tools.


There 's also a whole new Pane that is now accessible to Reader users of this PDF: the Extended Pane. Here, Readers users can place a signature, add a time stamp, or use the "Add or Edit Text Box" tool (which was formerly known as the Typewriter Tool).


The upcoming Adobe Reader XI makes it even easier for Reader Users to comment on your PDFs. Stay tuned!

Make PDF Sticky Notes in your InDesign Document

Create PDF Sticky Notes, right from InDesign. Two great solutions! This article can be found at InDesign Secrets.

http://indesignsecrets.com/make-pdf-sticky-notes-in-your-indesign-document.php