One of my recent projects took me to the Outer Banks of North Carolina, where after work one day, I played in the Atlantic for the very first time. I grew up on the west coast, near San Diego, and found the Atlantic to be quite different than the Pacific. On this particular beach, missing were the throngs of people, giant parking lots, and McDonalds. Other than one or two other families, my husband and I were the only ones on the beach. It was a wonderful day, plenty hot to enjoy a nice time in the water. Since most of my days are spent in my small home office, behind a giant computer screen, I was struck by the beauty and rhythm of the waves. I decided to design an afghan based on the colors and pattern I saw there.

I am a knitter, and I love geometric patterns. Years ago, I read a book entitled “Number Knitting” which is based entirely on knitting geometric shapes in garter stitch. In case you aren’t a knitter, garter stitch is the simplest type of knitting, named because it was the pattern used on the garter of hand-knit stockings. It is wonderfully elastic, and lies perfectly flat. It goes like this:
Row 1: Knit.
Rows 2-end. Repeat row 1.

It doesn’t get any simpler. Another one of the beauties of garter stitch is that is has a magical 2:1 ratio of (rows:stitches). This perfect 2:1 ratio allows you to create geometric shapes with precision: Triangles, squares, rectangles, trapezoids... Using these shapes, you can create beautiful designs. There are a few really great books that discuss in detail about using these shapes to create designs: Woolly Thoughts (written by two mathematicians), and the aforementioned Number Knitting (which is actually a patented knitting method!). One of knitting’s most beloved authors, Elizabeth Zimmerman, was also a proponent of garter stitch, and used it’s magical proportions to create fascinating garments, often made entirely in one piece. Though Elizabeth passed some years ago, her daughter, Meg Swansen, continues the family legacy with her business, and web site: Schoolhouse Press.
So how does this relate to InDesign?
In my first feeble attempts to work through design concept I had envisioned, I tried Illustrator. But it wasn’t working for what I wanted to do. It is very difficult to get the align and distribution correct on diagonal lines. I could have gotten out a pencil and paper, a protractor, and an angle, and tried to design it freehand on paper, but I can’t draw very well and I would have to know what I wanted to draw before I attempted to draw it. I am not a draftsman or a sketch artist. What I really needed was just a simple way to make horizontal, vertical, and diagonal lines. Wait! Diagonal lines are a feature in InDesign tables! I’ve never had a need for them before, but being stuck in an airport on my way home from the east coast, (with no internet connection) this seemed like the perfect opportunity to get some creative work done. Here are the features I used to create my afghan design.
- Tables
- Diagonal Lines
- Swatches
- Cell Styles
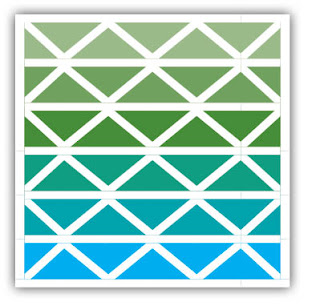
- First, make a table, equal in width and height. 6 rows by 6 columns
- Fill it with cyan.
- Add a 10 point white stroke to the exterior border of the table.
- Add 10 point white stroke to the top and bottom border of each row.
- Select a single cell, and add a 10 point right slanting diagonal stroke.
- Make a cell style based on each the right and left slanting cells. Apply those cell styles to each cell in the table, in a checkerboard pattern.
- Now choose your colors. I chose solid colors for each row, to simulate a gradient from cyan to light green. Yarn don’t come in gradients (at least not like this), so I needed to simulate one with my color choices.


So my afghan design is complete, but I started experimenting with diagonals and found that you can acheive some pretty cool effects. After applying some different stroke types to the diagonals, I learned a few things:
- I wasn’t getting the diagonals to line up perfectly, so after a bit of thinking, I realized that the proportion of the triangles wasn’t quite right. It appeared that the 10 point white row strokes were encroaching on the colored squares, so after a little bit of experimenting, I figured out that to make a perfect triangle, you need to account for the difference in width between the 10 point row stroke and the 0 point column stroke. This is because the row stroke pushes up the contents of the cell (and therefore the cell’s diagonal). I tried decreasing the width of each column by 10 points. And it worked. Now I had perfect squares and triangles.
- For fun, I tried adding changing the stroke type from Solid to Thin-Thick, but it doesn’t apply the way you would think. The thick side is always on makes the base of the left-most side of the stroke, and the thin side is makes the base of the right-most side of the stroke. So it fixed that asymmetry by changing the diagonal stroke type every other row.
- Another interesting thing I noticed is that because the first and last column have 10 point column strokes, you’ll need to add 5 points to the width of the first and column to account for the edge strokes encroaching on the column.


Here is the final afghan:


Would you like to purchase the pattern for this afghan?
And here is a video about how I made it, and then translated it back into my graphic design software. Scroll to 6:07.
Author Note: Did you like this article? Check out another article on diagonal lines in tables here.