If you are a knitter with a tablet or laptop, I'd like to introduce you to a different, perhaps easier way to keep track of your place in your pattern. With the recent release of Adobe Reader XI, knitters now have a great resource for their tool bag. This tutorial will use a charted color pattern, but this technique will just as easily work with a charted lace pattern. First, you'll need a PDF of your pattern.
Open the PDF in Adobe Reader. There are two options for opening files in Reader: Opening from your local hard drive and opening from an online account.

The first option is to open a file on your local hard drive...which is pretty self-explanatory. It's just a PDF located on your computer.
The second is opening a file from an online account, such as Acrobat.com. (Side note: The drop down for Open from Online Account is not exactly clear. I think that Open from Online Account should be outside of the drop down (like Show); it should not be the first item the the drop down. Regardless, if you are opening a file from your local hard drive, you can ignore this confusing drop down menu.)
However, storing your patterns on an online service such as Acrobat.com may be a good solution for you if you don't want to carry hardcopy patterns, have a tendency to lose papers, or need to have access to your pattern on multiple devices.
Once your pattern is open, click on the Comment pane. If you are used to used paper sticky notes, your first inclination may be use the Sticky Note tool to track your progress in your charted pattern. Let's explore why this isn't the best tool for the job.
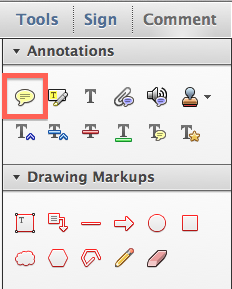
When you first click on the page with the sticky note tool, two things happen simultaneously: 1) A sticky note icon placed on the page. 2) Near the sticky note icon is a light yellow pop-up where you can type notes. The pop-up note will by default line up on the edge of the document. So if you zoom in and out, the location of the pop-up note will not stay constant relative to your pattern. It will always align to the side of your page.

Now you can choose a different color, icon, and opacity for your sticky note. This can be useful if you need to increase or decrease contrast between your sticky note and the page's content. You can easily type notes to yourself in typing area of the sticky note.

You can also move the pop-up note separately from the actual sticky note itself. However, the size of the sticky note and icon remain relatively constant on the page, no matter if you're zoomed in to 800% or zoomed out to 50%. This means that the size of the sticky note and placement of the pop-up are completely independent of the zoom level. So you can't count on them to visually stay where you put them.
What neat about sticky notes (and all other comments for that matter) is that you can change their color and opacity. Right-click on the sticky note and choose "Properties." There are a whole host of icon and color choices.

While sticky notes are great for other uses, in order to more easily track my progress in a charted pattern, I prefer to use a different tool. I like the Rectangle tool.

To make a rectangle, click on the rectangle tool and draw a rectangle on your page. The default rectangle is has a red stroke and no fill. But we can easily change this.

Right click on the rectangle and choose Properties (or press Cmd/Ctrl + I).

Here you can change the stroke and fill colors, as well as the opacity.

You may need to experiment with your Rectangle properties in order to find what works best for your pattern. See how my yellow rectangle has low contrast against my pattern?

By changing the color and opacity, now we have a sticky note that has a higher contrast between the different colors in the pattern.

The beauty of the rectangle tool is that the size of the rectangle stays constant relative to the zoom level. So when viewing the page at 400%, the rectangle will be four times larger than when viewing the page at 100%. Basically this means that the rectangle will stay where you put it, and remain correctly sized and proportioned.
 |
| 100% Zoom |
 |
| 400% Zoom |
In previous versions on Reader, users only had access to the Sticky Note Tool, not any Drawing Markup tools. But with the release of Reader XI, users can "comment" on any PDF you want (barring any security settings that the publishers may have imposed). Better still, you can Save the PDF, and your "comments" will still be there in the exact same place the next time you open the PDF.
Edit: 9-13-918
If you regularly use PDF annotations, check out my article on Bluebeam Revu. It's an amazing program designed specifically to meet the needs of users in Architecture, Engineering, and Construction.