This was the slideshow I created for my Ignite presentation at the 2013 Print and ePublishing conference. The original presentation was 5 minutes long, with the slides auto-advancing every 15 seconds. In this video, I opted to take a bit more time for each slide, so I could better explain each pattern and how it was created. I discuss TeaCup PatternMaker, InDesign tables, Illustrator graphic styles, InDesign stroke styles, type on a path, and knitting.
Tuesday, April 30, 2013
Sunday, April 28, 2013
My Ideas for How InDesign and Acrobat Can Be Improved (Kickstarter Ideas)
I am currently at the Print and ePublishing Conference (PePcon) in Austin. Attending the conference with me are InDesign trainers, developers, users from around the world. It's an amazing event and I am so fortunate to be a part. During the course of this event, I have the opportunity to meet with independent InDesign developers as well as members of the Adobe InDesign team. We have so much to talk about! I have plenty of ideas about how to make InDesign (and Acrobat) better. So for you, the InDesign developers of the world, I have prepared detailed notes. I hope find my ideas thought-provoking. But moreover, I hope that you implement my ideas into a future version of InDesign.
And for those of you who are independent developers, if you see any ideas here that you'd be interested in developing, let's chat!

InDesign
- Split columns should work at the end of a story, without having to add an extra non-splitting blank paragraph at the end.
- When creating a hyperlink, Shared Destination should not be the default.
- When changing a hyperlink type from Shared Destination to URL (using the dropdown list), Shared Destination is checked by default. Then I have to uncheck it. Every time! Plus, after changing the hyperlink type from Shared Destination to URL, the URL I had before is gone, so then I have to paste/type in the destination URL that I had previously specified.
- Often (almost always), when making a note in InDesign, after I click the "New Note" button, I can only type one letter and then the text cursor jumps out of the note and back into the regular text flow, just to the right of the note. I think it's only let me make a new note and type directly in the note once or twice. Since most of my documents are from a previous version, this happens most of the time. I found that on new CS6 documents, and documents that I had exported as IDML and then back to INDD, this does not happen. It would be nice if it always worked as expected.
Conditional Text
Sub Conditional Text (and here): Parent conditions can set be set that child conditions can all be applied, or be mutually exclusiveI am pleased to announce that Rorohiko has built this! Read my writeup about Conditional Text Groups at InDesign Secrets. You can purchase Conditional Text Groups at the Rorohiko website.- When renaming a condition, the cursor keys do not work to cursor through the characters in the name.
- Conditional Table Cells
- Apply/remove condition of text within cells by selecting a range of cells.
- An easier way to see the content within a hidden condition. Currently, you have to hover over the little condition marker. I would like to see the content of conditional text in the story editor, just as I can see the content of Notes in the story panel.
- I would like hidden conditional text to able to be included in Find functions.
Find/Change
- In the Find/Change Dialog box > Conditions: When searching for text with multiple certain conditions applied, only one of which I know, I cannot find the text unless I know exactly which conditions are applied. If I choose [Any Condition], that forces the checkboxes to act like radio buttons. I need to be able to find the text, regardless if I know all of the conditions are applied. I want to be able to search for Condition 1 + Any Condition.
In the same Find/Change dialog box, under conditions, the scroll bar doesn't scroll with the mouse scroll wheel. It just jumps all the way from the top to the bottom. It should scroll properly.This was fixed in InDesign CC!- In the Find/Change dialog box > Find Format Settings > Paragraph Style drop down menu: there should be a little twirl down triangle next to each style group, so we can easily see and close the groups.
- There should also be an option for alphabetizing the list, so it's easier to find what we're looking for. (Same thing goes for listing the paragraph styles in the TOC dialog box).
Images
- Relative links: I want to be able to specify a links folder where all the links are stored. It should function in the same way as the Document Fonts folder. InDesign should automatically look at the Links folder next to the InDEsign document, and relocate all the links. This should be something that I can turn on and off: a document-specific preference.
Colors and Gradients:
- Make the gradient panel bigger and easier to use
- Be able to add rotation to a gradient swatch, and the ability to set type to Linear, Radial, or doesn't matter
- To be able to set gradient rotation angle in gap colors and paragraph rules
- Gradients swatches with transparency (not just gradient feather)
Strokes:
- Make it so we can add custom stroke styles (more than just dashes, dots, and stripes. More like Illustrator brushes, like the Easter egg stroke styles)
- The ability to add skew within a stroke style
- Scalable end caps (like in Illustrator)
- Be able to specify end cap colors that independently of the stroke and gap colors.
- Custom end caps (by defining our own arrowheads and such)
- Specify corner radius for both objects and strokes.
Preferences
- If my text is set is set to be displayed in points (and it always is) I also want to have other spacing associated with my text be displayed in points as well (such as spacing before and after, indents, etc). Even though I like to layout my entire document in inches, I want to be able to have more options when it comes to setting the units of choice for other things.
- In: Preferences > Unit and Increments > Other Units: There should be another one listed here besides Stroke. It should be for Effects. Just because I like to work in inches doesn't mean that I want my effects to work in inches. Those should work in points (or whatever I want them to). Perhaps the Stroke unit preference could be "Stroke and Effects."
- Units in the Strokes Styles dialog box should be the same as the units of measurement as specified in Preferences > Unit and Increments > Other Units > Stroke. (Currently, the units in the stroke styles dialog box is pulled from the default unit of measurement (what you set with no documents open).
Pages:
- A “Transformation Value” type of readout for page sizes. Hover your cursor next to a selected Page panel thumbnail, and a little gray box would appear showing that page’s width and height.
Objects:
- Add the ability to have anchored objects sit BELOW the text frame in the stacking order
- To be able to have paragraph styles reference a certain object as a background
To PDF print export:
- Add the ability to include interactive elements when exporting a Print PDF (for PDF sticky notes and form objects).
- Add View and Layout options to Print PDF export
- Add the ability to fix hairlines when exporting to PDF
Table of Contents
- I would like to be able to tell InDesign which documents will be referenced in the table of contents. Let's say I have 75 documents in a book, but I know that only 20 of them have paragraph styles that will affect the table of contents. InDesign still has to open every single one of the files, even though they won't affect the TOC.
Notes
- I wish that User Names and colors would automatically determine the PDF note author and color.
- I'd like to have a drop down property in the Notes panel so that I can choose a different sticky note icon for when the document is exported to PDF. I even designed a new UI for what I think the Notes panel should look like. Check it out here.
- To be able to add notes independent of text flow, just like I can in Photoshop or Acrobat.
- To be able to specify a geometric shape as a note, just like using the pencil or rectangle tool in Acrobat (so that the shape appears as a comment in the comments pane in Acrobat.
Acrobat
Commenting
Sort comments by color (which is missing in Acrobat X and XI)(This was added in Acrobat DC)- Sort comments by fill color, not just stroke color
- Change sub-leveling sorting of sort comments by color to sort by order of appearance in the document (not by Y-coordinates) (This was fixed in Acrobat DC when the ability to sort comments by cold was added
- Add a "highlight mode" (via a multiply blending mode effect) to Acrobat shapes, so that they can be used a highlighters on a document
- Easier custom stamp management
- To be able to scale stamps non-proportionally
- Add "Mark as checked" back to the contextual menu when right clicking on a comment.
- Make it so that I can mark a comment as checked, by using a keystroke.
When viewing comments in the Comments pane in Acrobat X and XI, the mouse scroll wheel doesn't work to scroll the comments. I have to actually click on the scroll bar and drag up and down.(This was fixed in Acrobat DC)In Acrobat 9, there used to be a way to Sort Comments by checkmark, and it would arrange the comments into two two groups with twirl down menus. Now in Acrobat X and XI, the amazing Sort Comments function has been replaced with Filter Comments, which is much less intuitive and harder to use.Sort Comments has returned in Acrobat DC!- Also removed in Acrobat X and XI was the handy list of functions along the top of the comment pane. I used to be able to navigate through the comment using the Next and Previous buttons. Now I have to actually click on each and every comment in order to move through them. What a pain!
Sharing
- When sharing a file using Adobe send now, add a check box for "Choose Open file." The fields automatically populate sometimes, but I shouldn't have to navigate to a file that I already have open in order to select it as the file I want to send to someone.
Preferences
- Provide a list a keyboard shortcuts (quick key accelerators) somewhere within the program, rather than just in the online help file.
- Make the quick-key accelerators customizable.
- Bring back command + space bar for the marquee zoom tool.
- Make Comments pane one of the choices to have visible upon opening a PDF.
Add "Fix Hairlines" to the Action Wizard.(Acrobat DC added the ability to create Custom Tools, to which you can add any tools that you want and appear in the Actions list) So I can now activate Fix Hairlines with just clicks, instead of navigating through a bunch of menus)).
Monday, April 22, 2013
InDesignSecrets Podcast 192
Some months ago, I had the opportunity to co-host the InDesign Secrets podcast. I dreamed of that day for about five years!
The episode was all about Conditional Text. I shared a bit about my Conditional Text workflow. At the bottom of the show notes is the answer to the Quizzler that David and Anne-Marie discussed in episodes 190 and 191.
I forgot to post this on my blog at the time it aired, but better late than never!
Indesign Secrets Podcast 192
 |
| Quizzler |
Saturday, April 20, 2013
Use PatternMaker to Design a Geometric Color Block Pattern
In a post a couple of years ago, I explained how to design a pattern in InDesign that mimicked an afghan I have made. That method used tables and some creative cell-merging.


The original design was based on knitted garter stitch, which incidentally is my favorite type of knitting. I have details of the afghan construction here.
So, to keep it simple, I'll be using points as my measurement of choice for this pattern. That'll let me easily use the same increments as I did in my original post (8, 5, 5, 5, 8), for square that is 33 x 33.


But this evening I figured out how to create this same pattern using PatternMaker.
So, to keep it simple, I'll be using points as my measurement of choice for this pattern. That'll let me easily use the same increments as I did in my original post (8, 5, 5, 5, 8), for square that is 33 x 33.
Start with a square 165 pt x 165 pt and fill it with the "Weave" pattern. (I chose 165 because each square will be 33x33. And 33 x 5 = 165).

Change the Line Color (not to be confused with the Endline Color).

Next, change the Number of Lines to 2 and the Angle to 0.

Since the original design was based on a 33 stitches of knitting, we want to match those proportions. So change the Weave size to 33. See how the set of 5x5 squares line up perfectly inside the frame now?

Now, increase the Line Weight to 5.

My original squares were just stripes (no black borders on the sides). In the final afghan, they just appeared to have black vertical bars because the squares were joined together at right angles.

So what does this have to do with our PatternMaker pattern? It means you should remove the end lines.

Now fill the frame with black.

This is a really versatile pattern because it's easy to knit, done with modular construction (which means a series of small squares, and thus more frequent sense of accomplishment), and simple enough that I can knit it after a long day of computer work when my brain is tired. I think I'll do another version of this afghan soon, maybe in a different colorway. This afghan would lend itself well to gifts, but it also works well in college colors.
 |
| Baby Girl blanket |
 |
| Baby Boy blanket |
 |
| Americana |
 |
| Americana 2 |
 |
| Eastern Carolina University |
 |
| NC State |
 |
| Pt. Loma Nazarene |
 |
| University of North Carolina |
 |
| University of Oregon |
Thursday, April 18, 2013
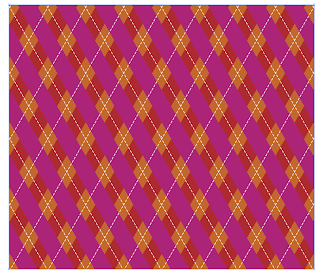
How to Make an Argyle Pattern in InDesign
This article will teach you how to make an argyle pattern using InDesign and Teacup PatternMaker plugin. Wikipedia has a great article on the history of the argyle pattern. This pattern is surprisingly simple to make, using only five objects. The magic is the a single blending mode.
First, choose a few colors you like and add them to the swatches panel. You'll probably change them later, as you experiment with blending modes. But for now, start with a few swatches in the swatches panel. They have to be in the swatches panel in order to show up in the dropdown menu of PatternMaker color choices.
I like pink and purple, because those colors are predominant in the splash screen of InDesign (which, if you don't already know, is my favorite software). Plus, I'm a woman, and we tend to like pink.

Next, draw a big frame and apply the PatternMaker "Lines" pattern.


First, choose a few colors you like and add them to the swatches panel. You'll probably change them later, as you experiment with blending modes. But for now, start with a few swatches in the swatches panel. They have to be in the swatches panel in order to show up in the dropdown menu of PatternMaker color choices.
I like pink and purple, because those colors are predominant in the splash screen of InDesign (which, if you don't already know, is my favorite software). Plus, I'm a woman, and we tend to like pink.
Next, draw a big frame and apply the PatternMaker "Lines" pattern.

Now, you may be thinking, "Why are we drawing dashed lines when what we need is a bunch of diamonds?" First thing we need to do is to turn off the dashes.

Next, make the Stroke Weight really thick, and then change both the angle and the line distance. I made my Line Distance 26 pt, Angle 60 degrees, and Stroke Weight 13 pt. The key is that the line distance needs to be double the stroke weight. That is what will give us nice perfectly symmetrical diamonds.

Now for the next color: Copy, paste in place, and change the angle to a negative number. Oh wait! You can't? Me neither.

So instead of using a negative line angle within PatternMaker, simply flip the object horizontally. Like so:

Next, add a blending mode to the top frame. I chose Darken. But you might prefer a different color mode.

Next, copy, and paste in place. Put the blending mode back to Normal. In the PatternMaker panel, change the Stroke Weight to 1 pt and the color to Paper.

Again, copy and paste in place, then flip horizontal.

Now we have a basic argyle pattern, but I think it needs a bit of color in the background. Make another rectangle and color it brown. Send it to the back.

Now, you might like the way this looks, but I think it's kind of ugly. I don't want the purple interacting with the brown background. So we need to isolate the pink and the purple lines so that those are the only two objects affected by the blend mode of the purple lines.
When you have a bunch of objects stacked on top of each other, all with the same bounding box dimensions, it's rather troublesome to select just the ones you want without moving all the others out of the way. Enter: the Layers panel.

With Layer 1 twirled open, I can see all five objects. I know that the rectangle at the bottom is the brown frame. And I want just the two objects above that. So click on one of the little squares next to the object name, then shift+click on the little square directly above it. That will select both the purple lines and the pink lines.
Next, group them and in the Effects panel, click "Isolate Blending."

That's the basic idea. You can change up your patterns by making the thin lines dashed, changing the line angle, colors and blending modes.


Happy Patterning!
Subscribe to:
Posts
(
Atom
)