Showing posts with label Printing. Show all posts

Thursday, July 5, 2018

Compare and Contrast: Page Thumbnails vs. Organize Pages Tool

With the release of Acrobat DC, a number of the longstanding functions of Acrobat were duplicated into new tools. What’s not readily apparent is that the a number of the old methods were left in place. I wrote about one of those (the Properties Bar) here. In today's article, I’ll be discussing another one of the deprecated tools: Page Thumbnails.

The Page Thumbnails are located in the left-hand pane of Acrobat DC. If your left-hand pane isn't open, simply click on the triangle in the left-hand side of the UI, and the pane will pop open. To view the various buttons, right click anywhere in the pane.

Navigation Page Buttons

Once the Page Thumbnails are open, click on the Options button to reveal various functions.

Page Thumbnails Options

Most of the functions that exist in the Page Thumbnails were duplicated in Acrobat DC's "Organize Pages" tool.

"Organize Page" Tool
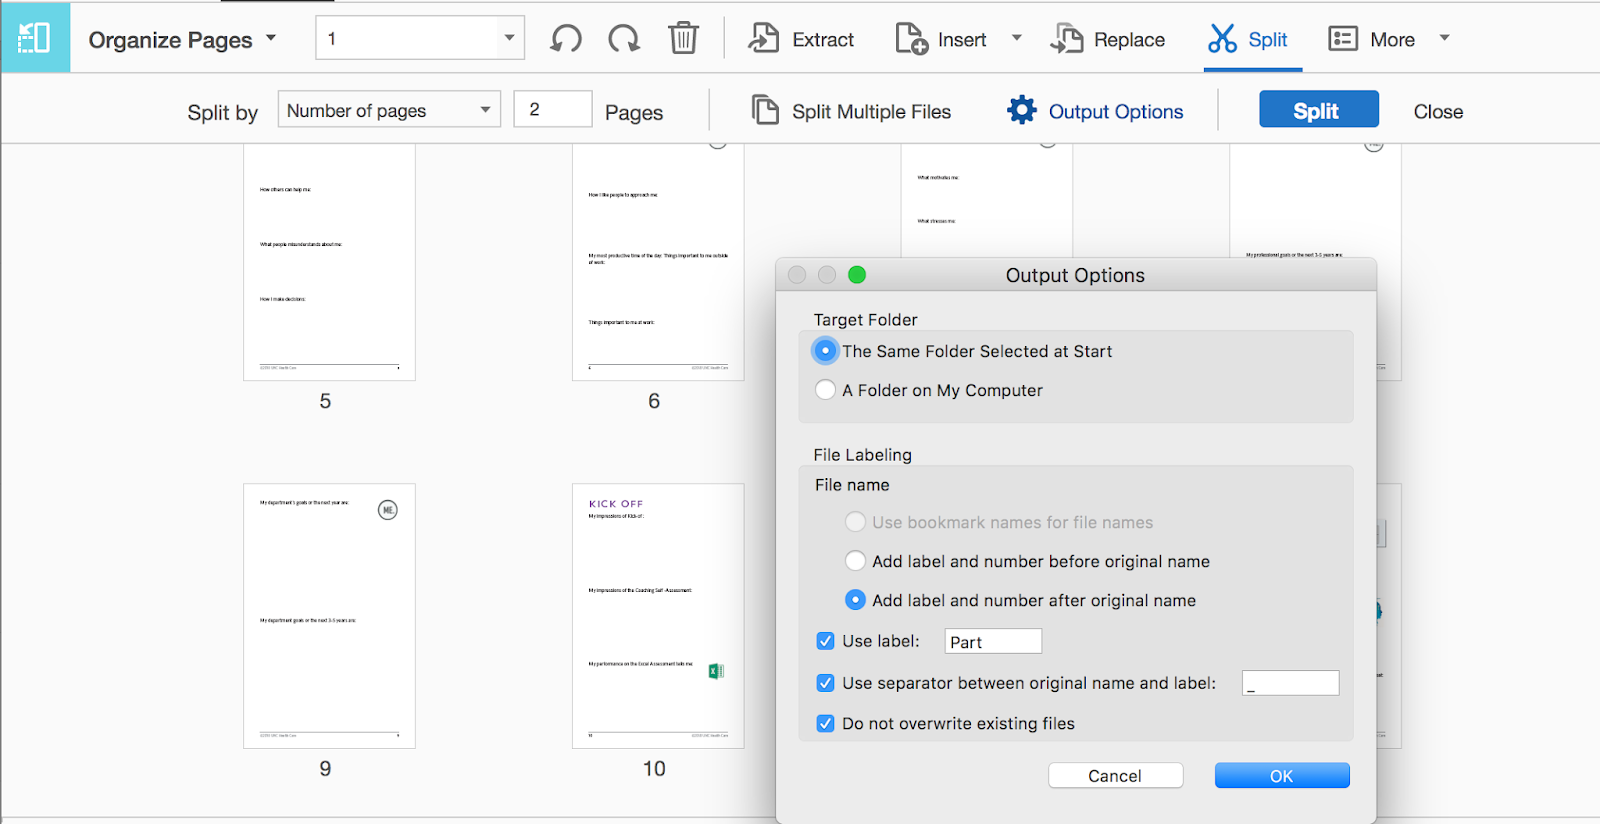
The Organize Pages tool has the options listed across the top, in a graphical format, rather than in a singular dropdown list. Some of the functions have additional options, which are listed in either dropdowns or secondary dialog boxes. 

Split Files: Output Options

Split Files: Split By options

Compare and Contrast: Page Thumbnails vs. Organize Pages Tool

Acrobat Function
Page Thumbnails
Organize Pages Tool
Drag and Drop page insertion
Delete pages
Insert pages from blank file
Non sequential page extraction
(Only through drag and drop to the desktop, not through the menus)
Split Pages
--
Bates Numbering
--
Set Page Boxes
(Labeled in the menu as “Crop Pages”
Page Labels (formerly "Page Numbering")
Page Transitions
Page Templates
--
Set Page Properties
Rotate Pages
View thumbnails while concurrently viewing full size document
--

So why do I prefer using Page Thumbnails?

Since most of the functions are duplicated in both tools, which tool I use depends upon which functions I use the most. For my work, much of what I do in Acrobat involves printing double sided documents. Page Thumbnails allow me to view thumbnails while concurrently viewing the full size document. That feature helps me to spot errors when printing. The one and only function that is missing from the Organize Pages Tool is the very reason that I prefer the Page Thumbnails tool.

Page Thumbnails

My work does not require the use of:
  • Split Pages
  • Bates Numbering
  • Page Templates
Those are the three functions that are in the Organize Pages tool but not in the Page Thumbnails tool.

Which method do you prefer when viewing thumbnails?

Edit: 9-14-18
I learned to day that the Organize Pages tool has another unique capability that does not exist in the Page Thumbnails tooL; You can drag in images and drop them into the Organize Pages pane and it will automatically convert the images to pages, and add them into the PDF. It do so in one batch, alphabetically.

Friday, December 18, 2015

How to Print a PDF with Comments

In my technical publishing workflow, I have done my very best to convince my clients of the beauty and efficiency of PDF commenting. And for those people who are my direct contacts, it works! They read my instructions, perhaps watch a quick tutorial video, and they are faithfully using the commenting tools to mark up the documents I send them. But then comes the inevitable question: "How do I print out the document along with the comments?" While my client and I can see the comments just fine right within Acrobat, the backstory is that someone at his or her office (the boss) wants the hard copy of the document, complete with comments. Sigh...

This article details two different ways to print a document with comments (what's in the pop-up notes) and why one of those ways is so far superior to the other.


Read the entire article at Adobe's Acrobat User blog.

Thursday, December 17, 2015

The Ins and Outs of Summarizing Comments


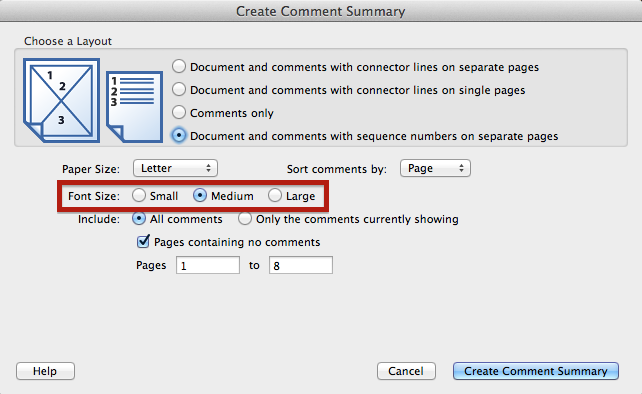
In my technical publishing workflow, I have done my very best to convince my clients of the beauty and efficiency of PDF commenting. And for those people who are my direct contacts, it works! They read my instructions, perhaps watch a quick tutorial video, and they are faithfully using the commenting tools to mark up the documents I send them. But then, comes the inevitable question: “How do I print out the document along with the comments?” While my client and I can see the comments just fine right within Acrobat, the backstory is that someone at his office (the boss) wants the hardcopy of the document, complete with comments.

Read the entire article at the Adobe Document Cloud Blog.

Monday, May 4, 2015

How to Check Tint Shades the Using Separations Preview Panel

I recently designed a large table (900+ cells) for a client. I used cell styles, paragraph styles, and character styles. We went through several iterations as the client decided how she wanted various tints to appear in the design. At the very end of the project, the client asked me to double check the tint shade of the gray cells.

Read the entire article at InDesign Secrets: http://indesignsecrets.com/check-tint-shades-separations-preview-panel.php


Thursday, April 24, 2014

An Easier Way to Do an 11x17 Foldout Page

Lately, I've been working on training manuals. The manuals are printed on standard 8.x5 x 11" paper, 3-hole drilled, and placed into a binder. But sometimes, there is an 11x17 foldout page. While InDesign allows for mixed page sizes in a single document, it gets complicated (easily messed up) when the content of all the pages flows together in one story. I've come up with a fairly fool proof solution to this problem. It involves creates the entire document as 8.5 x 11 and using Acrobat to attach the 11x17 file.

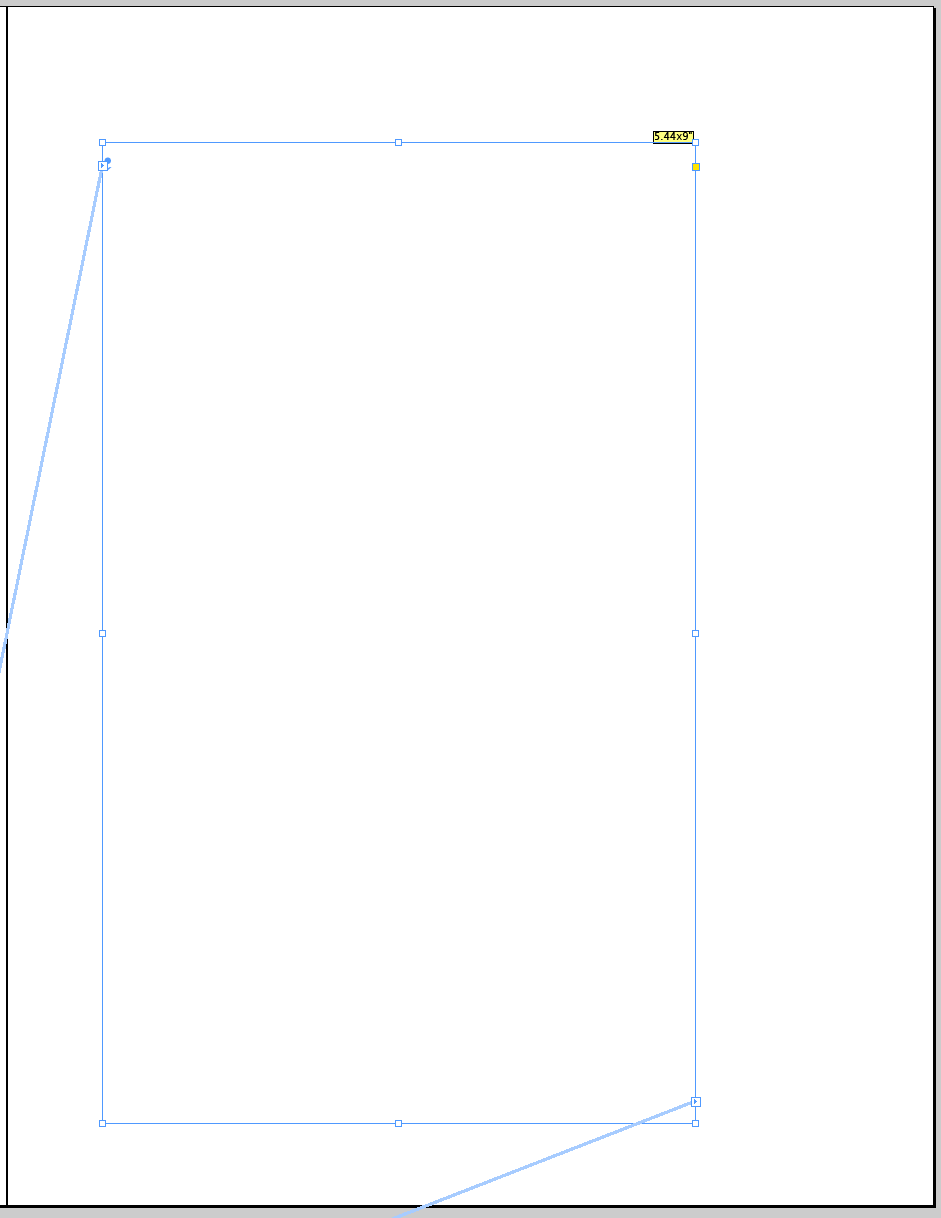
1. Make a empty page in your InDesign document. It should be part of the threaded story.


Empty Page with a threaded frame


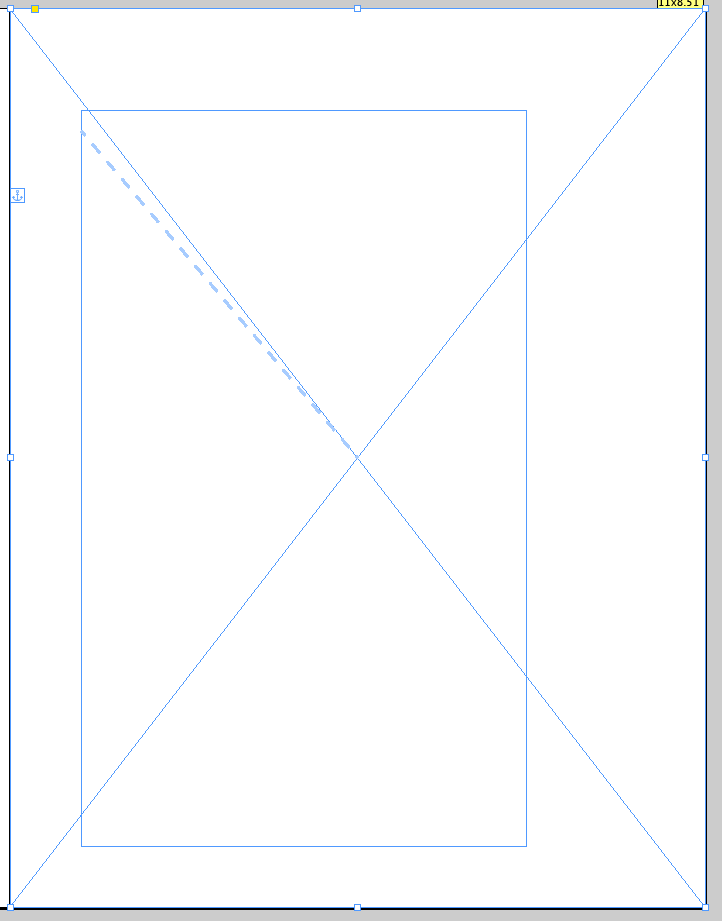
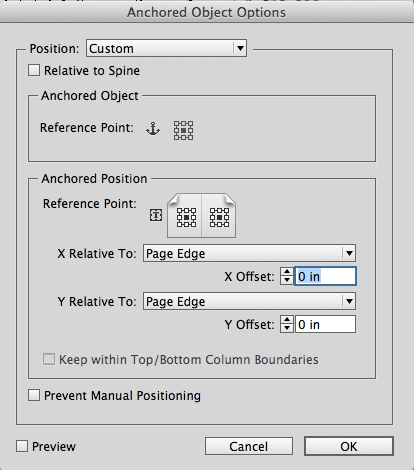
2. Create an 8.5 x 11 graphic frame and make it anchored into this empty frame. Set the Anchored Object settings according to the graphic below.


Graphic Frame Anchored into the Text Frame
Anchored Object Settings for a full page centered graphic

3. Place the 11x17 foldout page as a graphic into the graphic frame you just made.


4. Add a big yellow text frame indicating what this page is for.

Be sure to anchor this text frame into the same place as you anchored the graphic frame. You may need to scoot the graphic frame out of the way for a moment in order to anchor the yellow frame.


5. I also like to add an InDesign Note indicating what is supposed to happen with this page.

I use a plugin called PDF Stickies. It converts my InDesign Notes into PDF sticky notes. I wrote an article about how to use that plugin here. The important thing to do here is to type in the filename of the 11x17 foldout graphic that needs to go here in the final printed piece.


6. Add a blank page after the one you've just made.

Then, using the story editor, copy and paste the contents from the right facing page to the left facing blank page you just added.


7. Change the text to indicate that this is the backside of the 11x17 page. 

This serves to keep your page numbering correct upon final output.


8. Export the PDF.

Note: in order to get the PDF Stickies plugin to export the stickies to a Print PDF, you need to add the InDesign document to a book and then export from there.

9. Open the file in Acrobat and go to the Comments pane. Also open up the Annotations twirl down.


10. In the Comments List, you'll find the name of the 11x17 graphic that the printer will be printing full size and inserting here. Copy that filename.


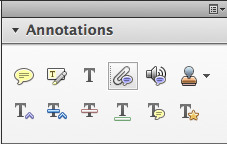
11. In the Annotations twirl down, click on the little paperclip icon.


Attach File

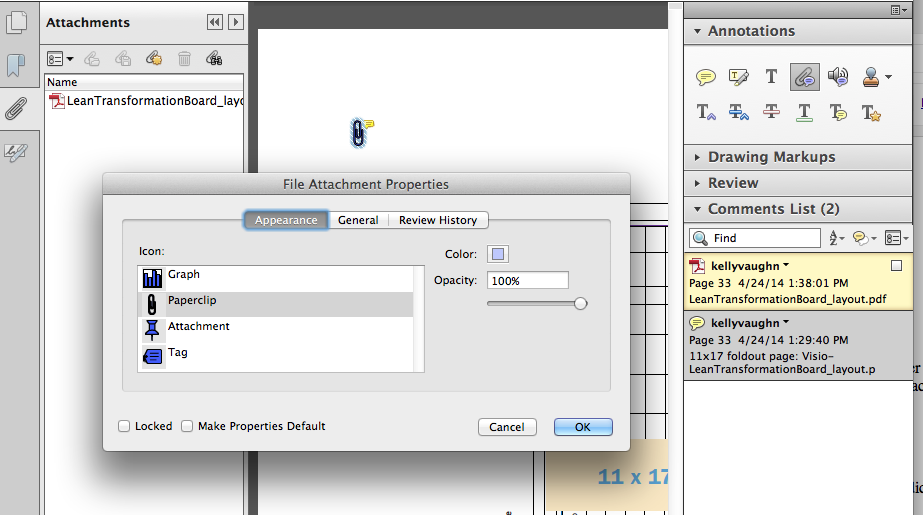
12. When Acrobat asks you what file to attach, paste the filename you just copied into the search field.


See how it attached the file and made a comment all in one fell swoop?

Attachment Comment in Acrobat

13.  Now you can delete the yellow sticky note comment in the Comments List.


12. Be sure to tell your printer about the 11x17 foldout page and let him know that the page location is referenced in the Comments List, and the 11x17 file to print is in the attachments pane.

Saturday, March 2, 2013

Using InDesign Snippets in a Printing Workflow

If you're a designer about to submit a brand new layout file to your prepress department during the proofing round, I have one word for you... STOP.

This article can be found at InDesign Secrets: http://indesignsecrets.com/using-indesign-snippets-in-a-printing-workflow.php

Thursday, January 17, 2013

Use Place and Link to Impose Documents in a Printing Workflow

Learn how to keep your live artwork and imposed artwork in the same document and still retain the ability to make edits once and have them update in the imposition. This article can be found at InDesign Secrets.


Sunday, July 10, 2011

How to Make Your Own Custom Business Cards for About $10

As a freelance designer, you need business cards, right? But what if you're on an extremely tight budget or need your cards within a day or two (as opposed to a week or more)? Let's explore a few options for the budget/time-conscious. First I'll discuss how I chose my final business design and printing method, which meets my budget requirements and still has a cool factor that makes other designers closely examine them with curiosity.

My current business cards are printed on snappy, sparkly, iridescent pink paper. They're girl-ish, but subtle. For a long time I didn't hand them out because I though people might think the paper was weird because it's a little thinner than normal cardstock. But recently, I handed a couple of them out and gotten very positive responses from both men and women alike. One person even asked me, "Did you have these done in San Diego?" To be truthful, I made them. In my home office. And they were free.

So, how does one go about making your own free/cheap business cards? Well, let's find out! But first, let's discuss a few different printing options that I explored before settling on the final paper choice and printing method.

Letterpress Printing
Since I first discovered letterpress printing, I've wanted to purchase my own letterpress business cards. However, seeing as I work from home, and hand out approximately 10 (ten) business cards per year, it seems a bit excessive to spend several hundred dollars on fancy letterpress business cards.

Online Business Card Websites
Online printers, such as VistaPrint.com, PrintingForLess.com, and Moo.com offer very affordable pricing because they will gang up your business cards with dozens of other orders, and print them all on the same paper stock, at the same time. While you will get 4-color offset printing, your paper choice is somewhat limited. These large-online print shops often offer gloss UV coating or a lamination. Adding a glossy UV-cured coating means that the business cards are dry immediately. That in turn means that the print shop can speed up production and pump out even more business cards, even faster (making them more affordable).

Some of the online printers, such as Moo.com, even let you choose different background images for each and every one of your business cards. Many of these online printers will even offer "free" business cards. All you have to pay for is shipping and handling. However, "free" typically means that their company logo or URL is somewhere on the card. If that's not a big deal to you, then these "Free" cards may be a good way to go.

Local Print Shop
Offset Printing
Local print shops will print offset and digital, which means you can get your custom Pantone colors and use whatever paper you like. However, since your job is custom, they'll have to print your job all by itself, and not gang-up any other projects with it. In turn, that means that your job has to be profitable for them all by itself. It's not uncommon for print shops to have a 1000 card minimum order for offset printing. 1000 business cards would last me approximately 200 years.

Digital Printing
Digital printing is often mistakenly referred to as "color copying" (which is not technically correct). There's no copying taking place. Each page is printed from the original digital file. With digital printing, there is no make-ready for the press. There are many other differences as well, but the most important one for the sake of this project is that you can print as few as one page and as many pages as you want. Digital printing offers the quantity that I'm looking for.

Local print shops (especially smaller copy shops) typically have a rack of paper stock in the back of the shop. They'll have a selection of something like Classic Crest Linen and Laid paper. The paper is already cut down to 8.5x11 and they use it to run business cards and stationary packages. This paper, though it is more interesting than the standard 80# white cardstock, is still pretty everyday-ish and doesn't really offer the wow factor that I'm looking for.

And while local print shops do have a decent selection of stationary paper, if you want something that they don't have in stock, they'll have to order it for you. Local print shops buy paper by the ream, and often in whole cartons. So if you want fancy paper from a print shop, you're going to have to buy a lot of it.

So we need to find a place that sells beautiful, unusual paper by the sheet.

Paper By The Sheet
I wondered for several years how to find cool paper by the sheet. There are a couple of places that I know of.

Retail Paper Supply Store
The first is a paper supply store, like Xpedx (think "Dunder Mifflin" in a retail storefront). Paper vendors are the suppliers from which printers purchase their paper. If you can ever manage to take a trip down to one of the paper vendor retail storefronts, I highly recommend it. I was in the printing industry for about 8 years before I finally went to one. I wish I had visited there back when I was first starting out! It was awesome. They'll likely have the same types of paper that you'll find at a local printer, only a lot more of it. They might have 100 different types of invitation envelopes alone. Plus they'll have all the matching paper in cardstock and text weight...and you can buy all of it by the sheet, or by the box. They also have lots of other cool stuff like rulers, artist's tape, and raffle tickets. If you're a paper junkie, you'll have tons of fun there.

But as much paper as they have, they tend to only keep in stock the common papers (the type of paper that small print shops would use for stationary packages and general office use). So how do you go about finding really cool paper by the sheet?

Scrapbook Store
One evening, I was out walking my dogs in our small town, and I saw a new business that had just opened: it was a scrapbook store.

In case you've never been to a scrapbook store (men, this is for you), they sell all kinds of interesting stuff. Besides really cool paper and cardstock, they sell envelopes, scoring and folding tools, stickers, ribbons, tiny little rivets, embossing dies, stamps, different kinds of glue, shiny stuff, sparkly stuff, textured stuff... Visiting the scrapbook store is like sensory overload, but in a good way. Great scrapbookers are great designers. Only instead of software programs, they use stamps and glue and heat guns. Did you know that scrapbooking stores sell equipment and supplies that will let you make your own 1-off raised thermography designs? Neato!

So, if you've never been to a scrapbooking store, I encourage you to take a field trip to one. And hey, while you're there, pick up a few sheets of cool paper and follow along as we create the 8-up business  file in InDesign.

Okay, just kidding, I've already prepped the 8-up file. All you need to do is take your design and place it into the file I've made. But first you need to choose your template.


Using the Business Card Template
I keep several business card templates, for various designs and paper sizes.
  • 8-up, on 8.5 x 11", for business cards with bleed.
  • 10-up, on 8.5 x 11", for business cards without bleed.
  • 15-up, on 12 x 12", with bleed
  • 15-up on 12x12", without bleed
8-up, on 8.5x11", with bleed

10-up, on 8.5x11", without bleed

15-up, on 12x12", without bleed

15-up, on 12x12", with bleed

For you, my beloved readers, I have decided to make my templates available for download. Both the 8.5x11" templates are in one file, and the 12x12" templates are in a second file. I have CS3, CS4, and CS5 files, but for those you you who still have CS2, I've also provided a CS2 inx file. (And for those of you who haven't upgraded, did you know that by joining an InDesign User Group (which is free to join), you qualify for Adobe software discounts?)

Working With A Local Printer
If you've already got a good relationship with a local printer, you've already accomplished the most difficult aspect of this project. If you don't already have a relationship with a local printer, try to develop one. Different printers have different specialties, and you should choose your printer according to the size and specs of your print job.

Some printers specialize in high-quantity, offset press work. Others are geared more towards small business owners and digital printing. These smaller print shops are the type you'd find in a retail storefront. This business card project would be better suited for one of the independent print shops located in a retail storefront.

Hopefully, your local printer will already be familiar with using odd sized paper. Bring in a few extra sheets in case they have any problems with the paper. They shouldn't, since paper from scrapbooking stores is generally laser-compatible. But since this is a special, short-run job, go out your way to make the project easy for your printer. Bring extra sheets. Give them a few extra days. And I've found that bringing them high quality chocolate or homemade cookies never hurts, either.

Many small printers will charge a "digital download fee" for opening your file. This fee can range from $2 - 20. Generally, it's around $10. In my experience, if they charge this fee, they'll charge it whether you send them press-ready PDF, or natives file that will require them to unzip, install fonts, preflight and relink. So it may be a good idea to ask them if they charge a digital download fee.

Impose your 1-up design
I'm intentionally brief on this, because I'm assuming that you have already designed your business card, and you already know how to place images into InDesign. If not, check here. Then come back.

Trim your cards
For the business cards without bleed, I place the cards all next to each other in the template, to make for fewer cuts. Cutting isn't a big deal when you have a hydraulic chop-cutter, but when cutting at home using an X-acto knife, the fewer the cuts, the better.

But first, put in a new X-acto blade in your knife. You've got fancy paper and a beautiful design, so don't ruin it by using a dull blade.

Celebrate Being Frugal!
So you've bought paper, imposed your design, found a printer, got your cards printed, and trimmed them. And it's probably cost you about $10. So how did I get mine for free? Well, I was making some custom notecards for someone,  using the aforementioned sparkly paper, and there was extra room at the bottom of each sheet. So I filled it with my business cards.

Granted, this whole process did take a few hours of time, but when you're short on money and have a little time to spare, there is still a way to have really cool attention-grabbing business cards.

Author edit: 8-8-13: Check out another business card article I wrote over at InDesign Secrets: "Use Place and Link to Impose Documents in a Printing Workflow." That article shows you how to set up a business card template with crop marks, and then use Place and Link so that you can keep your 1-up design and your 10-up imposed layout in the same document and the cards will magically impose and auto-update.

Monday, March 7, 2011

PMS to CMYK Press Sheet

Years ago, while working at a sheetfed litho shop, I was bored one day and looking for something to fill my time. The prepress supervisor asked me to make a press sheet with all the PMS color chips, plus all of their corresponding CMYK values right underneath the color chips. He seemed puzzled at how excited I was to take on the task. Preparing this file was fun! We used that press sheet for a couple of years (until, sadly, the printing company went out of business). This color chart was particularly helpful in helping us color-match on our large format solvent roll printer and UV flatbed printer.

I saved the file and stumbled across it recently. Click here for a downloadable PDF. It is a 38" x 25" press sheet, complete with gripper. Enjoy!

Wednesday, January 26, 2011

Variable Data Meets Large Format Printing

A little history...

This project came about as an attempt to market a newly formed large format printing company. A month or so after I got hired, the company announced that they were going to expand by starting a large format division. We were to get 10 foot wide solvent printer, a 5 foot x 10 foot UV flatbed printer, a digital die cutter (camera guided computer driven table router), and a really big laminator. I was tasked with developing a workflow and a marketing campaign for the new division of our company. So armed with about 3 pages of instructions and $350,000 in equipment, I was off on a new adventure.

Prior to purchasing the large format equipment, this printing company did strictly sheetfed work (shockingly, we did not even own a color laser printer). So there was a considerable amount of education to do with regard to large format printing.

The challenge:

Educating traditional print buyers (designers and print brokers) about large format substrates and capabilities

My personal objectives:

  1. To design a mail piece so cool that people not only would not throw it in the trash, but would pin up on their cubicle wall and show it off to their friends.
  2. To push to the limit the complexity of what my team and equipment was capable of producing.

The project:

Customized MarketMail pieces (non-rectangular) on Sintra board, with variable data graphics, text... and engraving.

Each postcard that we would product would be completely unique. I had seen custom printed postcards before (utilizing different pictures and text). I had also seen CMM postcards before, batch produced by the thousand. But our postcards were going not only combine an unusual shape and custom printing, they were going to have the recipient's name engraved on the front.

The USPS website has a fairly decent writeup about CMM. Basically, it's unusual shaped postcards. They can be weird shapes, have holes die cut through them, they can be even have stuff hanging from them. I heard about a business that sent out flip-flops as CMM mail pieces. Pretty cool!

I chose to use 3M Sintra board for our postcard. Sintra board is an extruded PVC material. It is waterproof, stiff, has perfectly squared edges, and comes in big sheets and various thicknesses. It's great for engraving, and the UV ink doesn't flake off of it like some other substrates.

Here are the step-by-step instructions for creating your own engraved diecut mailers. These instructions are intentionally brief. I am assuming that if you attempt this, you'll already know how to set up templates, do data merge, use InDesign and PDF layers, clean up files in Illustrator, etc. This is more of an overview of a process rather than a tutorial on specific software features.

Note: In many large format workflows, they actually set it up so that the software does the work of imposition, creating cut files, and so forth. You can send a single PDF to the RIP, and the RIP will separate out the Cut file and the Print file. In an ideal world, our workflow would have been set up that way. But for reasons beyond my control, our RIP software didn't communicate with our cutting software. So we did everything manually.

Step 1: Create a 1-up postcard template in InDesign

Front:
  • Graphic placeholder (Orange Oval)
  • First name placeholder (Data Merge placeholder for engraving) Note: I chose Arial Rounded for the font, and just gave it stroke, no fill.
  • Cut Path (magenta line)
  • Drill holes (green circles)

Back:
  • Graphic placeholder
  • Address info
  • Salesperson contact info

Step 2: Arrange objects on layers in InDesign

  • Print layer: everything that is going to be printed
  • Cut layer: everything that is going to be cut or engraved (Cut path, drill holes)
  • Engrave layer: name for engraving


Step 3: Data Merge

  • Choose your data source and merge your data.
  • Now, depending upon your version of InDesign, save the merged file for placing into the imposition, OR
  • Export a PDF for imposition (including Acrobat layers).

Step 4: Prepare an imposition file, page 1

  • Prepare a template.
  • Make four layers: Print, Cut, Engrave and Registration Marks.
  • Put placeholder frames on the Print layer.
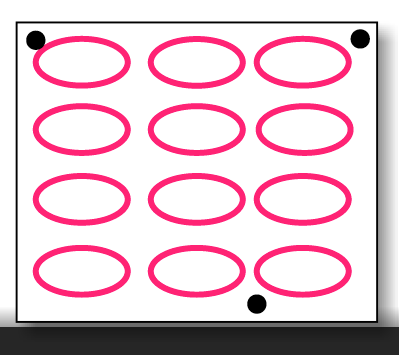
  • Add registration marks in a triangular position. (The registration marks are what the camera guided table router uses to know where to cut. They work so well you can even put your board on the table crooked and the router will still cut correctly because it uses the registration marks as reference points. These registration marks have nothing to whatsoever with litho registration marks that a pressman uses to align various plate colors. They are similar in the sense that they help with alignment, but that's about where the similarity ends.)


Step 5: Prepare an imposition file, page 2

  • Duplicate the placeholder frames onto a second page.
  • Add registration marks on the first page.

Step 6: Prepare an imposition file, part 2

  • Duplicate placeholder frames from Print layer onto the Cut and Engrave layers.

Step 7: Impose 1-up, only Print layer

  • Front: left to right, top to bottom
  • Back: Right to left, top to bottom


Step 8: Prepare Cut Paths in Imposition

  • Place a page (any page) of the 1-up file into the placeholder frames on the Cut Path layer.
  • Be sure to Show Options: show ONLY the Cut layer.


Step 9: Prepare Engrave Paths

  • Do a multi-page import of the 1-up front file
  • Be sure to show options: show ONLY the Engrave layer.


Step 10: Export Print File

  • Hide the Cut and Engrave layers.
  • Showing only the Print and Registration Marks layers, export a PDF.
  • Depending on your RIP, you may want to rasterize and save as a TIFF.
Note: I know traditional litho prepress folks may gasp in horror over this statement, but large format RIPs typically use this as a workflow. As much as I liked the idea of sending to the RIP unflattened PDFs with native transparency, it just didn't work well. Since TIFFs are the preferred file format and the industry standard for large format RIPs, I figured I was not going to change an entire industry. So we used TIFFs.

Step 11: Export Cut/Engrave File

  • Hide the Print layer.
  • Showing only the Cut, Engrave, and Registration Marks layers, export a PDF.


Step 12: Clean up the Cut File in Illustrator

  • Using, Illustrator, open your the PDF cut file you just made.
  • Delete all empty paths (view in outline mode first)
  • Outline type (I used Arial Rounded)
  • Create separate layers for each type of object: Cut, Engrave, and Registration Marks.
  • Offset the stroke by 1/2 the diameter of the router bit you'll be using. (I like to use an Effect for this, then expand the object. That way, there are no extraneous paths to delete.)

Step 13: Go to Production!

  1. Print board - Side 1
  2. If using a non-square substrate (like cardboard, polystyrene, coroplast, etc.) square up the board on the flatbed cutter.
  3. Print board Side 2
  4. Engrave names
  5. Drill holes
  6. Cut out postcards

Tips:

  • Have plenty of time on your hands.
  • Don't have a project budget.
  • Work directly with equipment operators: the guys who run the flatbed printer and table router).

The Finished Product

This was the actual postcard that I mailed to myself when I mailed the postcards to our customers. On the back of the postcard in the top left, you can actually see the tire marks from where it got run over by the mail truck.

Postcard Front
Postcard Back

On a slightly different note, I originally prepared this as a Ignite InDesign slideshow for the 2010 InDesign Secrets Print and ePublishing Conference. I feel I should give a disclaimer that this slideshow was done before I owned a laptop, and I had to prepare the slides on the hotel lobby computer the night before, using Acrobat.com. So in case you think the most of the graphics in this tutorial look a little clunky, you're right, they do.

And in case you're not familiar with Ignite! presentations, that's where you prepare a 20-slide slideshow about your topic of choice, and you have 5 minutes to present, while the slides auto-advance every 15 seconds behind you on the screen. And in my case, my audience included pretty much all the super heros of the publishing world (who also happen to be well-practiced public speakers), and I (not exactly a well-practiced public speaker) was doing my very best not to hyperventilate. Exhilarating? Yes, indeed. Terrifying? OMG! But hey, when I was done, they gave me a neat little magnet to hang on my fridge. It was totally worth it. I'm doing it again a this year's conference!