Friday, December 18, 2015

How to Print a PDF with Comments

In my technical publishing workflow, I have done my very best to convince my clients of the beauty and efficiency of PDF commenting. And for those people who are my direct contacts, it works! They read my instructions, perhaps watch a quick tutorial video, and they are faithfully using the commenting tools to mark up the documents I send them. But then comes the inevitable question: "How do I print out the document along with the comments?" While my client and I can see the comments just fine right within Acrobat, the backstory is that someone at his or her office (the boss) wants the hard copy of the document, complete with comments. Sigh...

This article details two different ways to print a document with comments (what's in the pop-up notes) and why one of those ways is so far superior to the other.


Read the entire article at Adobe's Acrobat User blog.

Thursday, December 17, 2015

The Ins and Outs of Summarizing Comments


In my technical publishing workflow, I have done my very best to convince my clients of the beauty and efficiency of PDF commenting. And for those people who are my direct contacts, it works! They read my instructions, perhaps watch a quick tutorial video, and they are faithfully using the commenting tools to mark up the documents I send them. But then, comes the inevitable question: “How do I print out the document along with the comments?” While my client and I can see the comments just fine right within Acrobat, the backstory is that someone at his office (the boss) wants the hardcopy of the document, complete with comments.

Read the entire article at the Adobe Document Cloud Blog.

Thursday, December 3, 2015

How to Create a Checkerboard Paragraph Rule


In a recent InDesign Secrets article, Keith Gilbert explored How to Add a Rule Around a Paragraph. It is a very cool trick that overlaps gradients stop to create gradients that aren't really gradients at all, but rather, bands of colors that transition sharply from one color to the next. One of our readers then commented  "I wonder if anyone has worked out a way to combine this with underline to create a hacked shaded box." And today I will explain how to do just that. This technique uses both InDesign and Illustrator.

Read the entire article at InDesign Secrets.

Thursday, September 24, 2015

Sort Comments by Color... In Acrobat DC! (Sort of...)

Just kidding!

My most beloved feature in Acrobat is Sort Comments by Color. Sadly, Adobe did not include this feature beyond Acrobat 9. So to this day, I still use Acrobat 9, every single day. This is the primary reason Why I Run Four Different Versions of Acrobat.

Though Adobe official stopped supporting Acrobat 9 a couple of years ago, and eventually I'll no longer be able to install it on my computers, I am perpetually on the hunt for a way to sort comments by color in Acrobat X and beyond. I think I may have found a way. It's not nearly as good as the original, built-in, thoughtfully designed way of sorting comments by color, but for those Acrobat users who no longer have Acrobat 9, yet still need to sort comments by color, this may well work for them.

To use this trick, you need to be willing to sacrifice your name as the default Author name in your comments. So let's see how it works!

Step 1: Highlight some text. Right click on it and choose "Properties." Then click on the General tab. Notice the author name. Acrobat pre-populated that for me based a checkbox located in Preferences > Commenting.


Step 2: Go to Preferences > Commenting. In order to sort comments by color in Acrobat X and beyond, we're going to Uncheck the box: "Always Use Log-in Name for Author Name." Now click OK.


Step 3: Go back you your highlight and right click > Properties > General tab. Change the author name to Yellow (or whatever color you highlight happens to be). Also check the box, "Make Properties Default."

Step 4: Highlight some more text and notice the Author name. See how the second highlight has the exact same properties as the fist highlight?


Step 5: Highlight a third bit of text. Press Cmd/Ctrl+E to bring up the Properties Bar. (In case you're to familiar with the properties bar, you are in for a treat. It's a contextual bar that lets you change the color, icon, and opacity of comments. It also lets you change font of properties of pop-up notes. I wrote an entire article about the Properties Bar here.)

Using the Properties Bar, change the color of the highlight.

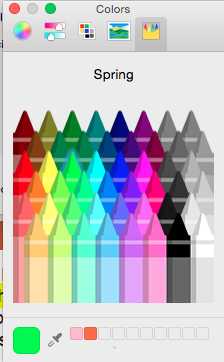
Color Swatch layout in the Properties Toolbar

While you can change the highlight color in the Properties dialog box, I really prefer the arrangement of the colors in the drop down on the properties bar. It's the same color swatch arrangement as it was in previous versions of Acrobat.

It used to be, that when you click on the colored box in the Appearance tab, the same color swatch layout (see above) was used in the the Properties Bar and the Comment Properties dialog box. But alas, no longer. Now here in the Appearance properties, when you click on the colored swatch, you have your choice of five additional dialog boxes, all with different ways of choosing a color. Seriously? I'm not designing a 4 color brochure, or trying to match a Pantone shade. I need a highlighter color.  That's it. The old way was better.


It seems that Adobe decided to forgo Acrobat's perfectly functional color swatch choices and instead use Apple's built-in color choices...which was the wrong move. For me, these additional five dialog boxes are more trouble than they're worth. The color swatch arrangement in the Properties Bar offers the perfect blend of color choices, with the minimum amount of effort required on my part. 

But I digress...

Step 6: Now that you've got your color chosen, change the author name from Yellow to Green. Then choose "Make Properties Default." Now add a few more green highlights.


Step 7: Repeat Step 6, but do it for Blue.


Step 8: Now go to the Comments pane and take a look.


The default sorting is by Page, but you can also sort by Author... which is why we renamed the Author name from login name to color. 
Sort Comments By... Acrobat DC

Now, note that in Acrobat 9, there was an additional sorting option: Sort Comments by Color. But that doesn't exist in Acrobat X, XI, DC... which is the entire purpose of this article. To offer a workaround to this missing feature.

Sort Comments By... Acrobat 9
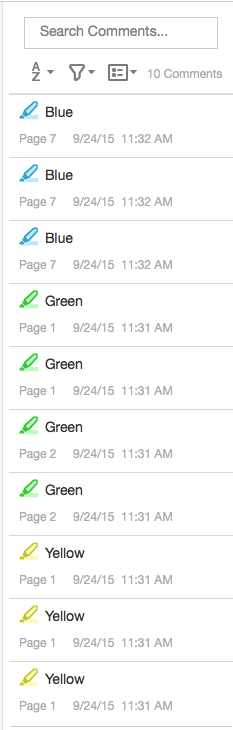
But let's go back to Acrobat DC and choose Sort Comments by Author (which in this case is color). Now they are all grouped together by color!


Now something else that Acrobat 9 had that is completely missing inlayer versions is the collapsable twirldown. So if I have 100 comments in my document, I have to keep scrolling, and scrolling, and scrolling... But not so in Acrobat 9.

Collapsable Comments in Acrobat 9
Okay, I digress again. Back to Acrobat DC! Let's say that you want to try and emulate the handy twirl downs of Acrobat 9, just so you don't have the scroll forever. You can choose to SHOW (filter) just the comments by a particular reviewer.

Filter Comments by Reviewer

Only the Yellow Comments Showing
Only the Green Comments Showing 
Only the Blue Comments Showing
So, while this isn't exactly the same as Acrobat 9 Sort Comments by Color, for those of you (like me) who rely upon that feature every day, not having it in the recent versions of Acrobat has proved very frustrating. And though you will have to cannibalize your author name in order to get this trick to work, I do hope that it will make some of your lives easier.

Tuesday, August 25, 2015

Repurposing Acrobat's Built-in Stamps

Did you know that Acrobat has a variety of built-in stamps? There are several stamp libraries, to serve basic office needs:

Standard Business Stamps
Sign Here Stamps
Dynamic Stamps
But recently, I needed a sign-here stamp with the arrow pointing to the right (instead of to the left). I wanted to use the same design as the original Sign Here stamp, so how to access the vector file?

I did a little digging and found where the stamps are hiding. These file paths are for the English language stamps, but the stamps for the other languages are located nearby.

Applications > Adobe Acrobat XI Pro > Contents > Built In > Comments.acroplugin > Stamps > ENU


The file path for Acrobat DC is: Applications > Adobe Acrobat > Contents > Plugin > Comments.acroplugin > Contents > Resources > Stamps > ENU

What's curious about the stamps in this folder is that there are some additional sets of stamps that Acrobat doesn't load. Take "Faces" for example. This was the very first set of stamps that I ever recall seeing. I think it was back in Acrobat 4. I remember thinking, "That's stupid! Why would anyone use stamps?"


What was Adobe thinking?

Faces Stamps
Also nearby are a few other stamp libraries.

Words Stamps

Pointer Stamps
So, how to repurpose these stamps? Simply open them in Illustrator. In this case, I have opened the SignHere.pdf stamp file in Illustrator. Because this file was made many years ago (before Illustrator had art boards), you'll be asked to choose which page you want to open.


Next, select the red arrow and reflect it.
Then, scoot the arrow into place.
Save the file with a new name and go back to Acrobat.


Now we'll make a custom stamp. Go to Comments > Stamp Tool > Custom Stamps > Create Custom Stamp. Then navigate to the PDF you just made.


In a previous post, I thought that you first had to crop the page size in order for the custom stamp to work properly. But I was wrong. Acrobat will use the artwork dimensions (as opposed to the artboard dimensions).

From the Category drop down menu, choose "Sign Here." Give your stamp a name, then click OK.


Now, your right-pointing Sign Here stamp is added to the Sign Here stamp Library!


Wednesday, August 12, 2015

Atlantic Triangles Waves Afghan Pattern

In addition to being a graphic designer ad technical publisher, I am also an avid knitter, and I enjoy designing afghans based on geometric shapes. I designed this afghan after a trip to the Atlantic ocean. To read about the backstory, click here.


Would you like to purchase the pattern for this afghan?


Description

This afghan is modular, constructed entirely in garter stitch. It uses one color at a time, and is easily adapaptable to a variety of yarns and colorways. I find it is a great use for the odds and ends of yarn that I have built up in my stash.

The repeating triangles compose a rythm. Should you choose to use of a variety of yarns in the design, the triangles will add some continuity to the piece. The white row separators serve as a visual respite between the triangles of color, and add further uniformity to the overall design.

Design Notes

The afghan can be constructed simply be repeating a series of triangles, rectangles, and trapezoids. Each stripe is constructed from the bottom up, using only one color at a time.

The long divider bars that separate the stripes are completed after the entire length of the strips are knitted. Using grafting, these long divider bars join the strips together.

Because this pattern is based on triangles, you can create new designs by rearranging the triangles and trapezoids.

While most of afghan is created using knitted garter stitch, one small section is created using purled garter stitch.

Final Size: 76" x 133"

Yarn

I used Plymouth Encore, worsted weight: 100 g balls (200 yards/ball).
MC (Colored) yarn: 12 balls, 2 each of six different colors
(1 ball for each strip of 7 triangles).
CC (White) yarn: 5 balls.


Big enough to fit an entire family under!

Would you like to purchase the pattern for this afghan?

Monday, August 10, 2015

Using the Links Panel to Locate the Original Raw Image

Have you ever worked on an InDesign document and needed to locate one of the original images? Take for example, this InDesign layout. It has a nice photo, but the photo is too small and I want to locate the larger version of it. I know I have the original photo somewhere, because I took the photo.

But did you know that InDesign can help you locate the original RAW file? Read the entire article at InDesign Secrets.

Friday, July 31, 2015

Monday, July 6, 2015

How to Make Checkerboard Gingham in InDesign Using PatternMaker Lines

Recently, I noticed a book on my bookshelf that had some interesting patterns on the front.  Today, for some reason, I was struck by the pattern in the lower left. It has such clean geometry, and is so attractive, that I decided to try and create it using Teacup PatternMaker.


I was able to create it using just four objects: all using the Lines pattern. The first object was the tiny squares. By creating dashed lines that have the same stroke weight, dash length, and gap length, but double the Line Distance, you get squares!

First set of squares


So to get the checkerboard, select the frame, then copy, paste in place, and scoot over a bit. My stroke weight was set to 6 pt, and my cursor key nudge (in Preferences) was set to 1pt, so I just had to nudge it over 6 pts and up 6 points and it lined up to make a perfect little checkerboard.

Second set of squares

Next, copy and paste in place, changing the color to blue to make it easier to line up. Change the line distance to 60 pt, and the stroke weight, dash length, and gap length to 30 pt. I chose 30 points because I needed a 5x5 set of tiny squares (6 pts each) to fit perfectly inside one of these larger squares.
Third set of squares
Now, copy and paste in place again, changing the color to see what you're doing and scooting into place.

Now, change the blue square to pink and the yellow squares to white. Voila! Checkerboard Gingham!


Like this? Check out some of my related articles:
How to Make a Gingham Pattern in InDesign
Quick! I need some 1950s style floor tiles in my design!
How to Make Lumberjack Plaid
 Making a Checkerboard Pattern With Nested Styles