Monday, December 19, 2016

PDFStickies: Why Wasn't This Built into InDesign in the First Place?

As a graphic designer and technical communicator, I  have the unique job of not only designing and layout out technical documents, but also the responsibility of creating nearly all the content. I work with mechanical engineers and master builders, taking their photos, emails, conversations, and drawings, and turning them into beautiful technical manuals. But along the way, I have a lot of questions for my clients. I have found that the best way to keep track of all my questions is to use PDF sticky notes, so that my clients can see my questions, in context, and answer them, in context.

But how do you make a PDF sticky note if while working in InDesign? The answer is in one of my favorite plugins: PDFStickies. Watch this video and take a peek into my workflow, and see how my InDesign notes magically become PDF sticky notes, all in the export process.


Interestingly, while InCopy has the native capability to export PDFs with sticky notes, InDesign sadly does not. Fortunately, a great developer has created a tool that gives this capability to InDesign.

You can purchase PDF Stickies here: http://www.kerntiff.co.uk/products-4-indesign/pdfstickies.

Update 1-3-18: PDF Stickies has been updated to InDesign CC 2018.

Friday, December 16, 2016

How to Add a Special Character in Front of a Numbered List

Recently, an excellent question came up on the InDesignSecrets forum.

I have a numbered list (1-72) that needs to have a checkbox in front of each number. I have a paragraph style already set up to handle the checkbox lists found in other parts of the doc, but this one list needs to have numbers after each checkbox. I see where you can add a bullet character to a numbered list in the paragraph styles, but it doesn’t really give me access to change that bullet character to the checkbox character I have set up.
I came up with a quick process to create a numbered list with a checkbox preceding each number.


Read the entire article at InDesign Secrets: How to Add a Special Character in Front of a Numbered List

Friday, December 9, 2016

Number Knitting #4: Virtual Coloring in Acrobat DC Using the Drawing Tools

I am currently working to republish "Number Knitting," an out-of-print knitting book from the 1950s. Last year, I scanned in the entire 275 page book, and have spent this year adding the patterns to the Ravelry database.

One of the reasons this book is so interesting to me is because it is unlike most other knitting books. The knitting is based on seven shapes. The author, Virginia Woods Bellamy, is considered by many to be the inventor of modular knitting. By combining these shoes in a variety of ways, you can make anything from blankets and placements to baby's clothes and evening wear. Like most women of her era, she obviously had a background in sewing, and so her garment patterns are constructed very differently than most modern-day knitting patterns. She constructed the shapes much like a seamstress would cut out shapes of fabric.

Number Knitting Shapes

Mrs. Bellamy also created a new form of charting, which greatly simplifies the instructions. The charts in the book were all hand-drawn; the darkness of the gridlines is equal to that of the main shapes. Because of this, it's easy to get lost in the chart. To complicate matters, additional lines within each shape also serve to denote color. The more lines each shape has, the darker the color. This chart represents a scarf to be knit in dark blue and light sand colored yarn. extra vertical lines (between the gridlines) in shapes and 3 indicate to use a darker yarn.


Golf Scarf
The chart for the Golf Scarf project is fairly easy to understand. But as the book progresses, the charts get decidedly more complex. Take the chart for the Winged Blouse for example. What in the world?! This could definitely use some design improvements to make it easier to see what's going on.

Winged Blouse
And how about this one? This is a blanket to be knit in four different colors. But it's tough to envision what it should look like.

Abstract Rose Chart
I decided to come up with a way to color-code the charts so I could, visually, keep better track of the pattern. Since I have the entire book as a PDF, I want decided to do the color coding right within Acrobat, so I could keep the book as a single file. I've explored various ways to use PDF commenting in other knitting patterns, such as this example where I demonstrated how to make virtual sticky notes for keeping track of your place in a PDF pattern.

I'll be using the same technique here, only instead of using plain rectangles, I'll be using the polygon tool to outline the different shapes. The first four units are all supposed to be knitted in the same pink color, so I used the polygon tool to outline those four as a single unit. I decreased the opacity to 37%, so I can see the chart through the pink shape.


Units 5-12 are all dove blue rectangles, so I used the rectangle tool to make those. Something I've noticed is that whenever I have a comment selected, it always turns darker... until I click away. Strange!


For the next four units, the pattern calls for a blue green, which isn't available through Acrobats DC's new color picker (it only has 18 color choices). So I opened up the Properties dialog box (available through a right-click contextual menu), and I chose a custom color that looked nice.


Finally, the remaining border units are to be a rose color. I needed to break this into two sections so that I could effectively knock out the center portion of the chart.


So there you have it! Using Acrobat's drawing tools are a great way to do virtual coloring on a PDF. While I am using Acrobat for this tutorial, these tools and capabilities are exactly the same in Adobe Acrobat Reader.

In addition to coloring the charts in Acrobat, I have also been going through the book and recoloring all the black and white photos. Slowly but surely, I am bringing this book back to life!
Abstract Rose Coverlet with Bias Edges
Would you like to help me reknit the patterns from the book? If so, check out the Number Knitting patterns in the Ravelry database, and let me know which ones you'd like to knit. I'll get you the pattern straight away!

Edit 8-4-17: If you would like this feature in Acrobat, please vote for it here on the new Adobe User Voice site.

Edit: 9-13-918
If you need an easier way to create highlighting objects in your PDF, check out my article on Bluebeam Revu. It's an amazing program designed specifically to meet the needs of users in Architecture, Engineering, and Construction. The drawing tools in Revu have a "highlight" checkbox, enabling any shape to act as a highlighter.

Monday, December 5, 2016

Number Knitting #3: So Why am I Republishing "Number Knitting?"

So why this book? What's so special about it?

This book is based on a method of knitting that's actually patented! It's based on garter stitch knitting. Many knitters are familiar familiar with the garter sticth pattern of the famous Elizabeth Zimmerman. What's so amazing about "Number Knitting" is that the author was a contemporary of EZ, yet most people have never heard of her. 

Why the Long Production time?

The reason for the lengthy production process is the very nature of a knitting book: it is a book of instructions on how to make a particular knitted object. In the case of this book, it is around 275 pages, and contain instructions to create 75 different projects. The projects range from small objects, like a placemats and scarves, and go all the way up to very large objects, like a huge lace shawls and complex jackets and coats. The small items could take a couple of evenings to knit, but the large objects could take many weeks, or even several months.
Snowflake Scarf
Snowflake Scarf
Gold Butterfly Stole
Hampton Shirt
Hampton Shirt
My goal is to knit all the items in the book, so that I can take new color photographs. In the meantime, to help generate some interest, and to begin to bring life back to the patterns, I have been colorizing them in Photoshop, according to the colors listed in the book.
Tropical Leaf Car Throw
It's a momentous task, and I have hundreds and hundreds of hours ahead of me. If you are a knitter, and would like to help reknit the items in the book, please consider joining our Ravelry Group. Ravelry is social media and portfolio platform where we discuss all kinds of knitting related things for this book project: things like technical questions regarding various ways to join pieces together, how to interpret the knitting charts, etc. (For you non-knitters reading this, Ravelry sort of like Facebook+Behance+Amazon+Pinterest+Messages, with an inventory database system thrown in the mix. It's amazing!)

Wednesday, November 30, 2016

The Case for Still Using the Deprecated Features in Acrobat, Part 1: The Properties Toolbar

When Adobe released Acrobat DC, it wasn't just a program upgrade; it was a complete overhaul. The name of the program remained the same, as did many of its functionalities, but the interface is nearly completely different.

Most of the original functions still remain, but they are dressed up with new icons and often, new locations. But interestingly, some of the tools now seemingly have two different identities: the new and shiny, and the older and deprecated. In today's post I want to explain the difference between the Properties Toolbar and the several of the Quick Tools.

Here I have selected a sticky note. It is a plain, run-of-the-mill sticky note, with the default color and icon. I've displayed the old Properties Toolbar by pressing Ctrl/Cmd + E.


I have my choice of colors, icons, and opacity. It has everything I need in order to modify the properties of the sticky note. Sadly, for several years now, this toolbar can no longer be docked. From what I understand, it has been deprecated, and Adobe is no longer improving it.


I miss the ability to dock the Properties toolbar, and I suspect that many others did as well, because in Acrobat DC, Adobe decided to change the tools so that the color choices would be available as part of the Quick Tools. What's interesting is that the default yellow color is not not of the choices in the Color Picker, which is why none of the colors are sleeted. You'll know when the color is selected because it will have a big checkmark inside of the color square.


Thankfully, the opacity is available within the Color Picker. But the icon choices are nowhere to be found! So if you want to change the icon, you'll still need to use either:
  • The Properties toolbar (Ctrl/Cmd + E) or
  • or the Properties dialog box (choose "Properties" from the comment contextual menu)


Choosing "Properties" or clicking on the "More... button on the Properties Toolbar will both bring up the Properties dialog box. The options available within the Properties dialog box will vary, depending upon which type of annotation (comment) is used.

Sticky Note Properties
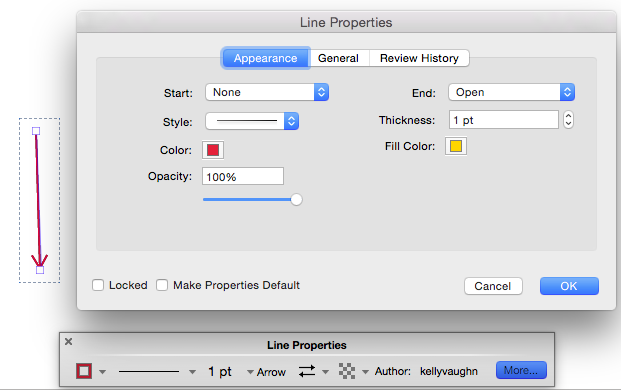
Lines and drawing markups have line thicknesses available, as well as both fill and stroke colors. Interestingly, the color fields are and "Color" and "Fill Color." So Acrobat views what we commonly know as the stroke color to be the main color. I wrote an entire article about that, and why I find it frustrating: Acrobat Rectangle Tool: Why Do You Disappoint Me So?

Line Properties
Most of the Properties dialog boxes are pretty straightforward, without too many options.
Underline Properties 
Pencil Mark Properties
But once you start dealing with text, the Properties dialog box and the Text Properties tool get more complicated. What's interesting is that the old Properties toolbar gives you WAY more options than the newfangled Text Comment Properties. In the new tool, gone are the options for bold, italic, subscript, and superscript. However, there is now a choice for increasing the line spacing, which is nice. I don't know that I'd ever use it, though. I use the text comments for filling out forms, rather than for typing paragraphs of text. Another interesting thing to note is that the Text Properties no longer works with the old Properties toolbar. However, the pop-up text properties will still work with the old Properties toolbar.

Newfangled Text Comment Properties
Pop-Up Text Properties - Properties Toolbar
While I really like the new user interface of the Color Picker, Text Properties, and Line Thickness Tools, as well as how they be added to the Quick Tools, I still usually default to using the old Properties toolbar, because it offers more options: sticky note icons, start and end arrowheads, line style, type styling, and has many more color choices available.

Quick Tools: Color Picker, Line Weights, Text Properties

Quick Tool: Color Picker Color Choices

Quick Tool: Line Thickness


Properties Toolbar with Lots of Color Choices

I really wish Adobe has incorporated all the options from the Properties Toolbar into the new quick Tools. Hopefully, they will address these issues in a future release, as they have done with other things I've complained about incessantly.

This is one of the topics I discuss at length in my Lynda course on PDF commenting.

Using the Properties toolbar from Adobe Acrobat DC: PDF Commenting for AEC by Kelly Vaughn

Edit: 9-13-918
If you need an easier way to control the properties of annotations in your PDF, check out my article on Bluebeam Revu. It's an amazing program designed specifically to meet the needs of users in Architecture, Engineering, and Construction. It has a huge Properties panel where you can edit all the properties of each individual object (right down to the X-Y coordinates and angle of rotation). You can also edit the properties of the document itself right in that panel as well. It's amazing!

Tuesday, October 18, 2016

How to Fill Out a Scanned Form in Adobe Acrobat Reader DC

Today I needed to fill out a scanned form. While I discussed how to do this in previous versions of Acrobat and Reader, the process keeps changing every time Adobe overhauls the programs. This video demonstrates the process in Adobe Acrobat Reader DC (which is free).

You'll never have to print and scan forms again!

Monday, October 3, 2016

Tips for Fixing Overset Text

For an experienced user, fixing overset text is so simple that we overlook it, but for a new user, overset text can be quite a conundrum. So I wanted to share with you several different ways to fix overset text.

I share how to fix overset text manually, semi-automatically, and full automatically, as well as dealing with and understanding overset text in table cells. I also share how to use Text Frame options to automatically reveal overset text.

Read the entire article at InDesign Secrets.
Overset Text
How to Fix Overset text Semi-automatically

Overset text in a sidebar
Overset text in table cells

Tuesday, September 13, 2016

My Secret Dream of Becoming a Clothing Designer

It's not something I generally advertise, but did you know that my college degree is in Home Economics? And that outside of work, I am a passionate knitting designer and long-time athlete? These things have come together recently in a way that allowed me to expand my designing beyond just my usual computer work. I recently submitted a dress design idea to a women's sportswear company and my idea gathered enough votes to go up for pre-orders.


They turned my rough sketch into a real design in print and in black, which is up for sale on the Skirt Sports website.


Skirt Sports asked me to write up a little background about the inspiration behind this dress design. In it, I share about my love of freedom of movement, being comfortable, and how that combined with my need for high-performance professional clothing. You can read the entire article here: The Brains, Beauty and Brawn Behind the Out & About Dress


Monday, September 12, 2016

How to Change the Text Size in Measurement Tool In Acrobat DC

I did a search for this topic this morning, and apparently, people have been wondering about this going back for about a decade, or whenever the Measuring Tool was added in to Acrobat. I do need to give a disclaimer that this is a kludgy workaround, and bypasses Acrobat's lack of built-in functionality for this feature. So here we go!

1. Start by opening the Measure Tool and measuring the object.


2. Next, go to your commenting tools and make a new text comment. You can use either there regular Add Text Comment tool, or the text box tool. Basically, we're just need to use one of the tools that gives us access to the text properties editing. Then using the Text Properties tool, type in the distance that Acrobat generated above when you measured your object. In this case, it is 1.5 in. Then change the font size to whatever you prefer. You can change the color as well if you like.


3. Next, select the text n the text comment you just made. Copy it.

4. Open the Comments pane. Select the distance measurement in the "Line" comment.


5. Paste in the text that you copied from the text box tool. Violá! Larger type!


Now, I wish there was a way to make this the default, but since Acrobat doesn't have text size as one of the editable properties of the measure tool, the size of the type isn't taken into consideration when you choose "Make Properties Default."


However, you can have access to edit a number of other properties of the Dimension Line, just not type size. If you need to have larger type Dimension Line type on a regular basis, I would imagine that an Acrobat scripter could easily write a script to do just that.


Edit: 9-18-918
I recently discovered a different software called BlueBeam Revu, which has much more customizable drawing markup properties, including the ability to choose the font, font size, and font color for measuring markups. Even the rectangle and callout line can have their own colors! Check out my article on Bluebeam Revu. It's an amazing program designed specifically to meet the needs of users in Architecture, Engineering, and Construction.

Friday, September 9, 2016

How to Use The Acrobat DC Highlighter Tool

Recently, Acrobat upgraded the highlighter tool so that you can highlight non-text objects. But most people aren't aware of the upgrade because it only works on scanned pages or pages with raster objects on them. Nevertheless, it's an interesting functionality. It's not quite as user-friendly as I'd like, but it's handy to be aware of. Enjoy!


Thursday, August 18, 2016

Are Your Sticky Note Icons Too Small? Make them Bigger!

Though I've grown to like Acrobat DC, one of my ongoing complaints about it is that it is too difficult to see which annotations are selected. Take a look at the following examples:

Acrobat 9
Acrobat XI
Acrobat DC
Notice how the sticky notes in both Acrobat 9 and XI had nice thick blue borders around them. But notice how delicate and thin the border is on the sticky note in Acrobat DC. While I realize that the Acrobat UI designers probably wanted to make the sticky notes less obtrusive, now they can be quite difficult to see. If I have multiple sticky notes on a very complex page, it's easy for those tiny little blue lines to get lost.

Also, something that is not apparent in these little screenshots is that in Acrobat 9 and XI, the blue lines around the sticky notes were actually marching ants. They had a very subtle blink to them, while the blue line around the DC icon does not blink at all, making it even more difficult to locate the sticky note on the page.

I recently stumbled across an older thread on the Acrobat forums that discussed how to increase the size of sticky notes. AND IT IS GOLD!

The first sticky note on the left is a normal sized sticky note. If you keep running the script, you keep increasing the size of your sticky notes. Now you can easily see it on the page!


This scripting goodness is courtesy of Try67, Acrobat scripter extraordinaire.
Select your sticky note, open the JS console (Ctrl+J), enter this code, select it and press Ctrl+Enter:
var r = selectedAnnots[0].rect;
r[2] += r[2]-r[0];
r[3] += r[3]-r[1];
selectedAnnots[0].setProps({rect: r})
This script works in Acrobat X, XI, and DC.

Edit 8-19-16: Try67 recently adapted this script to also work on text annotations, such as cross-outs and underlines. It is available for sale for $50. Check it out!