Tuesday, October 16, 2018

Things I Love About Bluebeam Revu: Part 2

There are so many things I love about Bluebeam Revu that it is impossible to fit them all in one article. So I am dedicating an entire series to it. Read Part 1 of the series here.

Keyboard Shortcuts

  • Customizable Keyboard shortcuts
In Revu 2.0 for Mac, users have the ability to set their own keyboard shortcuts! I've seen a fair number of keyboard shortcuts interfaces in my years in publishing, and I have to say that this is the best one I have seen. It clearly divides the shortcuts into two categories: Tools and Commands. It also has the ability to let users search for a specific command. 

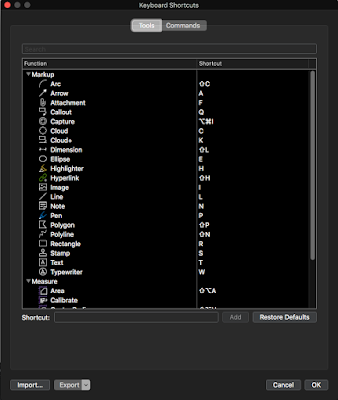
Keyboard Shortcuts: Tools

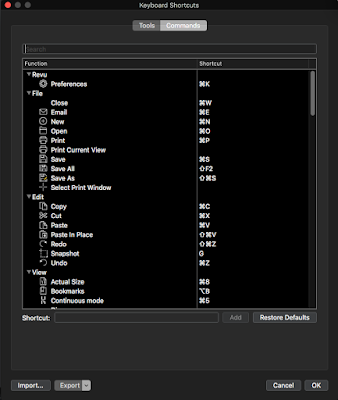
Keyboard Shortcuts: Commands
Now, the terms may be slightly different than what I'm accustomed to, but that's no problem. For example, what I know as the "Hand" tool is actually called "Pan" here in Revu; and it's located under the Commands tab.

The list of shortcuts automatically filters itself so that only functions which contain the search term are listed. This is very similar to how the Illustrator keyboard shortcuts work.

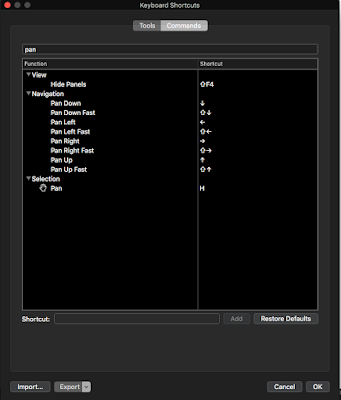
Users can search for shortcuts!

User Interface

I'm a huge fan of the UI in Revu. It puts a priority on efficiency and ease of use. I can tell that the people who designed and built Revu actually use it. 
  • Graphical Icons are built right into the dropdown menus, and the shortcuts for each function are displayed in the dropdown as well.

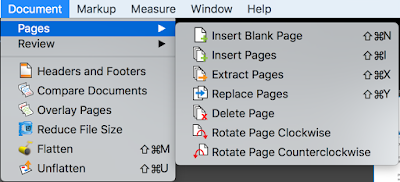
Revu for Mac 1.0: Document > Pages

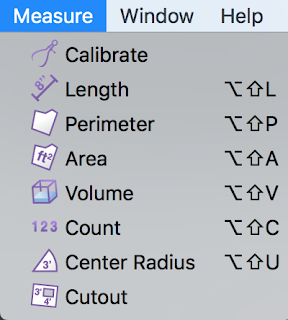
Revu for Mac 1.0: Measure
The graphical icons became a bit more streamlined in Revu 2.0 for Mac, but I really like the fact that they still have colors associated with them. The menus were also slightly redesigned in Revu 2.0 for Mac (relocating some of the menu items), but the tools are still very easy to locate. 

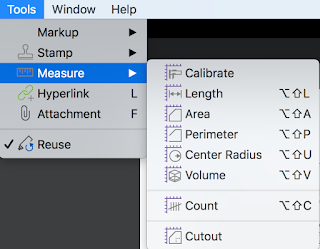
Revu for Mac 2.0: Tools > Measure

All of the markup tools are available in the menus.

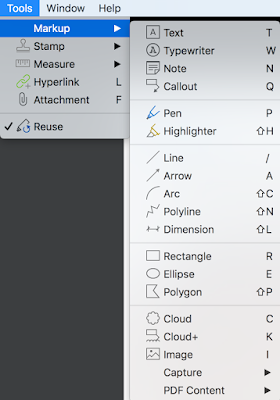
Revu for Mac 2.0: Tools > Markup
Something noteworthy about the location of the text markup tools is that they not located with the drawing tools. If you are familiar with Acrobat, you're probably used to the Sticky Note and the Highlighter tool having top bidding, base on their prominence in the menu bar. However, with Revu, the most prominent markup tools are actually the drawing tools. It took me a bit to locate the text annotation tools, but I found them in a submenu: Tools > Markup > PDF Content. I think that's an important distinction because, to me, it clearly separates out the intention of those tools. They are to markup existing PDF text content.


I also really appreciate how all the drawing markup tools are also permanently located as icons in the far right side of the program. And the program has very Fast UI, no waiting for any panels to load, ever!

The drawing markup and commenting tools are always available for easy access!

There are so many things I love about Bluebeam Revu that I will be doing a series of article explaining how awesome its features are. Please subscribe and join in learning this amazing program with me!


Follow by Email

Monday, October 8, 2018

How to Email a PDF using Bluebeam Revu

This process is so simple that it seemingly doesn't seven warrant a blog post. And yet, I'm posting this to demonstrate not how simple the process is, and how simple it should always be.

Email a PDF from Bluebeam Revu
What's so great about how Revu handles this task is that it will take the PDF in exactly its current state, and attach it to an email. Somehow, it even magically works when your document has comments in it that haven't been saved. It is a single step! And if you don't like the default keyboard shortcut for Emailing a PDF, you can give it a customized keyboard shortcut.

Customize your keyboard shortcuts

If Bluebeam Revu is new to you , and you'd like to know why I have found that it's such a great piece fo software, read this article.

Friday, October 5, 2018

How to Get the Old Version of Acrobat back

Earlier this week, my Acrobat updated it self without any intervention on my part. What the heck?! If you are like me and are disappointed with the user interface changes, there is a way to get the 2018 version of Acrobat back.

Why should we be limited to just one version of Acrobat? Keep them all!

1. Uninstall CC2019
I tried uninstalling through the Creative Cloud app and it didn't work, so I had to navigate to Acrobat CC in my applications folder and uninstall it there (double click on "Acrobat Uninstaller.")

2. Download CC 2018
I didn't see the 2018 download link on the Adobe website, but I was able to find it here:
https://prodesigntools.com/acrobat-dc-2017-2018-direct-download-links.html

3. Install Acrobat CC 2018.

4. Move CC2018 to the desktop and rename the folder (only if you want to also install CC 2019)
This is important because if the 2018 version is still in your app folder, it may just update to 2019 and you'd have to start this process over again.

5. Download and install CC 2019 (if you feel so inclined). Rename it's folder.
https://cloud.acrobat.com/acrobat
The latest two version of my Acrobat installations were a little buggy after this process. I don't know if that's because I was running both 2018 and 2019, or if they are just buggy. Acrobat does crash pretty regularly for me (even prior to this update), and I've read complaints from other users that 2019 crashes frequently, so I suspect the program is just buggy. Just be forewarned.

6. Turn off automatic updates for Pete's sake!
If you don't want automatic updates, be sure to turn off automatic updates in Acrobat Preferences > Updater.

Turn o
ff automatic updates if you don't want Acrobat updating on its own!

If you are using Adobe Reader, there is no option in the UI to turn off automatic updates; which means that you are stuck with the new version. Sorry!


For little bit of insight as to why people might want to revert to the earlier version, visit this thread in the Adobe forums: https://forums.adobe.com/thread/2541730

You can also visit the Acrobat User Voice forum here and share your thoughts with Adobe.

Please check this page containing the known issues of Acrobat and Reader.

Wednesday, October 3, 2018

MoreInfo Improves Notes, Conditional Text, Tracked Changes and More

Much of my workflow involves obscure, little understood technical features of InDesign. Two of the features I use the most are Conditional Text and Notes. They were introduced many years ago and haven’t been improved since then. However, from time to time, independent developers decide to tackle some of the challenges faced by users of these obscure features. And for these developers I am extremely grateful! In this post I’d like to introduce you to a new commercial plug-in called MoreInfo by Kerntiff Publishing Systems. MoreInfo combines the information from several features and displays it all in one handy spot. With MoreInfo, you can see, well, more info, on conditional text, notes, tracked changes, overset text, and index entries.

MoreInfo Panel

Read the entire article at InDesign Secrets.

Tuesday, October 2, 2018

How to Make a Multiple Color Highlighting Palette in Bluebeam Revu

I've recently switched PDF commenting programs and I'm excited to be learning new and more efficient ways to work. Normally, when I need help with software, I visit the product forums, but for some reason, Bluebeam decided to remove their forums in the name of privacy. So I'm left to figure things out on my own.

Today I wanted to set up a palette of highlighters a a custom tool set. It took a little bit to figure it out, but it works great and makes highlighting in multiple colors so easy!

1. Choose the Pen tool and draw a line. Be sure to NOT hold down the shift key. For some reason, this doesn't work when the shift key is held down.

2. Check the Highlight checkbox and change the line width to something thick. I used 12.

Draw using the pen tool, change the properties to Highlight and thicker

3. Right click on the line and select Add to Tool Chest. I had already set up a custom Tool Ste called "Highlighers." That's why it's listed right below "My Tools."

Add to Tool Chest

Manage Tool Sets
4. Go to the Tool Chest. Double click on the icon. That's it!
Viewed in Drawing Mode

Viewed in Properties Mode

Multiple Color Highlighting Palette!

Things to be aware of

It took a little bit of fiddling to figure out how to get this to work. The thing with commenting in Bluebeam is that the tools are so adaptable, they'll behave pretty much however you want. By holding down shift when drawing your line, Revu will recognize it as a line and will force it's behavior in the Tool Chest accordingly.


1. Line (properties mode)
2. Highlighter created from Pen
3. Line (in Drawing mode, works as a stamp)
4. Highlighter (Drawing mode, works as a stamp)
5. Highlighter created from the highlighter tool (buggy and doesn't work)
6. Pen (in drawing mode)
For you my beloved blog readers: I am sharing my set of Revu highlighters. Enjoy!

If you aren't familiar with Revu and want to learn more about why this software is so great, read this article.