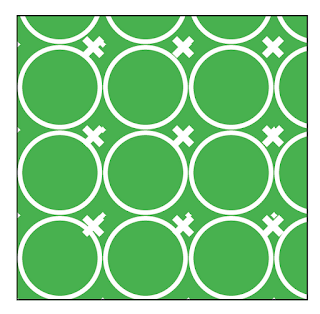
This pattern has two primary shapes: circles and crosses. First let's create the circles. The circles aren't just random circles, they are a grid of circles. And wouldn't you know it, PatternMaker has a pattern type called "Concentric Circles Grid."
So, after creating a new frame with a green fill, I applied that pattern. Here is the result:
Next, I adjust the number of circles. While the pattern is title "Concentric Circles," you can actually reduce the number of circles to 1.
The default grid angle is 70 degrees, so next I change the angle of the grid to 0 degrees.
We're almost done with the circle. Now, we just need to thicken the stroke and make the circles white. I change the stroke weight to 4pt and the color to white.
Now that my circles are complete, I'll move onto the crosses. Copy the frame and paste in place. One the top frame, remove the green fill. This will allow you to see the cross pattern in the frame below. Then select the bottom frame and change the pattern to Crosses.
Next I change the pattern angle and shape angle. This looks slightly different than the fabric pattern. See how in the above screenshot, the crosses are on a diagonal grid? By changing the pattern angle and shape angle, the crosses are now aligned in a horizontal and vertical grid.
Next I change the cross size to 21 pt and the and Element Gap to 50 pt. I chose 50 pt. because that was the distance used for the Element Distance in the Concentric Circles pattern.
Then, make the frame larger than you need it and reset the pattern. This will allow you to nudge the I nudge the Crosses frame so that the crosses are aligned in the correct spot within the circles.
Now, nudge the Crosses frame so that it is positioned correctly. Then reduce the size of the frame so that it is the same size as the Concentric Circle frame.
Finally, I increase the Crosses stroke weight to 6 pt.
You may notice that the original fabric pattern looked slightly different: the crosses had pointed ends, and didn't have the little white specks near where the circles intersected. But the goal was to get as close to the original pattern as I could, without leaving InDesign. Mission accomplished!
But wait, there's MORE!
Just for fun, let's push the exercise a little farther. Next, export the InDesign page to a PDF, with Acrobat 5 compatibility.
Then open the resulting PDF in Illustrator. Here is what you get:
And here is the same objects, viewed in outline mode (Cmd/Ctrl + Y). Notice how it is blank. Where are my patterns? I have no idea....
 |
| Why is this blank? I don't know. |
I've been told that Adobe doesn't officially support opening up random PDFs and editing them in Illustrator. I've always known there can be some weird conversion issues like outlining some of the type, but I've never seen anything as strange as this.
Now, I don't know what kind of code is going on behind the scenes that would make the pattern freak out, but fortunately, there are still some fun ways to get this patten as an editable file within Illustrator.
First I tried going to Acrobat and selecting the pattern with the Edit Object tool. Then right-clicking and choosing: Edit Obejct. Because the object is vector, it opened in Illustrator. But, unfortunately, I got the same result.
So now, go back to InDesign. Select the two patterns (Crosses and Concentric Circles Grid). Set the transparency to 99.9%.
Now, export a PDF with Acrobat 4 compatibility. You'll get a warning about bookmarks, transparency, yadda, yadda. Click OK. This will flatten the objects and make them more editable within Illustrator.
Here is the resulting file when opened in Illustrator. Now it looks right!
And here it is in when viewed in Outline mode. Aha! Now I have paths to work with.
Now, you may hear heated opinions about how flattened PDFs are evil, inflexible, and the bane of prepress technicians' existence. And when I send PDFs to my printer, I do my best to never send them flattened PDFs. But sometimes, flattening a PDF can be a good thing. Because Acrobat 4 is more archaic technology, I think that flattening a PDF is sort of like dumbing it down.
By reducing the transparency just a little bit, it's enough to sort of give the resulting PDF a kick in the butt and make it behave correctly. I wish I had a better explanation, but I not a coder. Sorry.
So now that you have access to the paths within Illustrator, you can (with a little digging in the layers panel) extract the white circles and crosses as one giant compound path.
Then, you can change up the colors a bit. Teacup PatternMaker is great, but it doesn't allow you to apply gradients to patterns. But by extracting the pattern in Illustrator, you can color it however you want. Here are a couple of colorways that I came up with.
 |
| Yellow concentric circles grid on red |
 |
| Purple concentric circles grid on blue |
Let's push it one step further, and do some Live Painting. Interestingly, when Live Painting with a gradient, the gradient is applied across the width of the entire live paint group, rather than the individual area you're painting.
 |
| Concentric circles and cross - painted using the Live Paint Bucket Tool |
I hope you have enjoyed today's lesson. Have fun patterning!


No comments :
Post a Comment